Custom Scenarios
Introduction to Custom Scenarios functionality
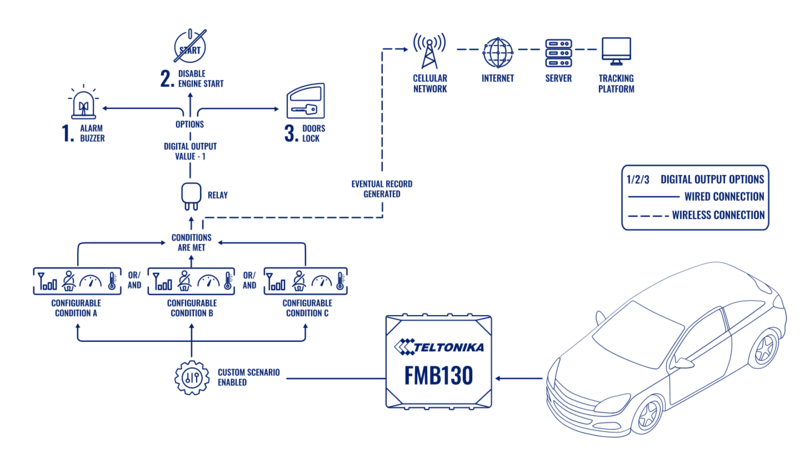
To meet the diverse and evolving needs of our clients, we have developed the Custom Scenarios feature. This solution allows users to define specific conditions using customizable parameters to trigger events or control a device’s digital outputs. By connecting the device to peripherals like alarms, buzzers, or relays, this functionality can notify drivers or perform targeted actions seamlessly.
The feature enables the device to operate autonomously based on predefined conditions, eliminating the need for constant monitoring of device status or complex backend integrations. With Custom Scenarios, any data the device can read becomes a potential input for controlling digital outputs, providing flexibility and efficiency.
Custom Scenarios functionality logic
The Custom Scenarios functionality enables configuration of up to three independent scenarios, each with up to three unique triggers. Triggers are defined using data from various I/O elements, such as: Fuel Level, Engine RPM, Seatbelt Status, DTC Faults, Movement Status, Ignition State, GSM Signal Level, 1-Wire/Bluetooth sensor temperature and etc. Each trigger is configured with specific logic operands (e.g., "On Entrance," "On Exit"), threshold values (Low and High levels), and an activation delay timer, which specifies how long a value must remain within the defined range before the trigger is activated.
When all triggers of a scenario evaluate as true, the scenario becomes active. This can generate a record (if configured) and control the digital output (DOUT) by toggling it on or off based on the active conditions. Additionally, if configured for continuous operation, the DOUT remains active as long as the conditions are met.
Key features include:
- Support for dynamic trigger logic based on selected operands and conditions.
- Autonomous device operation, even in low-power or deep-sleep modes, provided compatible I/O sources are used.
- Adjustable ON/OFF durations or permanent output control, enabling versatile device behaviors such as blinking or continuous activation.
- Custom Scenarios operate independently from the I/O menu, with priority management ensuring that higher-priority scenarios take precedence in controlling the DOUT when multiple scenarios are configured.
Custom Scenarios functionality configuration
Below is a detailed explanation of configurable parameters for each scenario.
| Parameter Name | Parameter ID | Value Range | Default | Description |
|---|---|---|---|---|
| Output Control | 19100, 19130, 19160 | 0–3 | 0 | Determines the DOUT controlled by the scenario:
|
| Priority | 19101, 19131, 19161 | 0–3 | 0 | Sets the priority of the scenario:
|
| Permanent Output Control | 19124, 19154, 19184 | 0–1 | 0 | Enables or disables continuous DOUT control while the scenario conditions are met. |
| DOUT ON Duration | 19102, 19132, 19162 | 100–65,000,000 ms | 200 ms | Specifies the ON duration for the DOUT. |
| DOUT OFF Duration | 19103, 19133, 19163 | 0–65,000,000 ms | 200 ms | Specifies the OFF duration for the DOUT. If set to 0, the DOUT remains ON continuously. |
| Source #1, #2, #3 | 19105–19119, 19135–19149, 19165–19179 | IO element IDs | N/A | Defines the I/O source monitored for the trigger. |
| Operand | 19106–19117, 19136–19147, 19166–19177 | 0–6 | 0 | Defines the logic applied to the source:
|
| Low Level | 19107, 19137, 19167 | Varies | 0 | Sets the lower threshold for the source trigger. |
| High Level | 19108, 19138, 19168 | Varies | 0 | Sets the upper threshold for the source trigger. |
| Activation Delay Timer | 19109, 19139, 19169 | 0–65,535 s | 0 | Time in seconds the condition must remain true to activate the trigger. |
| Logic | 19115, 19145, 19175 | 0–1 | 1 | Determines trigger evaluation logic:
|
Configuration Process
1. **Define Output Control**:
- Choose the DOUT (DOUT1, DOUT2, or DOUT3) to control when the scenario is active.
2. **Set Triggers**:
  - Configure up to three sources (e.g., ignition, fuel level, RPM).
  - Specify operands for each source to define the evaluation logic (e.g., "On Entrance," "Is").
  - Adjust low and high threshold levels and set the activation delay timer.
3. **Set Priority**:
- Assign a priority level to ensure higher-priority scenarios override lower-priority ones when controlling the same DOUT.
4. **Configure DOUT Timing**:
  - Define ON and OFF durations for DOUT blinking or continuous operation.
  - Enable Permanent Output Control if the DOUT should remain ON as long as the scenario is active.
5. **Save and Apply**:
- Verify all parameters and save the configuration. Scenarios are checked every second for activation.
Logic and Operations
- Each scenario operates independently but checks its triggers every second. - A scenario activates if its conditions are met, generating a record (if enabled) and toggling the configured DOUT. - Scenarios are compatible with low-power and deep-sleep modes, provided the sources used support these states.
Examples of Use
- **Scenario 1**: Control a relay based on fuel level dropping below a specific threshold. - **Scenario 2**: Trigger an alarm when RPM exceeds a set limit and the ignition is on. - **Scenario 3**: Enable a buzzer if temperature values from a Bluetooth sensor go out of range.
