Teltonika EN12830 EYE APP: Difference between revisions
Appearance
No edit summary |
No edit summary |
||
| (6 intermediate revisions by 2 users not shown) | |||
| Line 2: | Line 2: | ||
# Activate EYE Sensor EN12830 by touching it with any magnet | # Activate EYE Sensor EN12830 by touching it with any magnet | ||
#Download EYE APP ( | #Download newest EYE APP from Play Store (Android) or App store (iOS) | ||
#If you have | #If you have Old EN12830 EYE APP from .apk file, you should delete it first | ||
#In the APP, find the desired sensor and press on it | #In the APP, find the desired sensor and press on it | ||
#Enter PIN (default is 123456) | #Enter PIN (default is 123456) | ||
# | #How to start recording | ||
# | {| class="wikitable" style="width: 100%; | ||
#Choose | |- | ||
# | | style="width: 25%; border: 1px solid white; border-bottom: 2px solid #E8E8E8; text-align: center; vertical-align: center; background: white;"|[[File:11 EN12830.jpg|300px|center|link=https://wiki.teltonika-gps.com/view/File:11_EN12830.jpg]] | ||
| style="width: 25%; border: 1px solid white; border-bottom: 2px solid #E8E8E8; text-align: center; vertical-align: center; background: white;"|[[File:22 EN12830.jpg|300px|center|link=https://wiki.teltonika-gps.com/view/File:22_EN12830.jpg]] | |||
| style="width: 25%; border: 1px solid white; border-bottom: 2px solid #E8E8E8; text-align: center; vertical-align: center; background: white;"|[[File:33 EN12830.jpg|300px|center|link=https://wiki.teltonika-gps.com/view/File:33_EN12830.jpg]] | |||
| style="width: 25%; border: 1px solid white; border-bottom: 2px solid #E8E8E8; text-align: center; vertical-align: center; background: white;"|[[File:Log started.png|center|533x533px]] | |||
|- | |||
| style="width: 25%; border: 1px solid white; border-bottom: 2px solid #E8E8E8; text-align: center; vertical-align: center; background: white;"| Press "Temperature recorder" button in the sensor home screen | |||
| style="width: 25%; border: 1px solid white; border-bottom: 2px solid #E8E8E8; text-align: center; vertical-align: center; background: white;"|Press "NEW RECORDING" button. | |||
| style="width: 25%; border: 1px solid white; border-bottom: 2px solid #E8E8E8; text-align: center; vertical-align: center; background: white;"|Choose recording interval that you require. | |||
| style="width: 25%; border: 1px solid white; border-bottom: 2px solid #E8E8E8; text-align: center; vertical-align: center; background: white;"|Recording Status Info will change to Active | |||
|} | |||
That‘s it! Now EYE Sensor EN12830 will be recording temperature logs to its internal memory. | |||
That‘s it! | |||
7. How to download the records | |||
{| class="wikitable" style="width: 100%; | |||
|- | |||
| style="width: 25%; border: 1px solid white; border-bottom: 2px solid #E8E8E8; text-align: center; vertical-align: center; background: white;"|[[File:11 EN12830.jpg|300px|center|link=https://wiki.teltonika-gps.com/view/File:11_EN12830.jpg]] | |||
| style="width: 25%; border: 1px solid white; border-bottom: 2px solid #E8E8E8; text-align: center; vertical-align: center; background: white;"|[[File:44 EN12830.jpg|300px|center|link=https://wiki.teltonika-gps.com/view/File:44_EN12830.jpg]] | |||
| style="width: 25%; border: 1px solid white; border-bottom: 2px solid #E8E8E8; text-align: center; vertical-align: center; background: white;"|[[File:55 EN12830.jpg|300px|center|link=https://wiki.teltonika-gps.com/view/File:55_EN12830.jpg]] | |||
|- | |||
| style="width: 25%; border: 1px solid white; border-bottom: 2px solid #E8E8E8; text-align: center; vertical-align: center; background: white;"|Press "Temperature recorder" button in the sensor home screen | |||
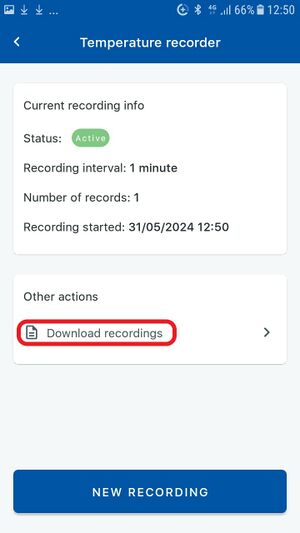
| style="width: 25%; border: 1px solid white; border-bottom: 2px solid #E8E8E8; text-align: center; vertical-align: center; background: white;"|Press Download recordings | |||
| style="width: 25%; border: 1px solid white; border-bottom: 2px solid #E8E8E8; text-align: center; vertical-align: center; background: white;"|Choose either to download recordings from specific date or to download all available recordings | |||
|} | |||
That‘s it! a .csv file will be downloaded into your phones files folder. It will contain all the data from temperature recordings. | |||
<small>''*All data is stored in "pages" of 15. And downloaded in "pages" of 15 too. E. g. if recording is started in 1 min intervals at 11:40 and at 15:00 you request to receive data for period from 11:50 to 12:00 you will get data from 11:40 to 12:10. As 11:50 will be in "page" 11:40-11:55, and 12:00 in " page" 11:55-12:10.''</small> | |||
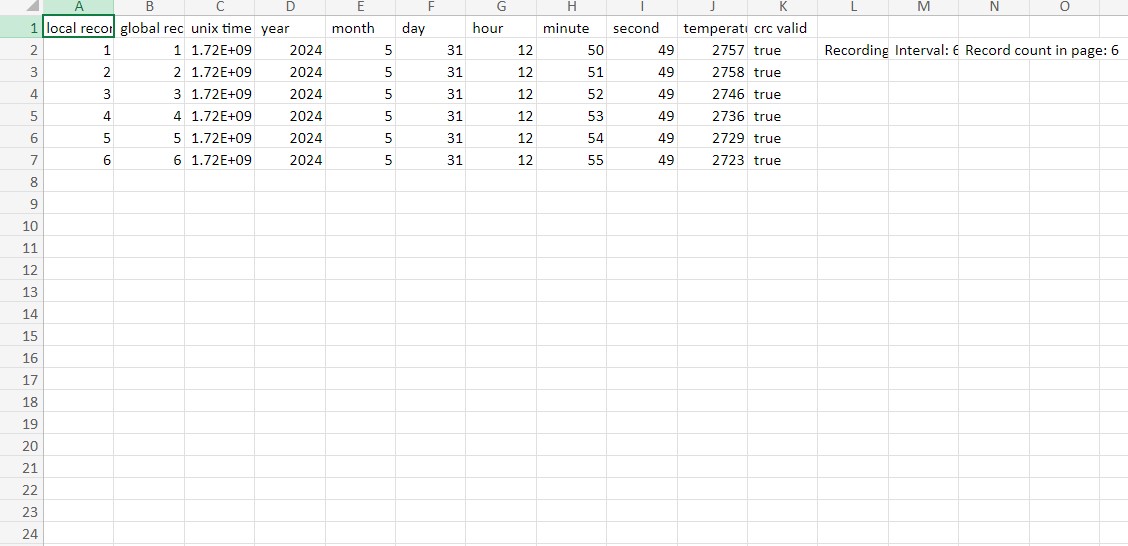
8. Example of recorded data open in excel: | |||
[[File:CSV_file_EN12830.jpg|link=https://wiki.teltonika-gps.com/view/File:CSV_file_EN12830.jpg]] | |||
# | |||
Latest revision as of 10:17, 10 October 2024
Quick start guide – EYE Sensor EN12830
- Activate EYE Sensor EN12830 by touching it with any magnet
- Download newest EYE APP from Play Store (Android) or App store (iOS)
- If you have Old EN12830 EYE APP from .apk file, you should delete it first
- In the APP, find the desired sensor and press on it
- Enter PIN (default is 123456)
- How to start recording
 |
 |
 |
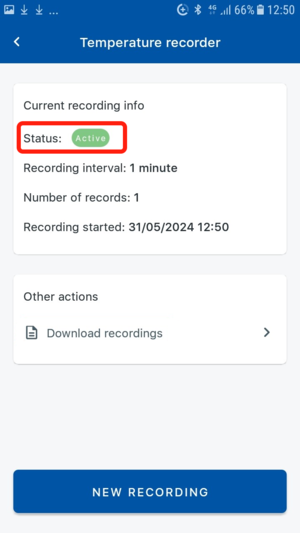 |
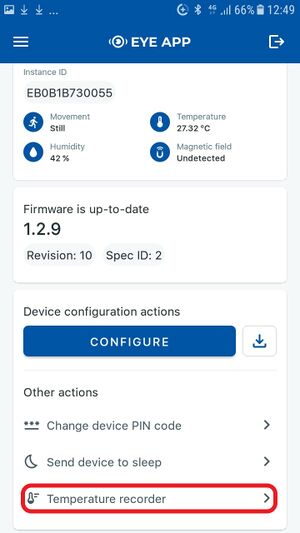
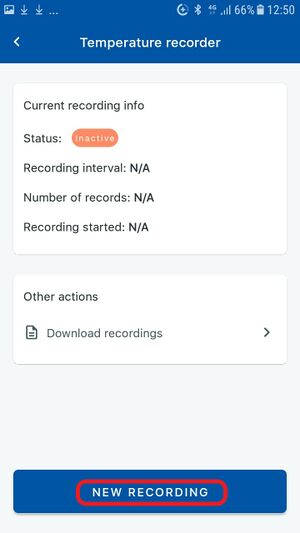
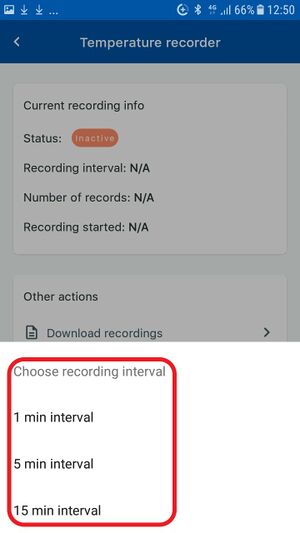
| Press "Temperature recorder" button in the sensor home screen | Press "NEW RECORDING" button. | Choose recording interval that you require. | Recording Status Info will change to Active |
That‘s it! Now EYE Sensor EN12830 will be recording temperature logs to its internal memory.
7. How to download the records
 |
 |
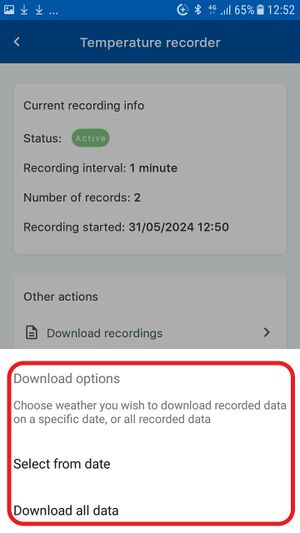 |
| Press "Temperature recorder" button in the sensor home screen | Press Download recordings | Choose either to download recordings from specific date or to download all available recordings |
That‘s it! a .csv file will be downloaded into your phones files folder. It will contain all the data from temperature recordings.
*All data is stored in "pages" of 15. And downloaded in "pages" of 15 too. E. g. if recording is started in 1 min intervals at 11:40 and at 15:00 you request to receive data for period from 11:50 to 12:00 you will get data from 11:40 to 12:10. As 11:50 will be in "page" 11:40-11:55, and 12:00 in " page" 11:55-12:10.
8. Example of recorded data open in excel:

