Difference between revisions of "Template:FMB Blue-tooth settings"
| (52 intermediate revisions by 12 users not shown) | |||
| Line 1: | Line 1: | ||
| − | + | ==General functionality== | |
| + | |||
| + | {{{pic_bt_general|[[Image:Fmb120_bt_general.png|300px|right]]}}} | ||
| + | General functionality configures Blue-tooth to work in slave mode. This mode allows any external device to connect to {{{model|FMB1YX}}}.<br/>Parameter ''BT Radio'' allows enabling or disabling Blue-tooth. There are three different settings: | ||
| + | * <span style=color:#F6A83E>Disabled</span> – Blue-tooth functionality will be disabled. | ||
| + | * <span style=color:#F6A83E>Enable (hidden)</span> – Blue-tooth functionality will be enabled, external devices will be able to connect to {{{model|FMB1YX}}}, but no devices will be able to detect it. | ||
| + | * <span style=color:#F6A83E>Enable (visible)</span> – Blue-tooth functionality will be enabled and any external device will be able to detect and connect to {{{model|FMB1YX}}}.<br/>''Local Name'' parameter lets user declare a visible name of {{{model|FMB1YX}}} to external devices.<br/>''Local PIN'' parameter lets user configure Blue-tooth PIN of {{{model|FMB1YX}}} device.<br/> | ||
| + | {{{model|FMB1YX}}} Blue-tooth has several different ''Security Modes'': | ||
| + | * <span style=color:#F6A83E>PIN only</span> – only Local PIN will be reacquired to complete connection to {{{model|FMB1YX}}}. | ||
| + | * <span style=color:#F6A83E>PIN + MAC list</span> – PIN and Authorized Devices MAC List will be checked against to allow connection to {{{model|FMB1YX}}}. If the external device MAC ID is in the list and correct ''Local PIN'' is entered then connection will be established, otherwise {{{model|FMB1YX}}} will reject connection. | ||
| + | * <span style=color:#F6A83E>MAC list only</span> – only ''Authorized Devices MAC List'' will be checked when trying to connect to {{{model|FMB1YX}}}. If external device MAC ID is in the list then connection will be established, otherwise {{{model|FMB1YX}}} will reject connection. | ||
| + | * <span style=color:#F6A83E>None</span> – neither ''Local PIN'' nor ''Authorized Device MAC List'' will be checked. | ||
| + | |||
| + | Auto connection functionality configures {{{model|FMB1YX}}} as master device, which allows connecting {{{model|FMB1YX}}} to an external device. {{{model|FMB1YX}}} currently supports these modes: | ||
| + | * <span style=color:#F6A83E>None</span> – disables auto connection functionality. | ||
| + | * <span style=color:#F6A83E>Hands Free</span> {{{txt_hide|or <span style=color:#F6A83E>OBDII</span> }}}– {{{model|FMB1YX}}} starts searching for an external hands free headset. If {{{model|FMB1YX}}} finds a device which matches user defined ''External MAC'' or ''External Name'' then {{{model|FMB1YX}}} will try to pair with that external device. If the external device asks for PIN then {{{model|FMB1YX}}} will send user defined ''External PIN''. After successfully pairing {{{model|FMB1YX}}} will connect to paired device. | ||
| + | * <span style=color:#F6A83E>Data Link</span> – BT Data link mode is enabled by Configurator ''Data Link'' parameter: when <span style=color:#F6A83E>Data Link</span> is configured and {{{model_2|FMB}}} has a link with the server, paired device can send messages via Blue-tooth SPP profile directly to the server. Messages will be encoded by codec12. | ||
| + | |||
| + | {| class="wikitable" style="border-style: solid; border-width: 0px" | ||
| + | |+ | ||
| + | |- | ||
| + | | style="text-align: left; background: #F6F6FB;" | [[Image:Bw_nb.png|50px]] | ||
| + | | style="text-align: left; background: #F6F6FB;" | {{{model|FMB1YX}}} supports ONE connection at a time.<br/>{{{model|FMB1YX}}} can see up to 10 available devices. If there are more than 10 devices, the list may change with each new scan. | ||
| + | |} | ||
| + | |||
| + | ''External Name'' parameter works as a substring, which allows user to enter a part of the full external device name. For example, if external device name is "HandsFreeHeadset" and user enters "HandsFree" in ''External Name'' parameter window, then {{{model|FMB1YX}}} will be allowed to connect to an external device named "HandsFreeHeadset". | ||
| + | |||
| + | ==How to connect Blue-tooth Hands Free adapter to {{{model_2|FMB}}} device== | ||
| − | == | + | {{{pic_bt_settings|[[Image:Fmb120_bt_settings.png|thumb|300px|right|Blue-tooth settings]]}}} |
| + | {{{pic_inc_call|[[Image:Fmb120_inc_call_action_settings.png|thumb|300px|right|Incoming Call Action settings under SMS/Call Settings]]}}} | ||
| + | ===Blue-tooth settings configuration=== | ||
| − | + | These are instructions on how to easily create a connection between a Blue-tooth Hands Free device and {{{model_2|FMB}}} device. First the {{{model_2|FMB}}} device Blue-tooth settings need to be configured. These are the required steps: | |
| − | + | * Press <span style=color:#F6A83E>Blue-tooth</span> settings (position 1). | |
| − | == | + | * Turn on BT Radio by pressing <span style=color:#F6A83E>Enable (visible)</span> (position 2). ''Local name'' (position 3) will be "{{{model|FMB1YX}}}_last 7 imei digits" by default, which can be changed. |
| + | * Set ''Security Mode'' (position 4) to <span style=color:#F6A83E>PIN only</span> or <span style=color:#F6A83E>None</span>. <span style=color:#F6A83E>PIN + MAC list</span> or <span style=color:#F6A83E>MAC list only</span> security modes could also be selected, but in that case external device MAC address is required to be entered to ''Authorized Devices MAC List'' (position 7). | ||
| + | * Set connection mode to <span style=color:#F6A83E>Hands Free</span> (position 5). | ||
| + | * Set ''External Name'' (position 6) as your hands-free device name for proper identification. In the given example hands-free headset name is "DMH10" but at least 2 characters are required to recognize it and connect to it. For better and quicker adapter identification on the network you could enter a full device name. You could check your hands-free adapter Blue-tooth name by scanning nearby Blue-tooth devices using a mobile phone or a computer with Blue-tooth adapter. | ||
| + | * Go to <span style=color:#F6A83E>SMS/Call Settings</span> in main menu and set ''Incoming Call Action'' to <span style=color:#F6A83E>Do Nothing</span> as shown on next figure. | ||
| + | * After all these steps press <span style=color:#F6A83E>Save to device</span> to save configuration. | ||
| + | * Now {{{model_2|FMB}}} device can be disconnected from the configurator. | ||
| + | <br/><br/><br/><br/><br/><br/><br/><br/><br/><br/><br/><br/> | ||
| + | |||
| + | ===Connecting Blue-tooth Hands Free adapter=== | ||
| + | ---- | ||
| + | Turn on hands-free device and then turn on its Blue-tooth connection for pairing following your model instructions. Hands-free adapter should make a specific sound in the speakers or its LED identification should inform about a successful connection. To check if the adapter is successfully connected, dial the {{{model_2|FMB}}} device phone number and the hands-free device should start ringing. If you later restart {{{model_2|FMB}}} device it will automatically reconnect to this adapter. | ||
| − | + | ==Logging the {{{model|FMB1YX}}} device using your mobile phone== | |
| − | |||
| − | + | Blue-tooth starts automatically when {{{model_2|FMB}}} device is on. Take your mobile phone, go to Settings->Blue-tooth and turn it on. Scan for nearby devices, find the device in the list, distinguish the device by last IMEI digits on device module. Press pair, wait until device asks to enter pairing password, type: ''"5555"'' (as in the example on the figure). Paired device will show up in the paired device list. Download a terminal for Blue-tooth e.g. BlueTerm from Play Store/App store. Run app, click Find->Connect to your paired device. Now we need to send a command to {{{model|FMB1YX}}} from Blue-tooth terminal, type: ''".log:1"''<br/>Device will respond with ''"Debug enabled"'' and {{{model|FMB1YX}}} log will show up. Do not forget to save the log file to mobile phone. | |
| − | |||
| − | |||
| − | + | ===Device debug over Android smartphone=== | |
| − | + | {{{pic_bt_general_vis|[[Image:Fmb120_bt_general_vis.png|300px|right]]}}} | |
| − | |||
| − | + | In order to pair {{{model_2|FMB}}} device with Android smartphone, make sure that BT radio is enabled (visible) in device configuration. It can be checked via SMS command too:<br/>''"getparam 800"''<br/>The answer has to be ''"2"'', which means "Enabled and visible". | |
| − | < | + | <br/><br/><br/><br/><br/><br/><br/><br/><br/> |
| − | |||
| − | + | {{{pic_android_bt|[[Image:Android_bt.png|300px|right]]}}} | |
| − | |||
| − | |||
| − | < | + | * Scan for visible BT devices using your Android smartphone and connect to your {{{model_2|FMB}}} device.<br/>Default {{{model_2|FMB}}} BT name is: ''"{{{model|FMB1YX}}}_last_7_imei_digits"''.<br/>Default PIN code is: ''"5555"''. |
| − | |||
| − | + | <br/><br/><br/><br/><br/><br/><br/><br/><br/><br/><br/><br/><br/><br/><br/><br/><br/><br/><br/><br/><br/><br/><br/><br/><br/> | |
| − | |||
| − | |||
| − | |||
| − | |||
| − | |||
| + | * Download "Blue-tooth Terminal" application. Following link can be used: https://play.google.com/store/apps/details?id=com.hatflabs.btt | ||
| − | {{{ | + | {{{pic_android_bt_serial|[[Image:Android_bt_serial.png|300px|right]]}}} |
| − | * | + | * Run "Blue-tooth Terminal", in menu press "Connect" and select paired {{{model_2|FMB}}} device. To start log check "CR" and enter the command into terminal: ''".log:1"''. |
| − | |||
| − | |||
| − | |||
| − | + | * Wait ~10 minutes and press "Save" button in menu. You will find the saved log file in device folder "My Files/Blue-tooth Terminal", select log files, press "Share via Email" and send them to Teltonika support. | |
| − | + | <br/><br/> | |
| − | |||
| − | + | <gallery widths=100px perrow=3 caption="Saving and sharing the log"> | |
| − | + | Image:Android_bt_log1.png | |
| + | Image:Android_bt_log2.png | ||
| + | Image:Android_bt_log3.png | ||
| + | </gallery> | ||
| − | + | <br/><br/><br/><br/><br/> | |
| − | |||
| − | |||
{| class="wikitable" style="border-style: solid; border-width: 0px" | {| class="wikitable" style="border-style: solid; border-width: 0px" | ||
| − | |+ | + | |+ |
|- | |- | ||
| − | | style="text-align: left; background: #F6F6FB;" |[[Image:Bw_nb.png|50px]] | + | | style="text-align: left; background: #F6F6FB;" | [[Image:Bw_nb.png|50px]] |
| − | | style="text-align: left; background: #F6F6FB;" | | + | | style="text-align: left; background: #F6F6FB;" | Unfortunately it is not possible to perform debug the same way on iPhone, because there is no native SPP Blue-tooth profile support on iPhone. |
|} | |} | ||
| − | + | {{{ | |
| − | + | para_obd| | |
| − | + | {{ | |
| − | + | Template:FMB1 Blue-tooth OBD dongle | |
| − | + | |model={{{model|FMBXXX}}} | |
| − | + | |model_2={{{model_2|FMB}}} | |
| − | + | }} | |
| + | }}} | ||
Revision as of 08:38, 28 September 2018
General functionality
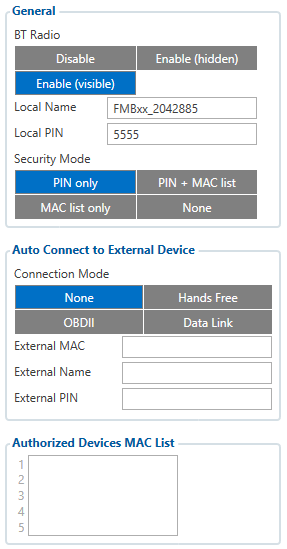
General functionality configures Blue-tooth to work in slave mode. This mode allows any external device to connect to FMB1YX.
Parameter BT Radio allows enabling or disabling Blue-tooth. There are three different settings:
- Disabled – Blue-tooth functionality will be disabled.
- Enable (hidden) – Blue-tooth functionality will be enabled, external devices will be able to connect to FMB1YX, but no devices will be able to detect it.
- Enable (visible) – Blue-tooth functionality will be enabled and any external device will be able to detect and connect to FMB1YX.
Local Name parameter lets user declare a visible name of FMB1YX to external devices.
Local PIN parameter lets user configure Blue-tooth PIN of FMB1YX device.
FMB1YX Blue-tooth has several different Security Modes:
- PIN only – only Local PIN will be reacquired to complete connection to FMB1YX.
- PIN + MAC list – PIN and Authorized Devices MAC List will be checked against to allow connection to FMB1YX. If the external device MAC ID is in the list and correct Local PIN is entered then connection will be established, otherwise FMB1YX will reject connection.
- MAC list only – only Authorized Devices MAC List will be checked when trying to connect to FMB1YX. If external device MAC ID is in the list then connection will be established, otherwise FMB1YX will reject connection.
- None – neither Local PIN nor Authorized Device MAC List will be checked.
Auto connection functionality configures FMB1YX as master device, which allows connecting FMB1YX to an external device. FMB1YX currently supports these modes:
- None – disables auto connection functionality.
- Hands Free or OBDII – FMB1YX starts searching for an external hands free headset. If FMB1YX finds a device which matches user defined External MAC or External Name then FMB1YX will try to pair with that external device. If the external device asks for PIN then FMB1YX will send user defined External PIN. After successfully pairing FMB1YX will connect to paired device.
- Data Link – BT Data link mode is enabled by Configurator Data Link parameter: when Data Link is configured and FMB has a link with the server, paired device can send messages via Blue-tooth SPP profile directly to the server. Messages will be encoded by codec12.
| FMB1YX supports ONE connection at a time. FMB1YX can see up to 10 available devices. If there are more than 10 devices, the list may change with each new scan. |
External Name parameter works as a substring, which allows user to enter a part of the full external device name. For example, if external device name is "HandsFreeHeadset" and user enters "HandsFree" in External Name parameter window, then FMB1YX will be allowed to connect to an external device named "HandsFreeHeadset".
How to connect Blue-tooth Hands Free adapter to FMB device
Blue-tooth settings configuration
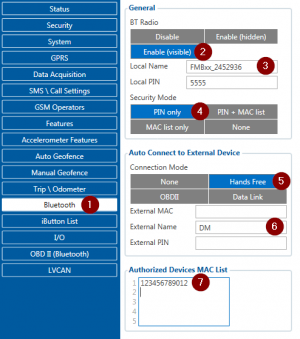
These are instructions on how to easily create a connection between a Blue-tooth Hands Free device and FMB device. First the FMB device Blue-tooth settings need to be configured. These are the required steps:
- Press Blue-tooth settings (position 1).
- Turn on BT Radio by pressing Enable (visible) (position 2). Local name (position 3) will be "FMB1YX_last 7 imei digits" by default, which can be changed.
- Set Security Mode (position 4) to PIN only or None. PIN + MAC list or MAC list only security modes could also be selected, but in that case external device MAC address is required to be entered to Authorized Devices MAC List (position 7).
- Set connection mode to Hands Free (position 5).
- Set External Name (position 6) as your hands-free device name for proper identification. In the given example hands-free headset name is "DMH10" but at least 2 characters are required to recognize it and connect to it. For better and quicker adapter identification on the network you could enter a full device name. You could check your hands-free adapter Blue-tooth name by scanning nearby Blue-tooth devices using a mobile phone or a computer with Blue-tooth adapter.
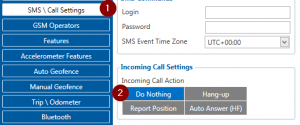
- Go to SMS/Call Settings in main menu and set Incoming Call Action to Do Nothing as shown on next figure.
- After all these steps press Save to device to save configuration.
- Now FMB device can be disconnected from the configurator.
Connecting Blue-tooth Hands Free adapter
Turn on hands-free device and then turn on its Blue-tooth connection for pairing following your model instructions. Hands-free adapter should make a specific sound in the speakers or its LED identification should inform about a successful connection. To check if the adapter is successfully connected, dial the FMB device phone number and the hands-free device should start ringing. If you later restart FMB device it will automatically reconnect to this adapter.
Logging the FMB1YX device using your mobile phone
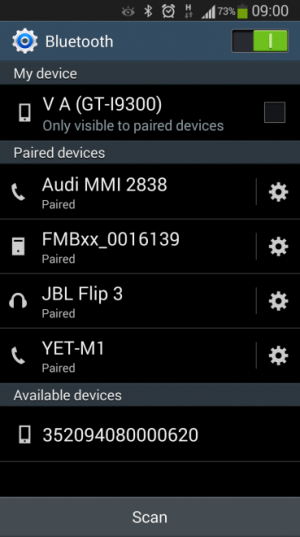
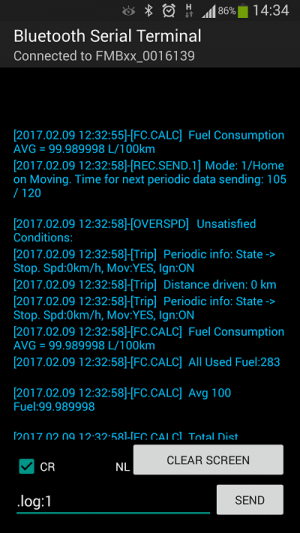
Blue-tooth starts automatically when FMB device is on. Take your mobile phone, go to Settings->Blue-tooth and turn it on. Scan for nearby devices, find the device in the list, distinguish the device by last IMEI digits on device module. Press pair, wait until device asks to enter pairing password, type: "5555" (as in the example on the figure). Paired device will show up in the paired device list. Download a terminal for Blue-tooth e.g. BlueTerm from Play Store/App store. Run app, click Find->Connect to your paired device. Now we need to send a command to FMB1YX from Blue-tooth terminal, type: ".log:1"
Device will respond with "Debug enabled" and FMB1YX log will show up. Do not forget to save the log file to mobile phone.
Device debug over Android smartphone
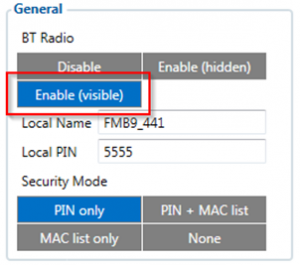
In order to pair FMB device with Android smartphone, make sure that BT radio is enabled (visible) in device configuration. It can be checked via SMS command too:
"getparam 800"
The answer has to be "2", which means "Enabled and visible".
- Scan for visible BT devices using your Android smartphone and connect to your FMB device.
Default FMB BT name is: "FMB1YX_last_7_imei_digits".
Default PIN code is: "5555".
- Download "Blue-tooth Terminal" application. Following link can be used: https://play.google.com/store/apps/details?id=com.hatflabs.btt
- Run "Blue-tooth Terminal", in menu press "Connect" and select paired FMB device. To start log check "CR" and enter the command into terminal: ".log:1".
- Wait ~10 minutes and press "Save" button in menu. You will find the saved log file in device folder "My Files/Blue-tooth Terminal", select log files, press "Share via Email" and send them to Teltonika support.
- Saving and sharing the log
| Unfortunately it is not possible to perform debug the same way on iPhone, because there is no native SPP Blue-tooth profile support on iPhone. |
How to connect OBD II Blue-tooth Dongle to FMB device
Blue-tooth settings configuration
Following are the instructions on how to easily prepare Blue-tooth Dongle connection to the FMB device. First we need to configure FMB device Blue-tooth settings. These are the required steps:
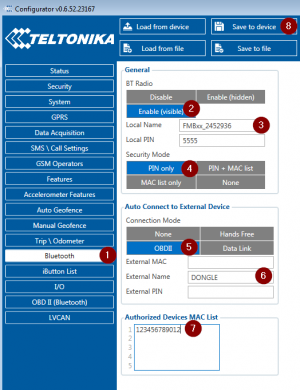
- Go to Blue-tooth section similarly to as shown in the figure to the right (position 1).
- Turn on BT Radio by pressing Enable (visible) (position 2). "Local name" (position 3) will automatically be "FMBXXX_last 7 imei digits", you can leave it or type your own name.
- Set Security Mode (position 4) to PIN only or None (you could select PIN + MAC list or MAC list only security mode but in this case you need to type external device MAC address in Authorized Devices MAC List (position 7).
- Set connection mode to OBDII (position 5).
- Set External Name as your Blue-tooth OBD II device name for proper device identification and connection to it. In this example OBDII device name is "DONGLE", at least 2 characters are needed to recognize it and connect to it. For better and faster adapter identification in network you could enter a full device name. You could check your OBDII adapter Blue-tooth name by scanning nearby Blue-tooth devices using a mobile phone or a computer with Blue-tooth adapter.
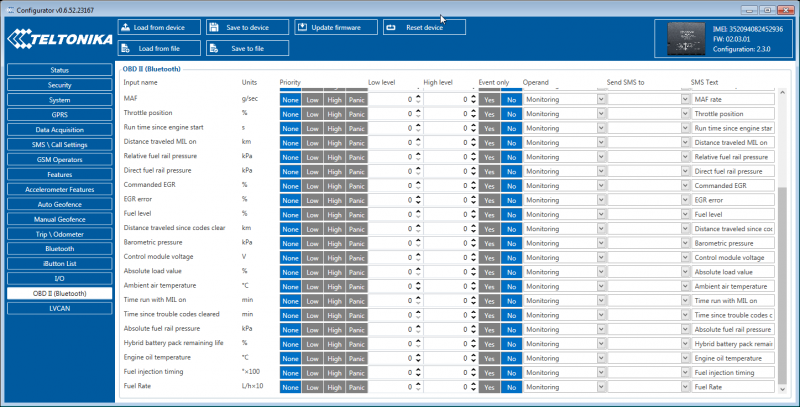
- Go to OBD II in main menu and select priority and others parameters visible in the following figure.
- After all these steps press Save to device to save configuration (position 8 in the top right hand figure).
- Now you can disconnect FMB device from the configurator.
Connecting to Blue-tooth OBD II dongle
After this configuration OBDII dongle can be connected to FMB device. Turn on ignition, then turn on its Blue-tooth connection. For pairing follow dongle instructions. OBDII device notification about paired Blue-tooth connection depends on the specific model. If you later restart FMB device it will automatically reconnect to this dongle.
Supported Blue-tooth OBD II dongles
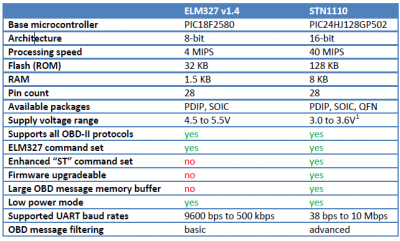
FMB module works with Blue-tooth OBD II dongles which are based on ELM327 or STN1110 chips.
Comparison of these chips is presented in the image below:
