Geofence Solution in the Event of Pandemic: Difference between revisions
No edit summary |
|||
| (19 intermediate revisions by 3 users not shown) | |||
| Line 1: | Line 1: | ||
== | ==Solution description== | ||
One of the more advanced features of GPS trackers is the ability to create Geofence scenarios in a real-time with triggered alerts. Geofences are designated areas or zones that can be defined on a map or as a distance from the specific location. The feature may help to comply with some pandemic lockdown measures and greatly benefit private car owners, families, corporate fleet managers and business owners. All Teltonika GPS tracker models have Geofence as a standard feature. | One of the more advanced features of GPS trackers is the ability to create Geofence scenarios in a real-time with triggered alerts. Geofences are designated areas or zones that can be defined on a map or as a distance from the specific location. The feature may help to comply with some pandemic lockdown measures and greatly benefit private car owners, families, corporate fleet managers and business owners. All Teltonika GPS tracker models have Geofence as a standard feature. | ||
==What you need for a solution?== | ==What you need for a solution?== | ||
| Line 21: | Line 13: | ||
Since Geofence can be used in all of Teltonika devices, it is important to follow your specific device [https://wiki.teltonika-gps.com/view/FMM130_First_Start#Mounting_recommendations mounting recommendations]. This is because if you were to install the tracker following the instructions of a different one, your device may not work properly in the end. Also, we offer a wide range of trackers that have different connectors, some of the devices we offer are "Plug and Track" (devices that have OBD-II connectors), other may demand more wiring work to be done. The list of all Teltonika Fleet Management devices can be found [[Fleet management | here]]. | Since Geofence can be used in all of Teltonika devices, it is important to follow your specific device [https://wiki.teltonika-gps.com/view/FMM130_First_Start#Mounting_recommendations mounting recommendations]. This is because if you were to install the tracker following the instructions of a different one, your device may not work properly in the end. Also, we offer a wide range of trackers that have different connectors, some of the devices we offer are "Plug and Track" (devices that have OBD-II connectors), other may demand more wiring work to be done. The list of all Teltonika Fleet Management devices can be found [[Fleet management | here]]. | ||
<!-- | |||
==== Connection scheme ==== | |||
[[File:Fmx130 installation.png|frameless|690x690px]] | |||
{| class="wikitable" | |||
! style="width:10%; border: 1px solid white; border-bottom: 2px solid #0054A6; background: white; color: #0054A6; text-align: left;"| PIN NUMBER | |||
! style="width:15%; border: 1px solid white; border-bottom: 2px solid #0054A6; background: white; color: #0054A6; text-align: left;"| PIN NAME | |||
! style="width:25%; border: 1px solid white; border-bottom: 2px solid #0054A6; background: white; color: #0054A6; text-align: left;"| DESCRIPTION | |||
|- | |||
| style="border: 1px solid white; border-bottom: 2px solid #E8E8E8; text-align: left; vertical-align: center; background: white;"| 1 | |||
| style="border: 1px solid white; border-bottom: 2px solid #E8E8E8; text-align: left; vertical-align: center; background: white;"|<span style="color:#FF0000">'''VCC (+10-30 V DC).'''</span> | |||
| style="border: 1px solid white; border-bottom: 2px solid #E8E8E8; text-align: left; vertical-align: center; background: white;"| Power supply (+10-30 V DC). | |||
|- | |||
| style="border: 1px solid white; border-bottom: 2px solid #E8E8E8; text-align: left; vertical-align: center; background: white;"| 7 | |||
| style="border: 1px solid white; border-bottom: 2px solid #E8E8E8; text-align: left; vertical-align: center; background: white;"|'''GND''' (-) | |||
| style="border: 1px solid white; border-bottom: 2px solid #E8E8E8; text-align: left; vertical-align: center; background: white;"| Ground | |||
|- | |||
| style="border: 1px solid white; border-bottom: 2px solid #E8E8E8; text-align: left; vertical-align: center; background: white;"| 8 | |||
| style="border: 1px solid white; border-bottom: 2px solid #E8E8E8; text-align: left; vertical-align: center; background: white;"|<span style="color:#FF6600">'''DOUT 1''' | |||
| style="border: 1px solid white; border-bottom: 2px solid #E8E8E8; text-align: left; vertical-align: center; background: white;"| Digital output, channel 1. Open collector output. Max. 0,5 A DC. | |||
|- | |||
| style="border: 1px solid white; border-bottom: 2px solid #E8E8E8; text-align: left; vertical-align: center; background: white;"| 9 | |||
| style="border: 1px solid white; border-bottom: 2px solid #E8E8E8; text-align: left; vertical-align: center; background: white;"| <span style="color:#842BD7">'''DOUT 2''' | |||
| style="border: 1px solid white; border-bottom: 2px solid #E8E8E8; text-align: left; vertical-align: center; background: white;"| Digital output, channel 2. Open collector output. Max. 0,5 A DC. | |||
|- | |||
|} | |||
--> | |||
==Configuration== | ==Configuration== | ||
| Line 103: | Line 121: | ||
<br /> | <br /> | ||
[[File: | [[File:Screenshot 4.jpg|left|frameless|200x150px]] | ||
It is also important to mention that the map in the Manual Geofence function section has a few features as well if you wish to make some adjustments using the interface: | It is also important to mention that the map in the [https://wiki.teltonika-gps.com/view/FMM130_Manual_Geofence_settings Manual Geofence] function section has a few features as well if you wish to make some adjustments using the interface: | ||
Manual Geofence also has a nifty feature that allows the user to draw their wanted Geofence using only the mouse. There are 4 buttons that make this feature into reality. | |||
First two are for drawing a circle or a rectangle. Simply press on the button, drag your mouse for the area you want the Geofence to be located and release. The Configurator will automatically calculate the size. | |||
The 3rd button is for deleting the Geofence which is currently chosen. | |||
The last button on the interface is used to zoom in on all of the available geozones. | The last button on the interface is used to zoom in on all of the available geozones. | ||
<br /> | <br /> | ||
| Line 133: | Line 145: | ||
'''Note''': We're sending two instead of one configuration messages since one SMS can contain up to 160 characters. For this scenario, we exceed the maximum allowed character amount. Therefore, we split the message into two. | '''Note''': We're sending two instead of one configuration messages since one SMS can contain up to 160 characters. For this scenario, we exceed the maximum allowed character amount. Therefore, we split the message into two. | ||
==Parsing | ==Parsing information== | ||
==='''1.Prerequisites:'''=== | ==='''1.Prerequisites:'''=== | ||
| Line 302: | Line 314: | ||
|} | |} | ||
== | ==Demonstration in platform== | ||
[[Category:Usage scenarios]] | [[Category:Usage scenarios]] | ||
TAVL: | TAVL: Open TAVL → select client → Track. By choosing a certain date frame for the device that you're watching, you can see the events that are generated when the Geofence is crossed (depending on what was chosen on the Configurator: On entry, on exit, on both). | ||
[[File:Screenshot 5.jpg|alt=|frameless|1153x1153px]] | |||
Wialon: Open WIALON → open messages → push unit ( select your device) → choose the date from which to which to show the records → select message (data messages) → push execute button and you will see all information. | |||
[[File:Screenshot 3.jpg|alt=|frameless|1153x1153px]] | |||
[[File: | |||
Latest revision as of 12:56, 10 September 2021
Main Page > General Information > Usage scenarios > Geofence Solution in the Event of PandemicSolution description
One of the more advanced features of GPS trackers is the ability to create Geofence scenarios in a real-time with triggered alerts. Geofences are designated areas or zones that can be defined on a map or as a distance from the specific location. The feature may help to comply with some pandemic lockdown measures and greatly benefit private car owners, families, corporate fleet managers and business owners. All Teltonika GPS tracker models have Geofence as a standard feature.
What you need for a solution?
- Geofence solution is supported by all Teltonika devices. To show this scenario, we will be using the FMM130 model.
- The SIM card in order to receive data to your server.
- Teltonika Configurator to make the configurations for your Teltonika device.
- FOTA WEB to send the configurations to your device remotely.
Installation
Since Geofence can be used in all of Teltonika devices, it is important to follow your specific device mounting recommendations. This is because if you were to install the tracker following the instructions of a different one, your device may not work properly in the end. Also, we offer a wide range of trackers that have different connectors, some of the devices we offer are "Plug and Track" (devices that have OBD-II connectors), other may demand more wiring work to be done. The list of all Teltonika Fleet Management devices can be found here.
Configuration
1. Prerequisites:
1.1. Read through First start guide
1.2. Understanding what manual Geofence has to offer.
2. Configuration of Manual Geofence feature
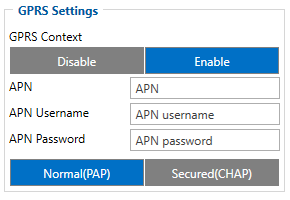
Parameter ID – Parameter name GPRS settings:
- 2001 – APN
- 2002 – APN username (if there are no APN username, empty field should be left)
- 2003 – APN password (if there are no APN password, empty field should be left)
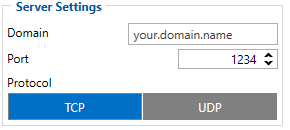
Server settings:
- 2004 – Domain
- 2005 – Port
- 2006 – Data sending protocol (0 – TCP, 1 – UDP)
After successful GPRS/SERVER settings configuration, FMM130 device will synchronize time and update records to the configured server. Time intervals and default I/O elements can be changed by using Teltonika Configurator or SMS parameters.
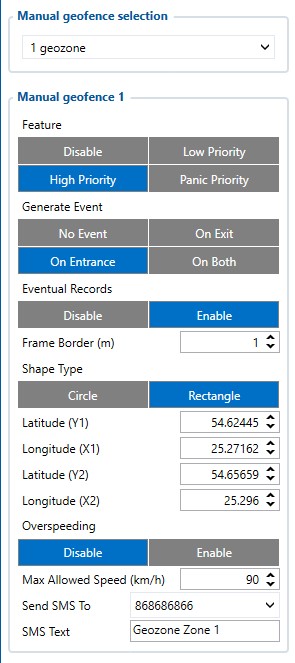
Manual Geofence settings:
- 20100 - Feature priority (0 - Disable, 1 - Low, 2 - High, 3 - Panic)
- 20101 - Generate Event (0 - No Event, 1 - On Exit, 2 - On Entrance, 3 - On Both)
- 20102 - Eventual Records (0 - Disable, 1 - Enable)
- 20103 - Frame Border (m)
- 20104 - Shape Type (0 - Circle, 1 - Rectangle)
- 20105 - Radius (m)
- 20106 - Coordinate Y1
- 20107 - Coordinate X1
- 20108 - Coordinate Y2
- 20109 - Coordinate X2
- 20110 - Overspeeding (0 - Disable, 1 - Enable)
- 20111 - Max allowed speed (km/h)
- 7025 - Phone Number
- 8025 - SMS Text
Note: Radius is only calculated if the chosen Shape Type is a Circle. In this example, Radius cannot be seen since the shape chosen is the Rectangle. Also, Latitude Y2 and Longitude X2 are only used when Rectangle is the chosen shape.

It is also important to mention that the map in the Manual Geofence function section has a few features as well if you wish to make some adjustments using the interface:
Manual Geofence also has a nifty feature that allows the user to draw their wanted Geofence using only the mouse. There are 4 buttons that make this feature into reality.
First two are for drawing a circle or a rectangle. Simply press on the button, drag your mouse for the area you want the Geofence to be located and release. The Configurator will automatically calculate the size.
The 3rd button is for deleting the Geofence which is currently chosen.
The last button on the interface is used to zoom in on all of the available geozones.
Quickstart: From default configuration to Geofence crossing detection in two SMS:
" setparam 2001:APN;2002:APN_username;2003:APN_password;2004:Domain;2005:Port;2006:0"
" setparam 20100:2;20101:2;20104:1;20106:latitudeY1;20107:longitudeX1;20108:latitudeY2;20109:longitudeX2"
This SMS will set up your device to report Geofence Crossing Detection scenario to the server.
Note: We're sending two instead of one configuration messages since one SMS can contain up to 160 characters. For this scenario, we exceed the maximum allowed character amount. Therefore, we split the message into two.
Parsing information
1.Prerequisites:
1.1. Open TCP/UDP port
1.2. Read Java parser first start guide
2. Parsing example:
| Unparsed received data in hexadecimal stream |
|---|
| 00000000000000460801000001776D581890010F07C39A
209CE0C2009C009D05000F9B0D06EF01F0001505C80045019B0105B5000BB6000 A424257430F8044000002F1000060191000000BE1000100005139 |
| AVL Data Packet | |
|---|---|
| AVL Data Packet Part | HEX Code Part |
| Zero Bytes | 00 00 00 00 |
| Data Field Length | 00 00 00 46 |
| Codec ID | 08 (Codec 8) |
| Number of Data 1 (Number of Total Records) | 01 |
| Timestamp | 00 00 01 77 49 BC 8E 70 (Thursday, February 4, 2021 2:00:26 PM) |
| Priority | 01 |
| Longitude | 0F 07 C3 9A |
| Latitude | 20 9C E0 C2 |
| Altitude | 00 9C |
| Angle | 00 9D |
| Satellites | 05 |
| Speed | 00 0F |
| Event IO ID | 9B (AVL ID: 155, Name: Geofence zone 01) |
| N of Total ID | 0D |
| N1 of One Byte IO | 06 |
| 1’st IO ID | EF (AVL ID: 239, Name: Ignition) |
| 1’st IO Value | 01 |
| 2’nd IO ID | F0 (AVL ID: 240, Name: Movement) |
| 2’nd IO Value | 00 |
| 3’rd IO ID | 15 (AVL ID: 21, Name: GSM Signal) |
| 3’rd IO Value | 05 |
| 4'th IO ID | C8 (AVL ID: 200, Name: Sleep Mode) |
| 4'th IO Value | 00 |
| 5'th IO ID | 45 (AVL ID: 69, Name: GNSS Status) |
| 5'th IO Value | 01 |
| 6'th IO ID | 9B (AVL ID: 155, Name: Geofence zone 01) |
| 6'th IO Value | 01 (00 – target left zone, 01 – target entered zone, 02 – over speeding end, 03 – over speeding start)
|
| N1 of Two Byte IO | 05 |
| 1’st IO ID | B5 (AVL ID: 181, Name: GNSS PDOP) |
| 1’st IO Value | 00 0B |
| 2’nd IO ID | B6 (AVL ID: 182, Name: GNSS HDOP) |
| 2’nd IO Value | 00 0A |
| 3’rd IO ID | 42 (AVL ID: 66, Name: External Voltage) |
| 3’rd IO Value | 42 57 |
| 4'th IO ID | 43 (AVL ID: 67, Name: Battery Voltage) |
| 4'th IO Value | 0F 80 |
| 5'th IO ID | 44 (AVL ID: 68, Name: Battery Current) |
| 5'th IO Value | 00 00 |
| N4 of Four Bytes IO | 02 |
| 1’st IO ID | F1 (AVL ID: 241, Name: Active GSM Operator) |
| 1’st IO Value | 00 00 60 19 |
| 2’nd IO ID | 10 (AVL ID: 16, Name: Total Odometer) |
| 2’nd IO Value | 00 00 0B E1 |
| N8 of Eight Bytes IO | 00 |
| Number of Data 2 (Number of Total Records) | 01 |
| CRC-16 | 00 00 51 39 |
Demonstration in platform
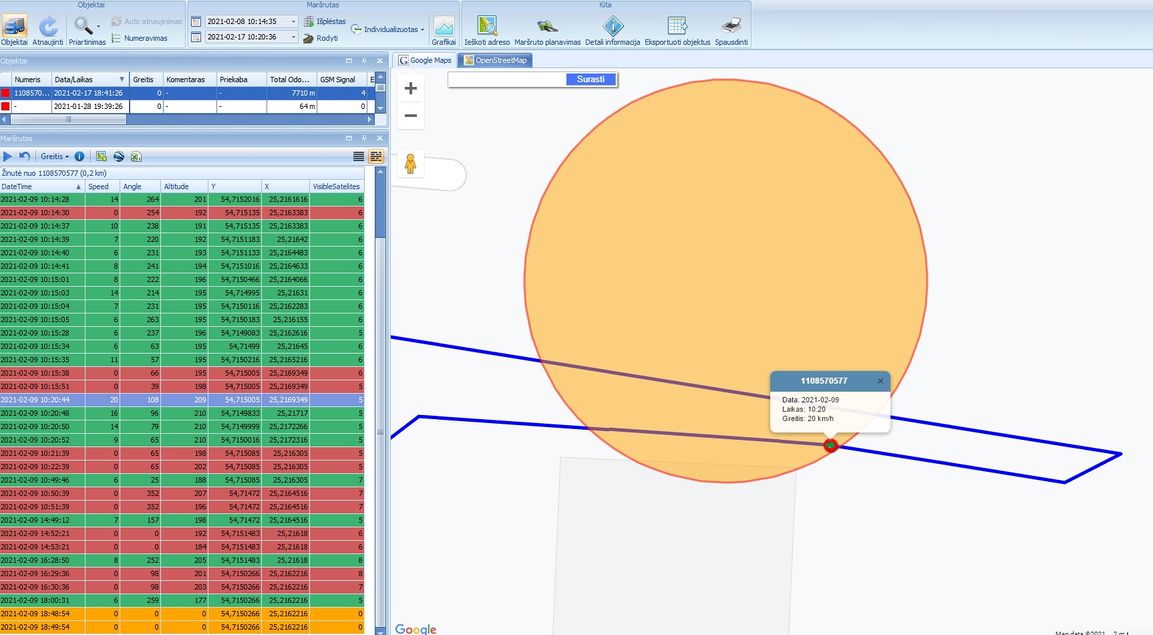
TAVL: Open TAVL → select client → Track. By choosing a certain date frame for the device that you're watching, you can see the events that are generated when the Geofence is crossed (depending on what was chosen on the Configurator: On entry, on exit, on both).
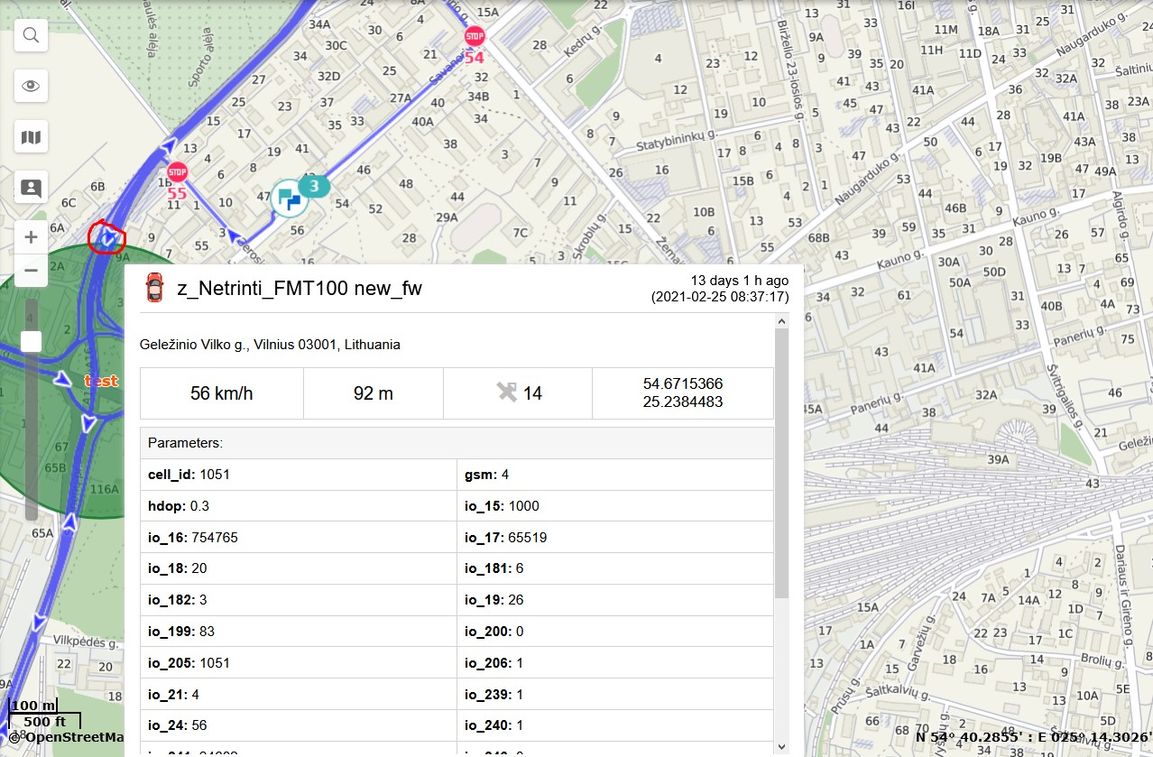
Wialon: Open WIALON → open messages → push unit ( select your device) → choose the date from which to which to show the records → select message (data messages) → push execute button and you will see all information.

