Difference between revisions of "Template:FMX640 Thermograph"
m (→Introduction) |
|||
| (58 intermediate revisions by 3 users not shown) | |||
| Line 2: | Line 2: | ||
With an increasing demand for cold-chain supply chains, Teltonika is offering the ability to monitor real-time information from freezer trailer thermographs. Each thermograph has an RS232 communication line where {{{model|}}} devices can connect via COM1/COM2 port of the device. The solution is easy to install and configure. This allows you to monitor the main information of the freezer trailer such as Temperature, Fridge door status, Alarms, etc., and generate events according to your needs. For more information please refer to the installation manual below. | With an increasing demand for cold-chain supply chains, Teltonika is offering the ability to monitor real-time information from freezer trailer thermographs. Each thermograph has an RS232 communication line where {{{model|}}} devices can connect via COM1/COM2 port of the device. The solution is easy to install and configure. This allows you to monitor the main information of the freezer trailer such as Temperature, Fridge door status, Alarms, etc., and generate events according to your needs. For more information please refer to the installation manual below. | ||
| − | '''NOTE:''' this feature is available from FW ver. '''01.02. | + | '''NOTE:''' this feature is available from FW ver. '''01.02.02.Rev.00''' |
==Supported Thermographs== | ==Supported Thermographs== | ||
| − | {{{model|}}} can be connected to | + | {{{model|}}} can be connected to DataCold600, Transcan2, TouchPrint thermographs. |
| − | Refer to the table | + | Refer to the table bellow to see which freezers use which thermograph: |
| − | {| class="wikitable" | + | {| class="wikitable" |
| + | |+ | ||
| + | ! | ||
| + | |Thermograph Type | ||
| + | ! | ||
| + | ! | ||
|- | |- | ||
| − | + | |Freezer Type | |
| − | + | |DataCold600 | |
| + | |Transcan2 | ||
| + | |TouchPrint | ||
|- | |- | ||
| − | + | |Carrier | |
| − | |||
| − | |||
| − | |||
| − | |||
| − | |||
| − | | Carrier | ||
| − | |||
| + | | + | ||
| - | | - | ||
| - | | - | ||
|- | |- | ||
| − | | ThermoKing | + | |ThermoKing |
| − | |||
| - | | - | ||
| + | | + | ||
| Line 40: | Line 39: | ||
==Installation guide== | ==Installation guide== | ||
| − | === ''' | + | === '''Touchprint'''=== |
| − | [[File: | + | [[File:Thermoking.png|center|frameless|665x665px]] |
| − | + | ||
| − | + | ||
| − | |||
| − | |||
| − | |||
No configuration is necessary. | No configuration is necessary. | ||
If the equipment does not receive information from the thermographer, the speed of the port accessing the configuration menu: | If the equipment does not receive information from the thermographer, the speed of the port accessing the configuration menu: | ||
| − | Keep the blue and red buttons pressed at the same time. "Enter PIN code" is displayed | + | Keep the blue and red buttons pressed at the same time. "Enter PIN code" is displayed in screen, enter pin "1111" by pressing the blue button four times. Travel for the options with the red button. |
| − | |||
| − | |||
| − | |||
| − | |||
| − | |||
| − | |||
| − | |||
| − | |||
| − | |||
| + | The ENG Display> OFF option must be ON, change its value with the keys ◄ and ►. Once switched to ON, keep scrolling through the options until find Baud Rate> 9600. The value should be 9600, otherwise adjust the speed by moving the cursor with the ◄ and ► keys, and adjust speed with the keys ▲ and ▼. | ||
| − | + | ==='''Transcan'''=== | |
| − | + | [[File:Transcan.png|center|frameless|545x545px]] | |
| − | + | Same connections as the ThermoKing thermograph. | |
| − | |||
| − | |||
| − | |||
| − | |||
| − | |||
| − | |||
| − | |||
| − | |||
| − | |||
| − | |||
| − | |||
| − | |||
| − | |||
| − | |||
| − | |||
| − | |||
| − | |||
| − | |||
| − | |||
| − | |||
| − | |||
| − | |||
Configuration: No configuration is necessary. | Configuration: No configuration is necessary. | ||
| Line 94: | Line 60: | ||
==='''Carrier Datacold 600'''=== | ==='''Carrier Datacold 600'''=== | ||
| − | + | [[File:Carrier Datacold 600.png|center|frameless|693x693px]] | |
| − | + | Press the green button for 4 seconds. | |
| − | |||
| − | |||
| − | + | → "Enter PIN" is displayed, enter "1111" with the blue button. | |
| + | → Choose Communication Setup menu with the blue button. | ||
| − | + | → Configure COM1 or COM2 depending on the connection: | |
| − | |||
| − | |||
| − | |||
| − | |||
| − | |||
| − | |||
| − | |||
| − | |||
| − | |||
| − | |||
| − | |||
| − | |||
| − | |||
| − | |||
| − | |||
| − | |||
| − | |||
| − | |||
| − | |||
| − | |||
| − | |||
| − | |||
| − | |||
| − | |||
| − | |||
| − | |||
| − | |||
| − | |||
| − | |||
| − | |||
| − | |||
| − | |||
| − | |||
| − | |||
| − | |||
| − | |||
| − | |||
| − | |||
| − | |||
| − | |||
| − | |||
| − | |||
| − | |||
| − | |||
| − | |||
| − | |||
| − | |||
| − | |||
| − | |||
| − | |||
| − | |||
| − | |||
| − | |||
| − | |||
| − | |||
| − | |||
| − | |||
| − | |||
| − | |||
| − | |||
| − | |||
| − | |||
| − | |||
| − | |||
| − | |||
| − | |||
| − | |||
| − | |||
| − | |||
| − | |||
| − | |||
| − | |||
| − | + | "11.1 COM 1 port settings" will be shown on the display. | |
| − | |||
| − | |||
| − | |||
| − | |||
| − | |||
| − | |||
| − | |||
| − | |||
| − | |||
| − | |||
| − | |||
| − | |||
| − | |||
| − | |||
| − | |||
| − | |||
| − | |||
| − | |||
| − | |||
| − | |||
| − | |||
| − | |||
| − | |||
| − | |||
| − | |||
| − | |||
| − | |||
| − | |||
| − | |||
| − | |||
| − | |||
| − | + | Select the default value, "UCP protocol" with the yellow or blue button. | |
| − | |||
| − | |||
| − | |||
| − | |||
| − | + | Confirm selection with the green button. Press the red button twice to access the | |
| + | main menu. | ||
| − | + | ==Configuration== | |
| − | |||
| − | |||
| − | |||
| − | |||
| − | |||
| − | |||
| − | |||
| − | |||
| − | |||
| − | |||
| − | |||
| − | |||
| + | Make sure the {{{model|}}} device is configured to receive data from “Transcan2 Reefer”, "Touchprint Reefer" or "DataCold Reefer". To do this, enter the configurator window, select the RS232 \ RS485 section displayed in the screenshots below, and configure accordingly (COM1/COM2 Settings, Mode “Transcan2 Reefer”, "Touchprint Reefer" or "DataCold Reefer", Baudrate: Default) | ||
| − | + | [[File:Transcan2_Reefer_2021_08_12.png|alt=|frameless|746x746px]][[File:Touchprint_Reefer_2021_08_12.png|alt=|frameless|746x746px]] | |
| − | |||
| − | |||
| − | |||
| − | |||
| − | |||
| − | |||
| − | |||
| − | |||
| − | |||
| − | |||
| − | |||
| − | |||
| − | |||
| − | |||
| − | |||
| − | |||
| − | |||
| − | |||
| − | |||
| − | |||
| − | |||
| − | | | ||
| − | | | ||
| − | + | [[File:DataCold Reefer 2021 08 20.png|frameless|739x739px]] | |
| − | + | ==== DataCold Reefer ==== | |
| − | |||
| − | |||
To configure "DataCold Reefer" I/O parameters, please select "Reefer IO": | To configure "DataCold Reefer" I/O parameters, please select "Reefer IO": | ||
| − | |||
| − | |||
| − | |||
| − | ==== | + | [[File:Reefer IO settings.png|frameless|1000x1000px]] |
| + | |||
| + | Data sending parameters (AVL ID) used for "DataCold Reefer" are these: 10040 - 10649. For more in-depth information, please refer to '''[[{{{model|}}} Teltonika Data Sending Parameters ID#Freezer_IO|Data Sending Parameters page]].''' | ||
| + | |||
| + | ==== Transcan2 Reefer ==== | ||
To configure "Transcan2 Reefer" I/O parameters, please select "TK Transcom IO": | To configure "Transcan2 Reefer" I/O parameters, please select "TK Transcom IO": | ||
| − | |||
| − | |||
| − | |||
| − | |||
| − | + | [[File:Transcom IO settings.png|frameless|1000x1000px]] | |
| − | |||
| − | [[File: | ||
| − | |||
| − | |||
| − | ==== | + | Data sending parameters (AVL ID) used for "Transcan2 Reefer" are these: 10683 - 10694. For more in-depth information, please refer to '''[[{{{model|}}} Teltonika Data Sending Parameters ID#Freezer_IO|Data Sending Parameters page]].''' |
| + | |||
| + | ==== Touchprint Reefer ==== | ||
To configure "Touchprint Reefer" I/O parameters select "TK Touchprint IO": | To configure "Touchprint Reefer" I/O parameters select "TK Touchprint IO": | ||
| − | [[File: | + | [[File:Touchprint Reefer IO settings.png|frameless|1000x1000px]] |
| − | + | ||
| − | Data sending parameters (AVL ID) used for "Touchprint Reefer" are these: 10695 - 10703. For more in-depth information, please refer to '''[[{{{model|}}} | + | Data sending parameters (AVL ID) used for "Touchprint Reefer" are these: 10695 - 10703. For more in-depth information, please refer to '''[[{{{model|}}} Teltonika Data Sending Parameters ID#Freezer_IO|Data Sending Parameters page]].''' |
| + | |||
| + | |||
[[Codec#Codec_8_Extended |Codec 8 Extended]] should be selected as the main data protocol in the “Protocol Settings” tab, which is located in the “System” section. | [[Codec#Codec_8_Extended |Codec 8 Extended]] should be selected as the main data protocol in the “Protocol Settings” tab, which is located in the “System” section. | ||
| + | [[image:Reefer3.png|center]] | ||
| + | [[Category:{{{model|}}}]] | ||
[[Category:{{{model|}}} Manual]] | [[Category:{{{model|}}} Manual]] | ||
Revision as of 16:43, 11 November 2021
Manual > Template:FMX640 ThermographIntroduction
With an increasing demand for cold-chain supply chains, Teltonika is offering the ability to monitor real-time information from freezer trailer thermographs. Each thermograph has an RS232 communication line where devices can connect via COM1/COM2 port of the device. The solution is easy to install and configure. This allows you to monitor the main information of the freezer trailer such as Temperature, Fridge door status, Alarms, etc., and generate events according to your needs. For more information please refer to the installation manual below.
NOTE: this feature is available from FW ver. 01.02.02.Rev.00
Supported Thermographs
can be connected to DataCold600, Transcan2, TouchPrint thermographs.
Refer to the table bellow to see which freezers use which thermograph:
| Thermograph Type | |||
| Freezer Type | DataCold600 | Transcan2 | TouchPrint |
| Carrier | + | - | - |
| ThermoKing | - | + | + |
RS-232 Interface
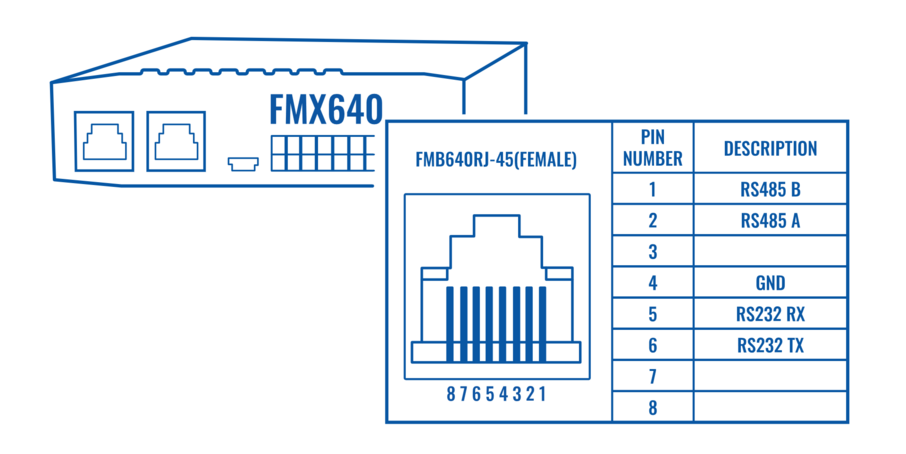
RS-232 supports full-duplex communication which means the data can be both sent and received at the same time as they use separate transmission lines. Most of the modes are the same as for [[]]. When entering Sleep or Deep sleep RS-232 will be powered off. [[]] RS-232 connection diagram is shown in the figure below:
Installation guide
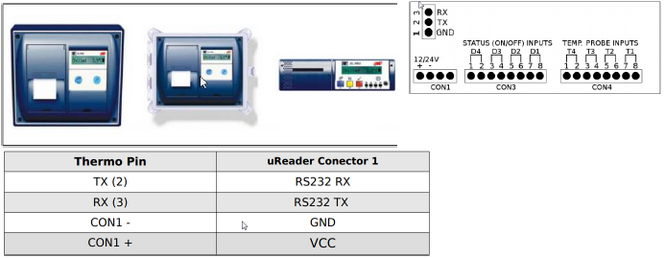
Touchprint
No configuration is necessary.
If the equipment does not receive information from the thermographer, the speed of the port accessing the configuration menu:
Keep the blue and red buttons pressed at the same time. "Enter PIN code" is displayed in screen, enter pin "1111" by pressing the blue button four times. Travel for the options with the red button.
The ENG Display> OFF option must be ON, change its value with the keys ◄ and ►. Once switched to ON, keep scrolling through the options until find Baud Rate> 9600. The value should be 9600, otherwise adjust the speed by moving the cursor with the ◄ and ► keys, and adjust speed with the keys ▲ and ▼.
Transcan
Same connections as the ThermoKing thermograph.
Configuration: No configuration is necessary.
See ThermoKing Configuration.
Carrier Datacold 600
Press the green button for 4 seconds.
→ "Enter PIN" is displayed, enter "1111" with the blue button.
→ Choose Communication Setup menu with the blue button.
→ Configure COM1 or COM2 depending on the connection:
"11.1 COM 1 port settings" will be shown on the display.
Select the default value, "UCP protocol" with the yellow or blue button.
Confirm selection with the green button. Press the red button twice to access the
main menu.
Configuration
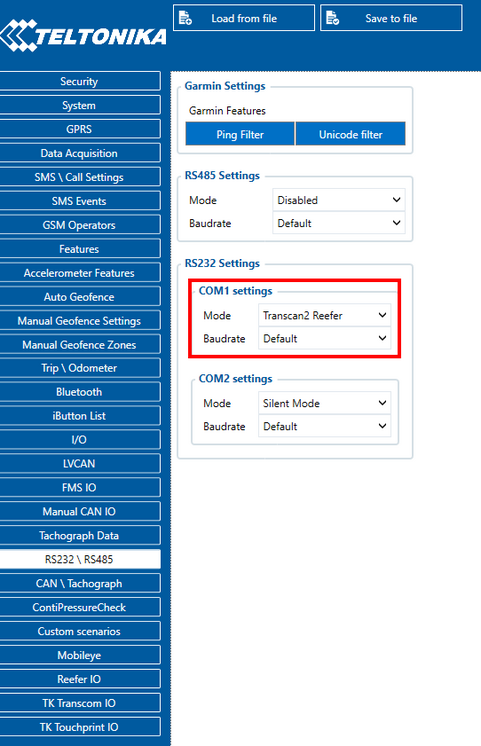
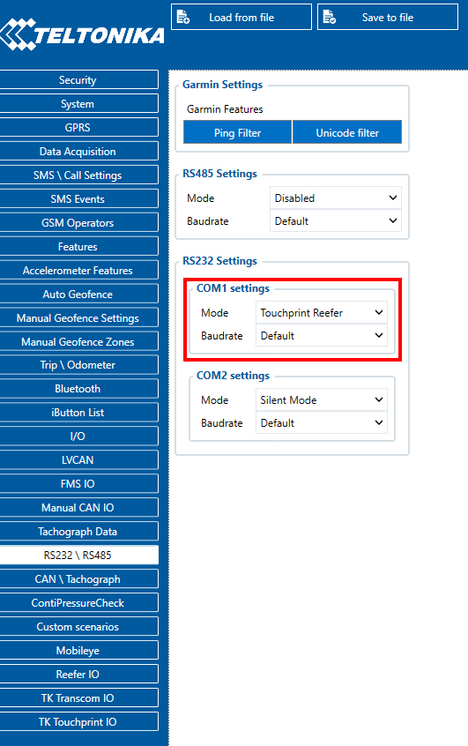
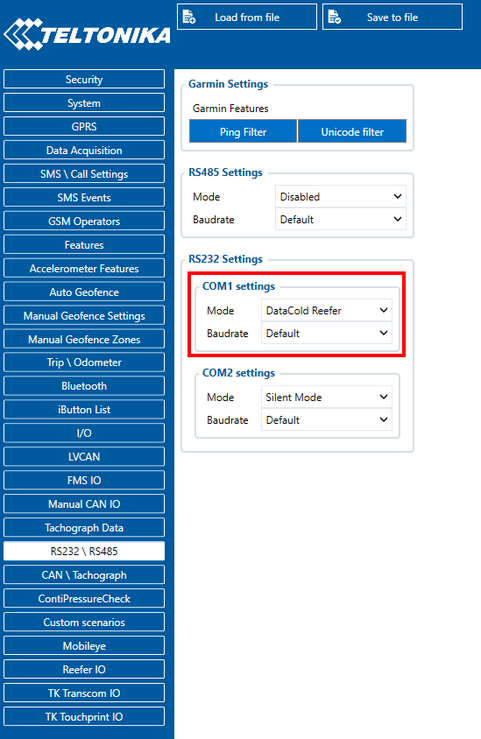
Make sure the device is configured to receive data from “Transcan2 Reefer”, "Touchprint Reefer" or "DataCold Reefer". To do this, enter the configurator window, select the RS232 \ RS485 section displayed in the screenshots below, and configure accordingly (COM1/COM2 Settings, Mode “Transcan2 Reefer”, "Touchprint Reefer" or "DataCold Reefer", Baudrate: Default)
DataCold Reefer
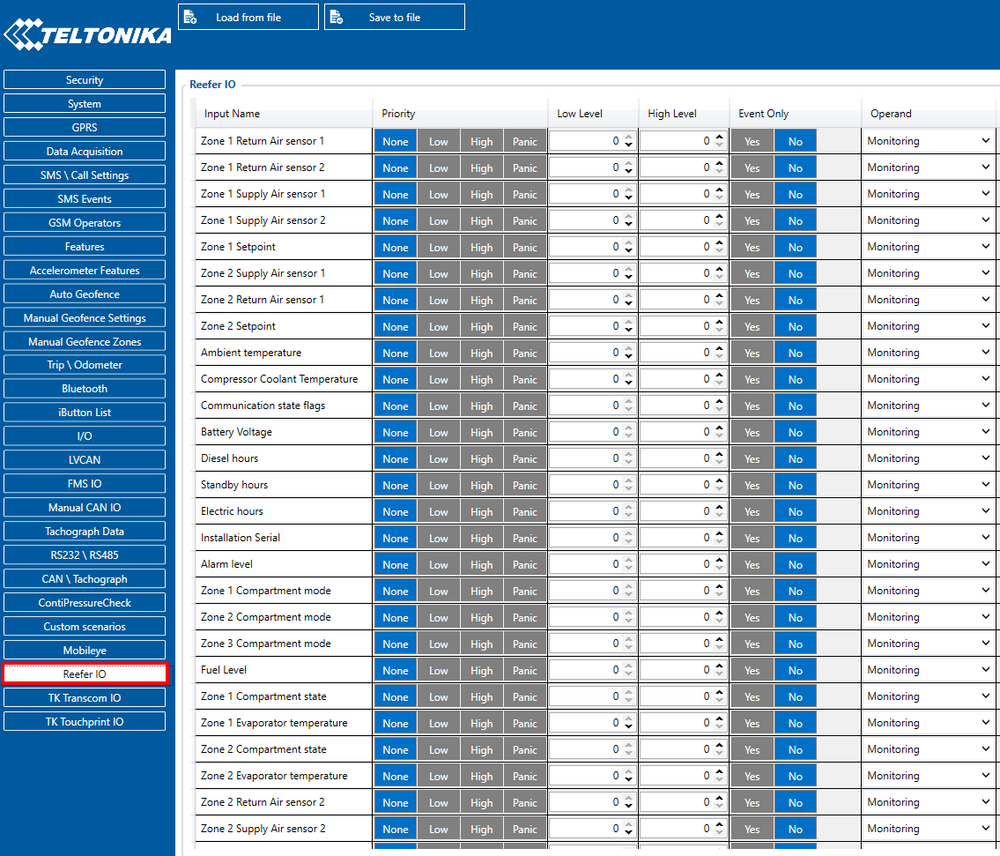
To configure "DataCold Reefer" I/O parameters, please select "Reefer IO":
Data sending parameters (AVL ID) used for "DataCold Reefer" are these: 10040 - 10649. For more in-depth information, please refer to Data Sending Parameters page.
Transcan2 Reefer
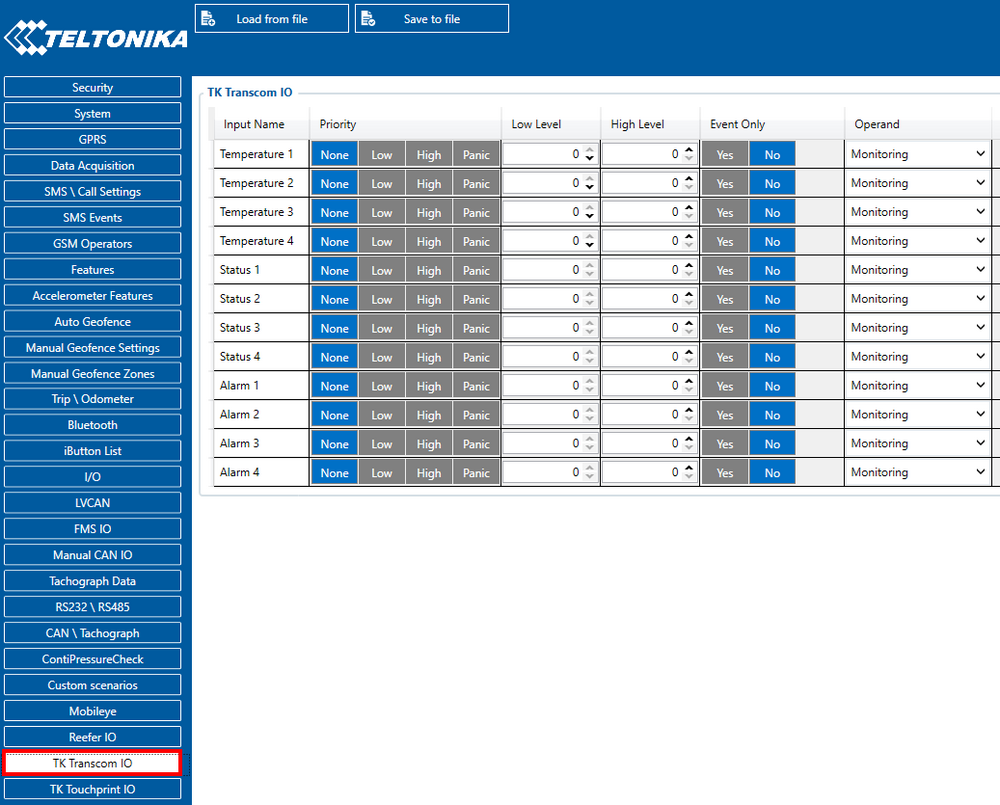
To configure "Transcan2 Reefer" I/O parameters, please select "TK Transcom IO":
Data sending parameters (AVL ID) used for "Transcan2 Reefer" are these: 10683 - 10694. For more in-depth information, please refer to Data Sending Parameters page.
Touchprint Reefer
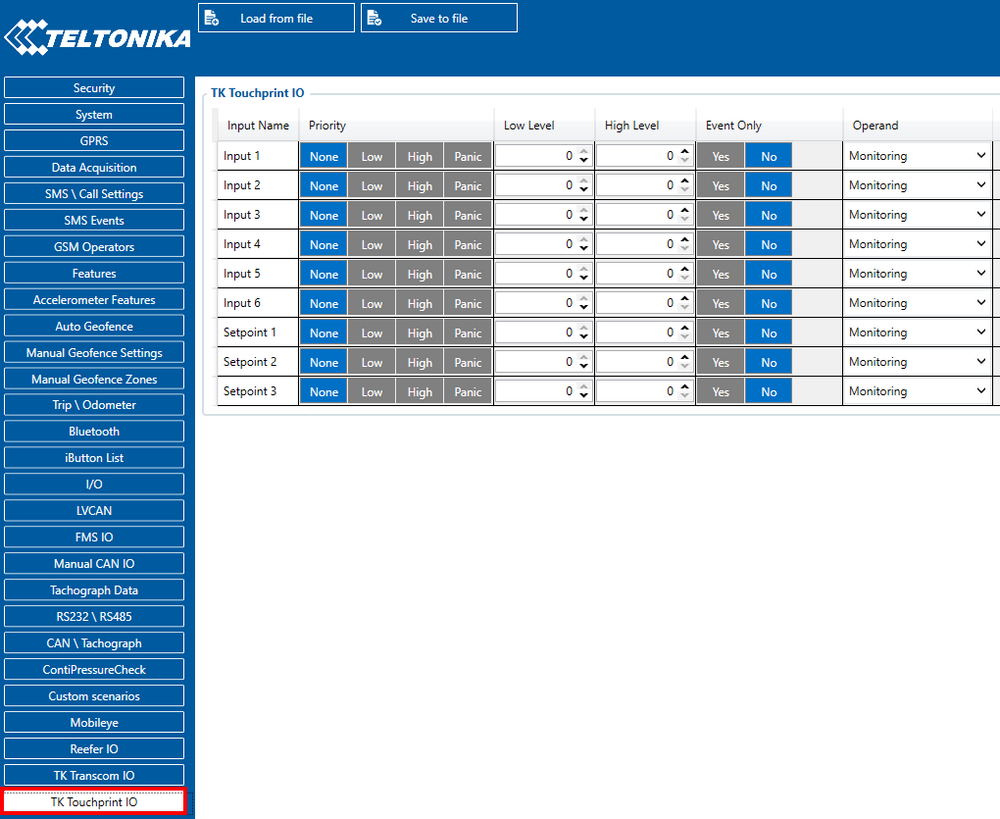
To configure "Touchprint Reefer" I/O parameters select "TK Touchprint IO":
Data sending parameters (AVL ID) used for "Touchprint Reefer" are these: 10695 - 10703. For more in-depth information, please refer to Data Sending Parameters page.
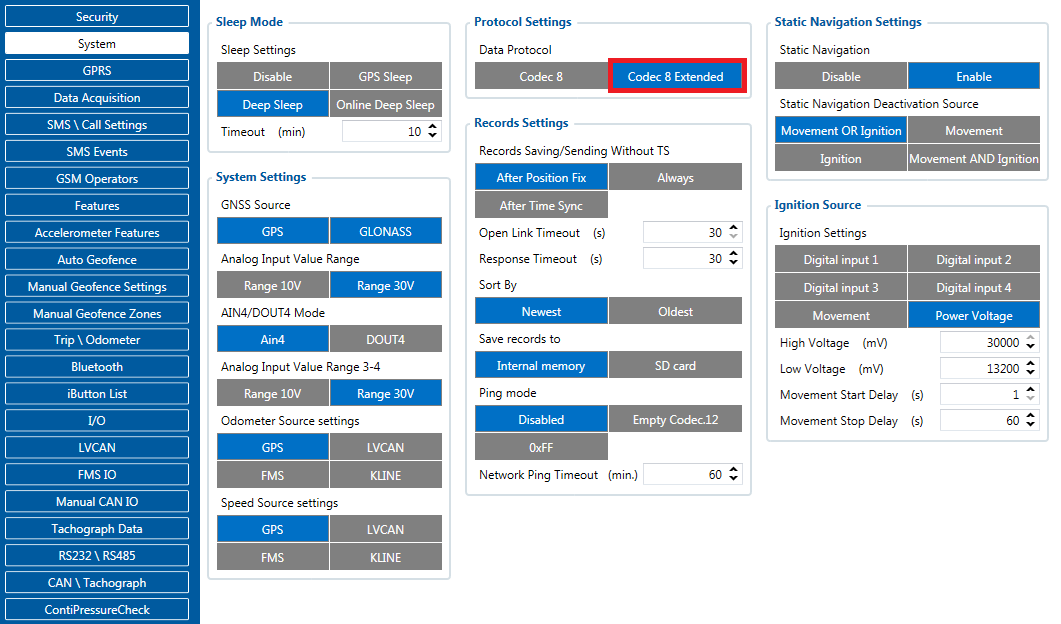
Codec 8 Extended should be selected as the main data protocol in the “Protocol Settings” tab, which is located in the “System” section.
[[Category:]]
