Difference between revisions of "Template:TCT Device Setup"
| Line 1: | Line 1: | ||
==Device Set-up== | ==Device Set-up== | ||
| − | After launching the | + | After launching the TCT tool you should see the main dashboard. You should start by clicking on the device set-up icon on the top right (shown below). |
[[File:{{{device_setup_icon|Device_Setup_Icon.png}}}|400px]] | [[File:{{{device_setup_icon|Device_Setup_Icon.png}}}|400px]] | ||
| Line 9: | Line 9: | ||
[[File:{{{device_setup_popup|Device_Setup_Popup.png}}}|400px]] | [[File:{{{device_setup_popup|Device_Setup_Popup.png}}}|400px]] | ||
| − | First on the list is | + | First on the list is <b>Configure APN</b>. Select the option after which you will be forwarded to the SIM settings window and mandatory fields will become highlighted while the rest of the screen becomes dimmed. |
[[File:{{{apn_configuration|APN_Configuration.png}}}|400px]] | [[File:{{{apn_configuration|APN_Configuration.png}}}|400px]] | ||
| − | Enter APN which corresponds to your current operator and press | + | Enter APN which corresponds to your current operator and press <b>Next</b> which will move you to the IP and Domain entry window. Enter the domain or IP address and press <b>Next</b> again. |
[[File:{{{ip_domain_configuration|IP_Domain_Configuration.png}}}|400px]] | [[File:{{{ip_domain_configuration|IP_Domain_Configuration.png}}}|400px]] | ||
| − | This will move you to the last necessary entry field which is Port. Enter the port and press | + | This will move you to the last necessary entry field which is Port. Enter the port and press <b>Next</b>. |
[[File:{{{port_configuration|Port_Configuration.png}}}|400px]] | [[File:{{{port_configuration|Port_Configuration.png}}}|400px]] | ||
| − | Within the next steps you will see optional configuration options for record profile settings, features and permanent I/O element configuration. These setup options are not mandatory although it is recommended to | + | Within the next steps you will see optional configuration options for record profile settings, features and permanent I/O element configuration. These setup options are not mandatory although it is recommended to configure them to make sure the device is fully set-up. |
[[File:{{{records_profile_settings_onstop|Records_Profile_Settings_Onstop.png}}}|800px]] | [[File:{{{records_profile_settings_onstop|Records_Profile_Settings_Onstop.png}}}|800px]] | ||
| Line 30: | Line 30: | ||
Send period controls the frequency of data being sent to the server over GPRS. The module makes attempts to send collected data to the server every defined period of time. If it does not have enough records (depends on the parameter Min. Saved Records described above), it tries again after the defined time interval. | Send period controls the frequency of data being sent to the server over GPRS. The module makes attempts to send collected data to the server every defined period of time. If it does not have enough records (depends on the parameter Min. Saved Records described above), it tries again after the defined time interval. | ||
| − | + | The device is able to collect records using four methods at the same time: time, distance, angle, and speed-based data acquisition: | |
| − | + | ||
| − | + | '''Time based data acquisition (By time)''' – records are acquired every time when a defined interval of time passes. Entering zero disables data acquisition based on time.<br> | |
| − | + | '''Distance-based data acquisition (By distance)''' – records are acquired when the distance between the previous coordinate and current position is greater than a defined parameter value. Entering zero disables data acquisition based on distance.<br> | |
| − | + | '''Angle based data acquisition (By angle)''' – records are acquired when the angle difference between the last recorded coordinate and current position is greater than a defined value. Entering zero disables data acquisition based on the angle.<br> | |
| − | + | '''Speed based data acquisition (By speed change)''' – records are acquired when the speed difference between the last recorded coordinate and current position is greater than a defined value. Entering zero disables data acquisition based on speed. | |
| + | |||
| + | After completing Data Acquisition settings configuration and clicking <b>Next</b> you will be forwarded to the Features Configuration window. There are three sections: driving behavior, vehicle protection and other features. You can see the available features at the bottom of each section window. | ||
| − | + | [[File:{{{features_configuration|Features_Configuration.png}}}|800px]] | |
| + | |||
| + | To learn more about the available features please go to the [[TCT Features]] page. <br /> | ||
| + | |||
| + | After clicking <b>Next</b> you will be forwarded to the last optional configuration page which is Input / Output (I/O). Page contains three sections: permanent I/O, OBD and LVCAN. In case of device setup you are suggested to configure permanent I/O section which contains the main device's I/O elements such as: Movement, Ignition, DINs, DOUTs, Speed etc. More on the available I/O elements visit the following Wiki page [[TCT I/O elements]]. | ||
| + | |||
| + | [[File:{{{io_elements|IO_Elements.png}}}|800px]] | ||
| − | + | When you are done configuring all necessary and optional sections in TCT, press <b>Finish</b> and the Device Set-up will be completed. You can always come back to the completed sections and edit the configuration. With the completion of the device setup, you can now proceed to mounting the device. | |
| − | |||
| − | |||
| − | |||
Revision as of 10:48, 12 December 2022
Device Set-up
After launching the TCT tool you should see the main dashboard. You should start by clicking on the device set-up icon on the top right (shown below).
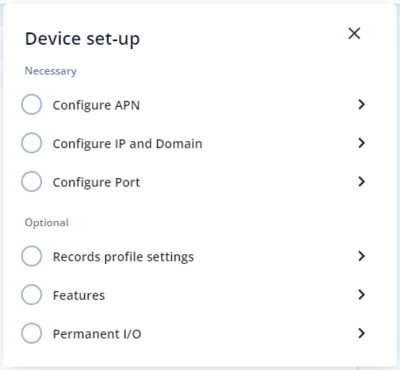
Pop-up window will show up with 3 necessary and 3 optional steps for device configuration.
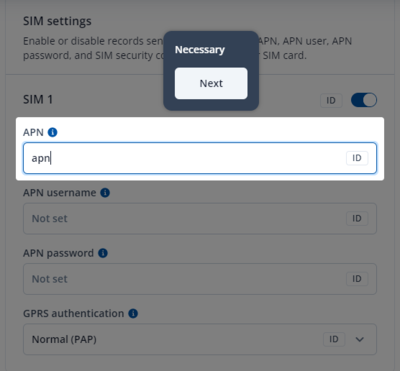
First on the list is Configure APN. Select the option after which you will be forwarded to the SIM settings window and mandatory fields will become highlighted while the rest of the screen becomes dimmed.
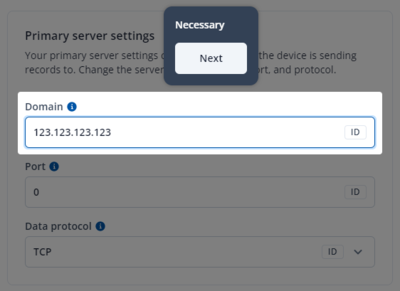
Enter APN which corresponds to your current operator and press Next which will move you to the IP and Domain entry window. Enter the domain or IP address and press Next again.
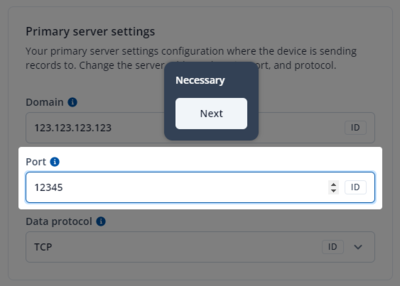
This will move you to the last necessary entry field which is Port. Enter the port and press Next.
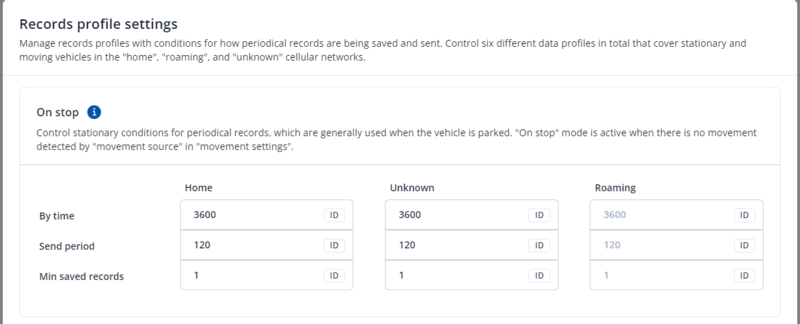
Within the next steps you will see optional configuration options for record profile settings, features and permanent I/O element configuration. These setup options are not mandatory although it is recommended to configure them to make sure the device is fully set-up.
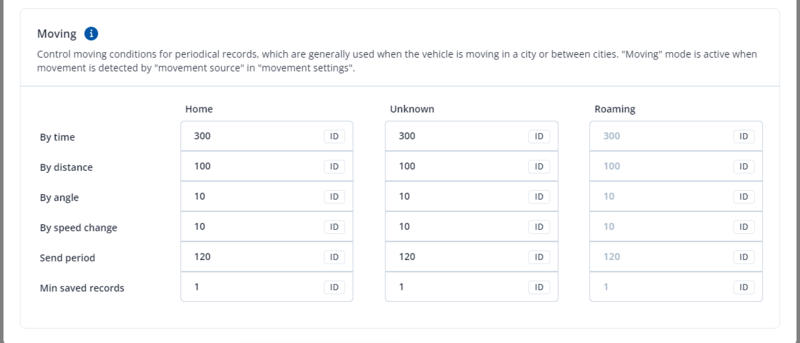
Min saved records defines the minimum number of coordinates and I/O data that should be transferred within a single connection to the server. If the device does not have enough coordinates to send to the server, it will check again after a time interval defined in Send period field. Send period controls the frequency of data being sent to the server over GPRS. The module makes attempts to send collected data to the server every defined period of time. If it does not have enough records (depends on the parameter Min. Saved Records described above), it tries again after the defined time interval.
The device is able to collect records using four methods at the same time: time, distance, angle, and speed-based data acquisition:
Time based data acquisition (By time) – records are acquired every time when a defined interval of time passes. Entering zero disables data acquisition based on time.
Distance-based data acquisition (By distance) – records are acquired when the distance between the previous coordinate and current position is greater than a defined parameter value. Entering zero disables data acquisition based on distance.
Angle based data acquisition (By angle) – records are acquired when the angle difference between the last recorded coordinate and current position is greater than a defined value. Entering zero disables data acquisition based on the angle.
Speed based data acquisition (By speed change) – records are acquired when the speed difference between the last recorded coordinate and current position is greater than a defined value. Entering zero disables data acquisition based on speed.
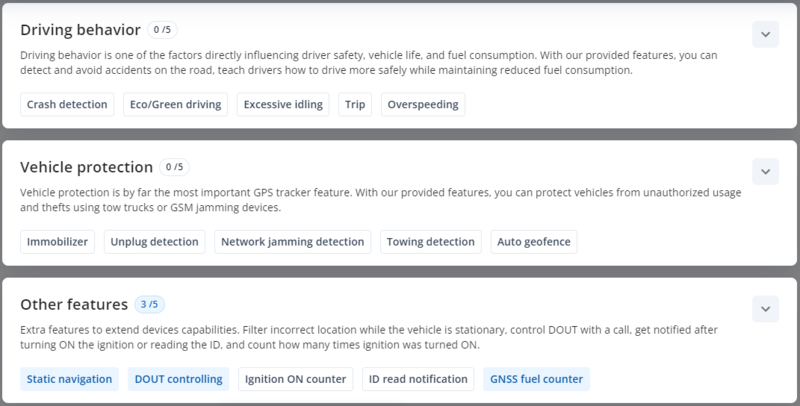
After completing Data Acquisition settings configuration and clicking Next you will be forwarded to the Features Configuration window. There are three sections: driving behavior, vehicle protection and other features. You can see the available features at the bottom of each section window.
To learn more about the available features please go to the TCT Features page.
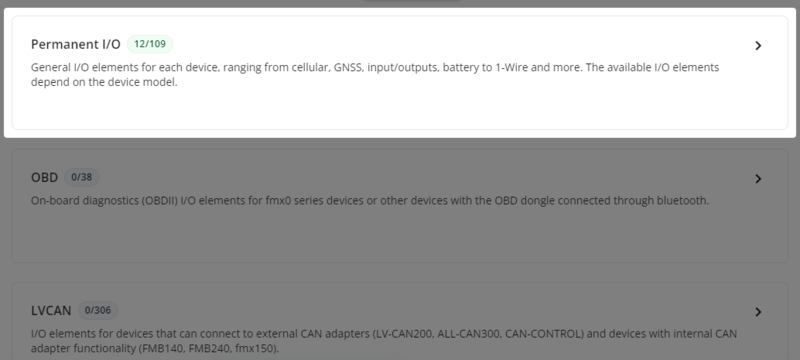
After clicking Next you will be forwarded to the last optional configuration page which is Input / Output (I/O). Page contains three sections: permanent I/O, OBD and LVCAN. In case of device setup you are suggested to configure permanent I/O section which contains the main device's I/O elements such as: Movement, Ignition, DINs, DOUTs, Speed etc. More on the available I/O elements visit the following Wiki page TCT I/O elements.
When you are done configuring all necessary and optional sections in TCT, press Finish and the Device Set-up will be completed. You can always come back to the completed sections and edit the configuration. With the completion of the device setup, you can now proceed to mounting the device.
