Difference between revisions of "Teltonika Configuration Tool Installation manual"
| Line 1: | Line 1: | ||
| − | In order to start using the | + | In order to start using the Telematics Configuration Tool (TCT), the user has to install it on their computer. |
The process of installing TCT is pretty straight forward and does not differ from any other program that You would install into Your computer. | The process of installing TCT is pretty straight forward and does not differ from any other program that You would install into Your computer. | ||
| − | == Recommended | + | == Recommended System Requirements == |
| − | '''OS:''' Windows 10; Windows 11 | + | |
| + | '''OS:''' Windows 7; Windows 10; Windows 11 | ||
'''CPU:''' Intel or AMD processor with 64-bit support | '''CPU:''' Intel or AMD processor with 64-bit support | ||
| Line 10: | Line 11: | ||
'''Disk Storage:''' 500 MB of free disk space | '''Disk Storage:''' 500 MB of free disk space | ||
| − | ''' | + | '''Memory:''' 500 MB of free RAM |
'''Graphics:''' DirectX 9 or later with WDDM 1.0 driver | '''Graphics:''' DirectX 9 or later with WDDM 1.0 driver | ||
| − | '''Internet:''' | + | '''Internet:''' Ethernet port or Wi-Fi w/ network access for auto update |
| + | |||
| + | == Telematics Configuration Tool Download Link == | ||
| + | |||
| + | To download the Teltonika Configurator Tool please click [https://wiki.teltonika-gps.com/view/Main_Page here]. | ||
== Telematics Configuration Tool Installation steps == | == Telematics Configuration Tool Installation steps == | ||
| + | |||
| + | [[Image:Gif 1 1400 x800.gif|frameless|]] | ||
| + | |||
| + | [[File:License Agreement.png|frameless|374x374px]] <br /> | ||
| + | |||
| + | |||
| + | |||
# In order to begin the installation, user has to start the ''TelematicsConfigurationTool.Setup.exe'' [[File:Exe Icon.png|frameless]] <br /> | # In order to begin the installation, user has to start the ''TelematicsConfigurationTool.Setup.exe'' [[File:Exe Icon.png|frameless]] <br /> | ||
| − | # When the setup is launched, user first sees the license agreement screen, which has to be agreed with in order to install the configuration tool. | + | # When the setup is launched, user first sees the license agreement screen, which has to be agreed with in order to install the configuration tool. |
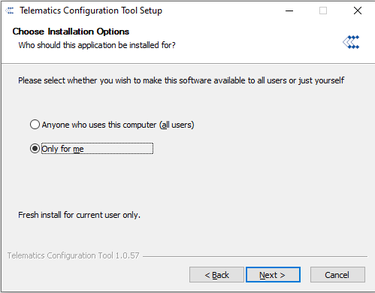
# Once the user agrees with the license agreement, he is taken to the user selection page. This allows the user to select, if after the installation this application will be available for all users of that computer or just the user that is currently logged in. <br />[[File:Users.png|frameless|375x375px]] <br /> | # Once the user agrees with the license agreement, he is taken to the user selection page. This allows the user to select, if after the installation this application will be available for all users of that computer or just the user that is currently logged in. <br />[[File:Users.png|frameless|375x375px]] <br /> | ||
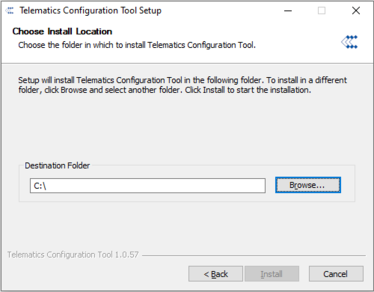
# After that, the user has to select the installation location on their computer. By default, the Telematics Configuration Tool is installed in the same drive as the operating system of the computer, but it can be selected according to the user needs. <br />[[File:Install Location.png|frameless|374x374px]] <br /> | # After that, the user has to select the installation location on their computer. By default, the Telematics Configuration Tool is installed in the same drive as the operating system of the computer, but it can be selected according to the user needs. <br />[[File:Install Location.png|frameless|374x374px]] <br /> | ||
Revision as of 14:48, 16 March 2023
In order to start using the Telematics Configuration Tool (TCT), the user has to install it on their computer.
The process of installing TCT is pretty straight forward and does not differ from any other program that You would install into Your computer.
Recommended System Requirements
OS: Windows 7; Windows 10; Windows 11
CPU: Intel or AMD processor with 64-bit support
Disk Storage: 500 MB of free disk space
Memory: 500 MB of free RAM
Graphics: DirectX 9 or later with WDDM 1.0 driver
Internet: Ethernet port or Wi-Fi w/ network access for auto update
Telematics Configuration Tool Download Link
To download the Teltonika Configurator Tool please click here.
Telematics Configuration Tool Installation steps

- In order to begin the installation, user has to start the TelematicsConfigurationTool.Setup.exe
- When the setup is launched, user first sees the license agreement screen, which has to be agreed with in order to install the configuration tool.
- Once the user agrees with the license agreement, he is taken to the user selection page. This allows the user to select, if after the installation this application will be available for all users of that computer or just the user that is currently logged in.
- After that, the user has to select the installation location on their computer. By default, the Telematics Configuration Tool is installed in the same drive as the operating system of the computer, but it can be selected according to the user needs.
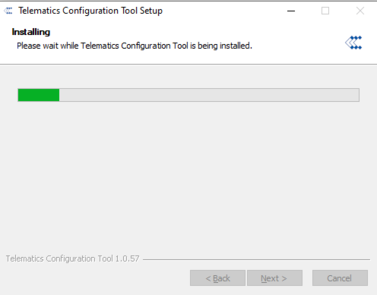
- After all the above steps are completed, the installation of the tool begins:
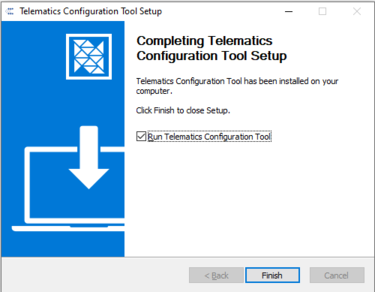
- If the installation is completed with no errors, client is informed about a succesfull installation of Telematics Configuration Tool.


Virtual-COM port drivers installation
In order to connect the device to the computer and use full functionality of the Telematics Configuration Tool, Virtual COM-port drivers have to installed.
The drivers can be downloaded from here: Virtual COM-port drivers for Teltonika devices
Important note
It is possible that during the installation, user might see a Windows SmartScreen message that can be seen below:

If this screen is shown, user has to click on "More info" text, after which additional information about the application is shown:

The app name should be TelematicsConfigurationTool.Setup.x.x.xx.exe. x here represent the version of the Setup, so it can differ according to the installer version that You have.
Also, user has to confirm that the publisher is indeed TELTONIKA TELEMATICS. If everything is correct, please click "Run anyway" at the bottom of the window and the installation will be started.

