|
|
| (71 intermediate revisions by 2 users not shown) |
| Line 1: |
Line 1: |
| − | __TOC__
| + | This will describe functionalities when they were added and their flow. |
| − | === Page Description ===
| |
| | | | |
| − | This page will describe EYE device functionalities, their value flow and required hardware, firmware and software versions.
| |
| | | | |
| − | ==EYE APP 1.2.2-89==
| + | Functionalities: |
| − | ===Search device with QR scan===
| |
| − | '''Functionality''': Now you can find devices with QR scan by pressing scan button [[File:EYE_APP_QR_BUTTON.png|frameless|25x25px]] and scanning device QR code.
| |
| | | | |
| − | '''Firmware''': 1.2.1.R.0+
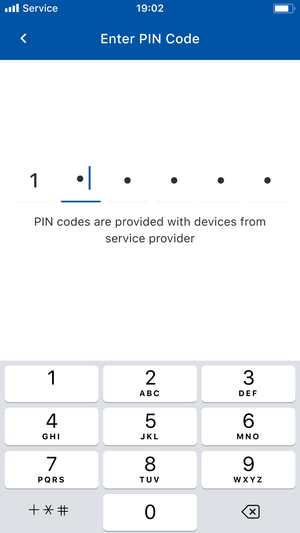
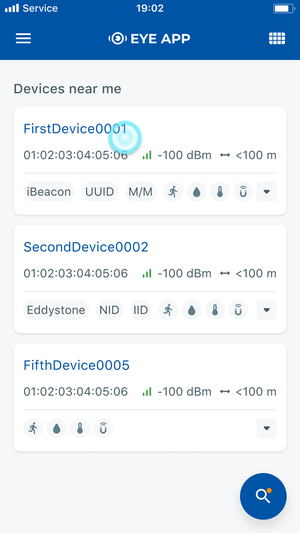
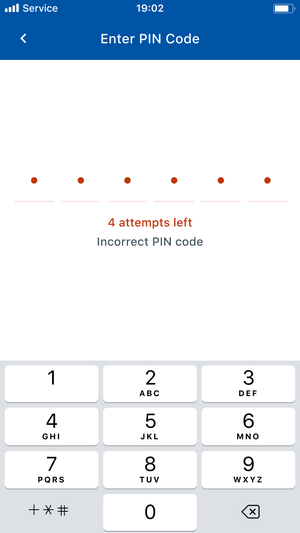
| + | Connecting to the device |
| | + | {| class="wikitable" |
| | + | |+ |
| | + | !Step No. |
| | + | !1 |
| | + | !2 |
| | + | ! |
| | + | |- |
| | + | |Step desc. |
| | + | |Tap the selected device to connect to it |
| | + | |Enter PIN |
| | + | |Connected |
| | + | |- |
| | + | |Step success visual |
| | + | | |
| | + | [[File:TapToConnect.png|alt=|frameless]] |
| | + | |[[File:PIN Code.png|frameless]] |
| | + | | |
| | + | |- |
| | + | |Failed attempt at functionality visual |
| | + | |[[File:TapToConnect.png|alt=|frameless]] |
| | + | |[[File:PIN Code (error).png|File:PIN_Code_(error).png|alt=|frameless]]''' |
| | + | | |
| | + | |- |
| | + | |Suppoted versions |
| | | | |
| − | '''Value''': Easier device management
| + | |EYE APP: 1.2.0-60+ |
| | | | |
| − | '''Flow:''' 1. Tap [[File:EYE_APP_QR_BUTTON.png|frameless|25x25px]] 2. scan the QR code engraved onto EYE device <br><br>[[File:EYE_APP_QR_PRESS_BUTTON.png|frameless|250px]][[File:EYE_APP_QR_SCAN.png|frameless|250px]][[File:EYE_APP_QR_SCAN_EXAMPLE.png|frameless|250px]]
| + | Firmware: 1.2.1+ |
| − | | + | | |
| − | ===Customized Sensor Selection===
| + | | |
| − | '''Functionality''': Users can disable sensors reading leaving only the sensors they require.
| + | |} |
| − | | |
| − | '''Firmware''': 1.2.10.R.4+
| |
| − | | |
| − | '''Value''': Data saving, battery life can be expanded by disabling accelerometer.
| |
| − | | |
| − | '''Flow:''' 1. Connect to EYE device 2. Click "configure" 3. Expand Active sensors tab 4. Uncheck sensors you want to deactivate 4. Save your configuration.<br><br>[[File:EYE_APP_CHOOSE_ONE_SENSORS.png|frameless|250px]][[File:EYE_APP_ONE_SENSOR_VIEW.png|frameless|250px]][[File:EYE_APP_CHOOSE_FOUR_SENSORS.png|frameless|250px]][[File:EYE_APP_FOUR_SENSOR_VIEW.png|frameless|250px]]
| |
| − | | |
| − | ===Auto-Disconnect Timer===
| |
| − | '''Functionality''': After 2 minutes of inactivity, users will be automatically disconnected from the device. Before disconnection, you will have the option to maintain the connection.
| |
| − | | |
| − | '''Firmware''': 1.2.10.R.4+
| |
| − | | |
| − | '''Value''': Enhanced privacy and energy saving.
| |
| − | | |
| − | '''Flow:''' 1. Connect to EYE device 2. Do not perform any saving actions for 2 minutes.<br><br>[[File:EYE_APP_TWO_MINUTE_WAIT.png|frameless|250px]][[File:EYE_APP_DISCONNECTED_AFTER_TWO_MINUTES.png|frameless|250px]][[File:EYE_APP_DISCONNECTED_WHILE_CONFIGURING.png|frameless|250px]]
| |
| − | | |
| − | ===Battery voltage display===
| |
| − | '''Functionality''': Eye App now provides a clear and convenient readout of the battery's voltage level, keeping users informed about their device's power status.
| |
| − | | |
| − | '''Firmware''': 1.2.1.R.0+
| |
| − | | |
| − | '''Value''': Keeping users informed about their device's power status.
| |
| − | | |
| − | '''Flow:''' 1. Expand sensor card in the overview screen or connect to the device<br><br>[[File:EYE_APP_VISIBLE_BATTERY_VOLTAGE.png|frameless|250px]]
| |
| − | | |
| − | ===12 characters name===
| |
| − | '''Functionality''': Users can now assign names of up to 12 characters,
| |
| − | | |
| − | '''Firmware''': 1.2.1.R.0+
| |
| − | | |
| − | '''Value''': A full MAC address can be used as the name.
| |
| − | | |
| − | '''Flow:''' 1. Connect to EYE device 2. Click "configure" 3. Expand Name settings drop down 4. Enter desired name 4. Save your configuration.<br>[[File:EYE APP 12 CHAR NAME.png|frameless|250px]]
| |
| − | | |
| − | ==<big>EYE APP 1.2.0-63</big>==
| |
| − | | |
| − | ===PIN code===
| |
| − | '''Functionality''': Eye App will time-out users on for 5 minutes after 5 unsuccessful PIN attempts
| |
| − | | |
| − | '''Firmware''': 1.2.1.R.0 to 1.2.8.R.2
| |
| − | | |
| − | '''Value''': Enhanced privacy
| |
| − | | |
| − | '''Flow:''' 1. Tap the selected device to connect to it 2. Enter PIN incorrectly, fail to enter PIN correctly 4 more times 3. Wait 5 minutes for timeout to end.
| |
| − | | |
| − | [[File:Screenshot 20230503 165303 EYE APP edited.jpg|frameless|250px]][[File:Screenshot 20230509 1518232 EYE APP.jpg|frameless|250px]][[File:Screenshot 20230509 152802 EYE APP.jpg|frameless|250px]]
| |
| − | | |
| − | ===PUK code ===
| |
| − | '''Functionality''': Eye App will block users that fail PIN 10 times.
| |
| − | | |
| − | '''Firmware''': 1.2.9.R.8+
| |
| − | | |
| − | '''Value''': Enhanced privacy
| |
| − | | |
| − | '''Lock flow:''' 1. Tap the selected device to connect to it 2. Enter PIN incorrectly, fail to enter PIN correctly 4 more times 3. Wait 5 minutes for timeout to end. 4. Tap the selected device to connect to it 5. Enter PIN incorrectly, fail to enter PIN correctly 4 more times. 6. Requirement to enter PUK code will now appear. PUK code is provided by support.
| |
| − | | |
| − | [[File:Screenshot 20230503 165303 EYE APP edited.jpg|frameless|200px]][[File:Screenshot 20230509 1518232 EYE APP.jpg|frameless|200px]][[File:Screenshot 20230509 152802 EYE APP.jpg|frameless|200px]][[File:Screenshot 20230509 151823 EYE APP.jpg|frameless|200px]][[File:Screenshot 20230509 175501 EYE APP PinnAttemptAfter5min.jpg|frameless|200px]]
| |
| − | | |
| − | '''Unlock flow:''' 1. Tap the blocked device to connect to it 2. Enter PUK correctly 3. You will be connected, PIN will be reset to default
| |
| − | | |
| − | [[File:Screenshot 20230503 165303 EYE APP edited.jpg|frameless|200px]][[File:Device screen 1.2.8 2.jpg|frameless|200px]]
| |
| − | [[File:PUK insert.jpg|frameless|200px]]
| |
| − | | |
| − | ===Hibernate mode:===
| |
| − | '''Functionality''': Eye App will allow users to send their devices back to hibernate mode
| |
| − | | |
| − | '''Firmware''': 1.2.9.R.8+
| |
| − | | |
| − | Hardware: BTSID1 hibernate version or any BTSMP1
| |
| − | | |
| − | '''Value''': Battery saving
| |
| − | | |
| − | '''Wake up flow:''' 1. Take magnet 2. Attach magnet to hibernating device 3. Wait for LED to blink.
| |
| − | | |
| − | [[File:520746_Magnet_EYE_gif_v1.6-min.gif|alt=|left|240x240px|link=https://wiki.teltonika-gps.com/view/File:520746_Magnet_EYE_gif_v1.6-min.gif]]<br>
| |
| − | | |
| − | | |
| − | | |
| − | | |
| − | | |
| − | | |
| − | | |
| − | '''Send to hibernate flow:''' 1. While connected and in overview tap "Send device to sleep". 2. Confirm your selection 3. Wait for EYE App to disconnect:
| |
| − | | |
| − | [[File:Device screen 1.2.8 2.jpg|400x400px]][[File:Screenshot 20230509 173323 EYE APP.jpg|400x400px]][[File:Screenshot 20230512 164509 Gallery.jpg|400x400px]]
| |


