Template:Bluetooth 4.0 settings: Difference between revisions
No edit summary |
mNo edit summary |
||
| (4 intermediate revisions by one other user not shown) | |||
| Line 1: | Line 1: | ||
__TOC__ | __TOC__ | ||
==Disclaimer== | |||
[[File:Alert.png|left|link=]] <br> If you are not using Bluetooth®, '''please consider turning it off''' or '''change Bluetooth® PIN''' to remove potential risks. | |||
If you are using Bluetooth® we strongly recommend '''using AES encryption''' for enhanced security. | |||
<br> | <br> | ||
{{{model|X}}} offers | {{{model|X}}} offers Bluetooth® 4.0 (Bluetooth® Low Energy, also referred as BLE) functionality. | ||
==Common settings== | ==Common settings== | ||
{| style="width: 100%" | {| style="width: 100%" | ||
|[[Image: | |[[Image:Bluetooth® 4.0 common settings.png|right]] | ||
* <b>Non Stop Scan</b> - Enabled Non Stop Scan feature, the device will try to scan for the sensors all the time if any of them are configured. | * <b>Non Stop Scan</b> - Enabled Non Stop Scan feature, the device will try to scan for the sensors all the time if any of them are configured. | ||
* <b>BLE Scan Start Period</b> - This parameter determines when the next BLE scan will start for Beacons and TZ sensors. | * <b>BLE Scan Start Period</b> - This parameter determines when the next BLE scan will start for Beacons and TZ sensors. | ||
| Line 25: | Line 32: | ||
===Configuration modes=== | ===Configuration modes=== | ||
{| style="width: 100%" | {| style="width: 100%" | ||
[[Image: | [[Image:Bluetooth® 4.0 common settings non stop scan.png|right]] | ||
* If the Non Stop Scan is <b>Enabled</b>, the Non Stop sensor scans until any error will be hidden. Although BLE scan duration will still be active because it is important for btgetlist SMS command. | * If the Non Stop Scan is <b>Enabled</b>, the Non Stop sensor scans until any error will be hidden. Although BLE scan duration will still be active because it is important for btgetlist SMS command. | ||
|} | |} | ||
{| style="width: 100%" | {| style="width: 100%" | ||
|[[Image: | |[[Image:Bluetooth® 4.0 common settings.png|right]] | ||
* If Non Stop Scan <b>Disabled</b>, Scan period is selected manually.<br><br> | * If Non Stop Scan <b>Disabled</b>, Scan period is selected manually.<br><br> | ||
The Scan time period will be selected from two sources: | The Scan time period will be selected from two sources: | ||
| Line 80: | Line 87: | ||
*<b>Offset</b> – value to be added to output data. Used only with Save action. | *<b>Offset</b> – value to be added to output data. Used only with Save action. | ||
How to correctly configure the <b> | How to correctly configure the <b>Bluetooth® LE solutions</b>, can be found here: | ||
*[[How to read data from TZ-BT04/05/05B sensor]] | *[[How to read data from TZ-BT04/05/05B sensor]] | ||
*[[How to read data from BLE Sensors]] | *[[How to read data from BLE Sensors]] | ||
| Line 91: | Line 98: | ||
While following the steps showed in the images below, you can find the supported sensors in our Configurator. | While following the steps showed in the images below, you can find the supported sensors in our Configurator. | ||
In the Configurator, find the | In the Configurator, find the Bluetooth® 4.0 Settings menu, select the advanced sensors mode which was mentioned before. The following window should appear. | ||
[[Image:Preset1.png|1200px|none]] | [[Image:Preset1.png|1200px|none]] | ||
Latest revision as of 11:44, 15 January 2024
Pages with broken file links > Template:Bluetooth 4.0 settingsDisclaimer

If you are not using Bluetooth®, please consider turning it off or change Bluetooth® PIN to remove potential risks.
If you are using Bluetooth® we strongly recommend using AES encryption for enhanced security.
X offers Bluetooth® 4.0 (Bluetooth® Low Energy, also referred as BLE) functionality.
Common settings
|
Configuration modes
- If the Non Stop Scan is Enabled, the Non Stop sensor scans until any error will be hidden. Although BLE scan duration will still be active because it is important for btgetlist SMS command.
The Scan time period will be selected from two sources:
For example, if Update frequency - 120 seconds and BLE Scan Duration - 60 Seconds, the device will start the first scan after 120 seconds and will scan nearby BLE devices for 60 seconds to update configured sensor data. The sensor data will be updated every 120 seconds. Update Frequency is counted even while a scan is performed. Update frequency period passes. 120 seconds -> 0 seconds, a 60 second scan is initiated. Update Frequency countdown is restarted (countdown from configured value to 0) while the scan (according to the BLE Scan duration parameter) is performed. |
BLE Serial Encryption

If BLE Encryption Key is set, then device will communicate over BLE SPP (Serial Port Profile) with AES cipher mechanism. All incoming and outgoing data will be crypted with AES128 algorithm with entered key. Connected to the other side device must have similar encryption method and algorithm BLE Encryption Key is a 16 byte hex coded string, like 00112233445566778899AABBCCDDEEFF
Keep BLE Encryption Key blank to non crypted communications.

This Simple BLE Terminal is for AES128 functionality testing as it has an Encryption Key option. Set correct key in app settings.
Detailed instructions on how to test AES128 BLE Encryption Functionality can be found in the following link.
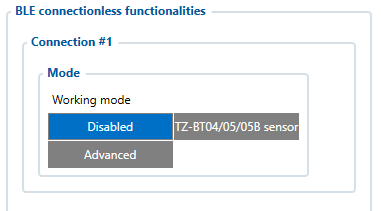
BLE connectionless functionalities
 Currently to the X device up to 4 sensors can be connected. |
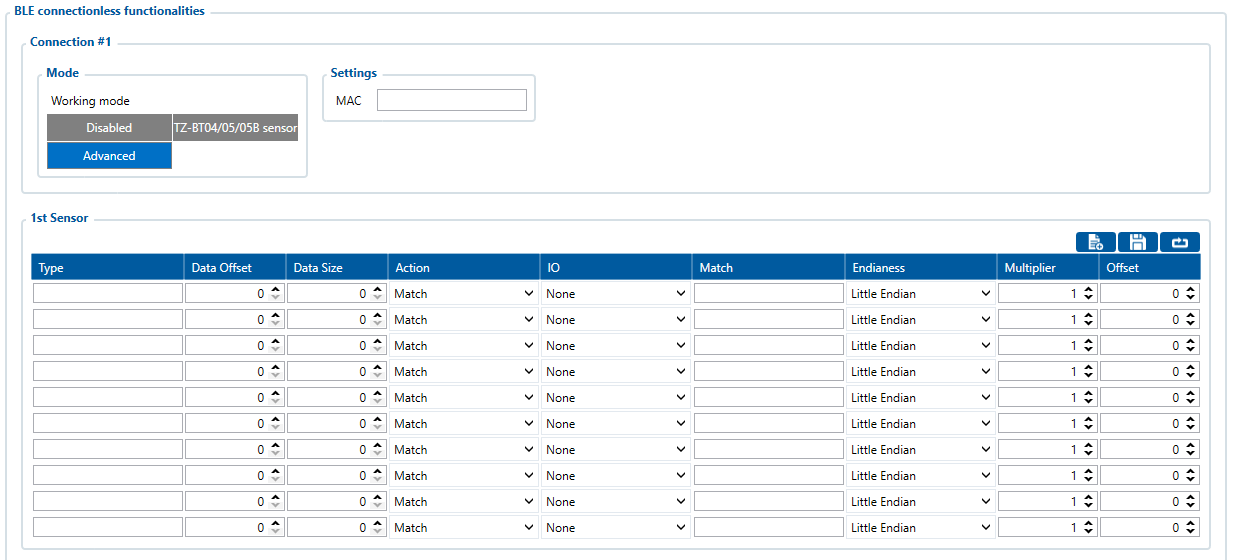
When Advanced mode is selected a table with configurable parameters will appear.

- Type – EIR data type. This parameter will indicate which type to look for and work with. Note: We have also added type with value 0xFE which will indicate to work with a whole data packet and not just a single data type.
- Data Offset – start index of data we are interested in.
- Data Size – size of the data we are interested in.
- Action – two actions are possible: Match and Save. Match means that we want to perform a validation of certain data. Save means that we want to get certain data and later save it to an AVL record.
- IO – tells which IO element's data will be saved to.
- Match – hex string to be matched with BLE sensor data. Used only with Match action.
- Endianness – endianness of data: little endian (ex. 0x1122) or big endian (ex. 0x2211). Used only with Save action.
- Multiplier – value to be used to multiply output data. Used only with Save action.
- Offset – value to be added to output data. Used only with Save action.
How to correctly configure the Bluetooth® LE solutions, can be found here:
Supported Sensors List
This list shows the supported BLE sensors and where their Presets can be found in the configurator to use those sensors with FMB devices. The prests and sensors have been fully tested by Teltonika and are confirmed to work properly.
While following the steps showed in the images below, you can find the supported sensors in our Configurator.
In the Configurator, find the Bluetooth® 4.0 Settings menu, select the advanced sensors mode which was mentioned before. The following window should appear.

At the top right corner, you should see the following Buttons, press on the first one from the left.

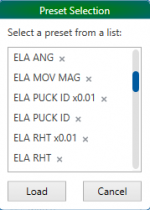
After the named Button was pressed the list with all supported sensors and the configuration presets should appear.

Select your sensor and click load. The correct configuration and recommended settings will appear in the configuration.

The supported sensors are listed below:
- EYE Sensor
- BLE TPMS -Tire Pressure Monitoring System.
- Efento Humidity BLE sensors (version 2.2 and 4 presets)
- ELA ANG (Angle)
- ELA MOV AG (Movement and Angle)
- ELA PUCK ID (ID)
- ELA RHT (Temperature and Humidity)
- ELA T (Temperature)
- ELA MOV MAG (Movement Magnetic)
- Escort Fuel BLE sensors
- Escort luminosity BLE sensors
- Escort Temperature BLE sensors
- S1 BLE Motion, Humidity and Temperature Sensors
- Technoton Wireless fuel level sensors
- TZ-BT04 Temperature and Humidity Sensors
- TZ-BT05 Temperature and Humidity Sensors
