FOTA Desktop: Difference between revisions
No edit summary |
|||
| (43 intermediate revisions by 9 users not shown) | |||
| Line 3: | Line 3: | ||
Teltonika fleet management devices support the following FOTA solutions: | Teltonika fleet management devices support the following FOTA solutions: | ||
==FOTA | == How to access FOTA Desktop licensing server == | ||
To use FOTA Desktop application it has to access the licensing server which can be reached via the domain address '''[https://api https://api.teltonika.lt]''' and HTTPS port 443, so if your network has HTTPS proxy service or is blocking outgoing traffic – make sure that the licensing server can be reached. | |||
==FOTA 3.x.x (lite) - desktop application== | |||
1. To receive FOTA desktop app installation file contact the support or your sales manager. | |||
FOTA | 2. Download and install FOTA desktop application: 3.4.x. or a later version. | ||
3. Run FOTA desktop app, copy your hardware key, and send it to the support or sales manager to receive FOTA desktop license. | |||
FOTA | 4. Enter License key and press 'OK' button. | ||
[[File:FOTA Desktop license.png|thumb|alt=|left|436x436px]] | |||
<br><br><br><br><br><br><br><br><br><br><br><br> | |||
5. To manually add devices to your FOTA database, click the "+" button in the Teltonika FOTA main window and enter the required device information. Also, you can import a list of devices using a CSV file.[[File:Add FOTA desk device.png|left|thumb|617x617px]] | |||
<br><br><br><br><br><br><br><br><br><br> | |||
6. To update the device configuration, select devices from the list | |||
[[File:FOTA DESK device.png|left|thumb|798x798px]] | |||
<br><br><br><br><br><br>then select the configuration file and click ‘Start Upload' button: | |||
<br> | |||
[[File:FOTA DESK CDF update.png|left|thumb]] | |||
<br><br><br><br><br><br><br><br> | |||
8. After successful configuration update you will see object status ‘Completed’ | |||
9. To update the device firmware, select devices from the list, then select the firmware file and click ‘Start Upload' button<br>10. After successful firmware update you will see object status ‘Completed’ | |||
'''Notice:''' | |||
FOTA Desktop requires to configure SMS service. | |||
FOTA 3 is much easier to use than FOTA 2 because it has its own database and doesn't require any SQL server. | |||
IMEIS in Fota 3.4.x, as well as FOTA 2.x, must be licensed in FOTA WEB server | |||
FOTA allows user to send push SMS to external device in order to connect to FOTA desktop app. | |||
'''Compliant devices:''' | |||
*Most FMxxxx devices | |||
==Additional information== | |||
{{{EOL|For EOL policy please refer to link [https://teltonika-gps.com/support/eol-products here].}}} | |||
[[Category:EOL Products]] | |||
Latest revision as of 11:55, 29 October 2024
Main Page > EOL Products > FOTA DesktopFOTA stands for "firmware over the air".
Teltonika fleet management devices support the following FOTA solutions:
How to access FOTA Desktop licensing server
To use FOTA Desktop application it has to access the licensing server which can be reached via the domain address https://api.teltonika.lt and HTTPS port 443, so if your network has HTTPS proxy service or is blocking outgoing traffic – make sure that the licensing server can be reached.
FOTA 3.x.x (lite) - desktop application
1. To receive FOTA desktop app installation file contact the support or your sales manager.
2. Download and install FOTA desktop application: 3.4.x. or a later version.
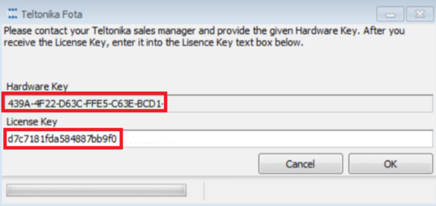
3. Run FOTA desktop app, copy your hardware key, and send it to the support or sales manager to receive FOTA desktop license.
4. Enter License key and press 'OK' button.

5. To manually add devices to your FOTA database, click the "+" button in the Teltonika FOTA main window and enter the required device information. Also, you can import a list of devices using a CSV file.

6. To update the device configuration, select devices from the list

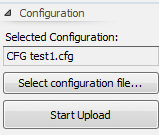
then select the configuration file and click ‘Start Upload' button:

8. After successful configuration update you will see object status ‘Completed’
9. To update the device firmware, select devices from the list, then select the firmware file and click ‘Start Upload' button
10. After successful firmware update you will see object status ‘Completed’
Notice:
FOTA Desktop requires to configure SMS service.
FOTA 3 is much easier to use than FOTA 2 because it has its own database and doesn't require any SQL server.
IMEIS in Fota 3.4.x, as well as FOTA 2.x, must be licensed in FOTA WEB server
FOTA allows user to send push SMS to external device in order to connect to FOTA desktop app.
Compliant devices:
- Most FMxxxx devices
Additional information
For EOL policy please refer to link here.
