Template:FMU126 Testing RS-232 TCP Link Mode: Difference between revisions
m edit the HEX strign deleting "$" |
|||
| (2 intermediate revisions by the same user not shown) | |||
| Line 24: | Line 24: | ||
(Please keep in mind that external device RX cable needs to be connected to {{{model|FMU1YX}}} device TX cable and external device TX cable connected to {{{model|FMU1YX}}} RX cable.) | (Please keep in mind that external device RX cable needs to be connected to {{{model|FMU1YX}}} device TX cable and external device TX cable connected to {{{model|FMU1YX}}} RX cable.) | ||
[[Image: | [[Image:FMB125_Hercules_window 1.1.png|600px|none]] | ||
Here you have to choose TCP Server section from the upper menu. In the marked fields: | Here you have to choose TCP Server section from the upper menu. In the marked fields: | ||
| Line 35: | Line 35: | ||
==Step 4. Sending from server to external device over Hercules== | ==Step 4. Sending from server to external device over Hercules== | ||
When sending a message from Hercules, first you have to pack it in Codec.12 format. If you want to send a message to external device over {{{model|FMU1YX}}} from server, a packed message should be pasted into the Send field in Hercules (Figure 2, marked field 3). The HEX format box should be unchecked if the text is in HEX format (for example: | When sending a message from Hercules, first you have to pack it in Codec.12 format. If you want to send a message to external device over {{{model|FMU1YX}}} from server, a packed message should be pasted into the Send field in Hercules (Figure 2, marked field 3). The HEX format box should be unchecked if the text is in HEX format (for example: 00000000000000260C01050000001e48656c6c6f2c206c657473207465737420544350206c696e6b206d6f64650100001aef etc.). When you press Send button, you will see your message in the Sent data field (Terminal). | ||
If the message is sent successfully to {{{model|FMU1YX}}}, you can check it in the Terminal window. | If the message is sent successfully to {{{model|FMU1YX}}}, you can check it in the Terminal window. | ||
| Line 46: | Line 45: | ||
Open Hercules application and just type your message in the marked field (3) and press Send button (4). If sent successfully, you will see it in Hercules Sent data field (Figure 4). For example test text will be sent: Hello, lets test TCP link mode. In Codec.12 format it looks: 00000000000000260C01050000001e48656c6c6f2c206c657473207465737420544350206c696e6b206d6f64650100001aef | Open Hercules application and just type your message in the marked field (3) and press Send button (4). If sent successfully, you will see it in Hercules Sent data field (Figure 4). For example test text will be sent: Hello, lets test TCP link mode. In Codec.12 format it looks: 00000000000000260C01050000001e48656c6c6f2c206c657473207465737420544350206c696e6b206d6f64650100001aef | ||
[[Image: | [[Image:hercules_3-2-8_JF1VyeMy8I.jpg|800px|none]] | ||
On terminal you should now receive message: | On terminal you should now receive message: | ||
Latest revision as of 14:39, 22 May 2020
Step 1. Understanding what is FMU1YX RS232 TCP Link mode
In this mode link with external device (for example PC) using text messages can be established. FMU1YX has to be connected to the external device through RS232. Any string of data coming to RS232 will be routed to server (if link is currently active). Messages that are exchanged between FMU device and server, have to be packed in Codec.12 format. Here for TCP link establishment we will be using Hercules. For sending messages from external device to server over FMU1YX Terminal will be used.
Step 2. Setting parameters in configurator for TCP Ascii mode test
First of all, in the FMU1YX configurator you have to set parameters for RS232 in global parameters window.
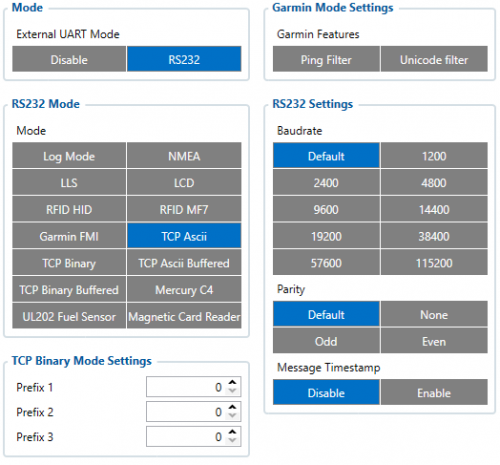
Here in RS232 settings section Baudrate can be chosen to any available. Mode has to be chosen to TCP Ascii.
2.1. Message Timestamp
Message Timestamp parameter is used to determine if it is necessary to include timestamp in RS232 TCP packet when sending to server. If parameter is Enabled, then Codec 13 is used for data sending. Otherwise, Codec 12 is used.
You can also use RS485 which is also suitable for Ascii TCP Link mode. In order to make a link between FMU1YX device and server, Domain and Target Server Port have to be set in the working device profile, GPRS data sending Settings section. When right parameters are set, you can save the configuration to FMU1YX device.
Step 3. Establishing FMU1YX test link with server through Hercules
In this case we have a PC that is considered to be a server and an external device at the same time. When FMU1YX is configured and connected to the external device, next what we have to do is to start Hercules (Figure 2) which is in server side and will be used for sending/receiving messages.
(Please keep in mind that external device RX cable needs to be connected to FMU1YX device TX cable and external device TX cable connected to FMU1YX RX cable.)
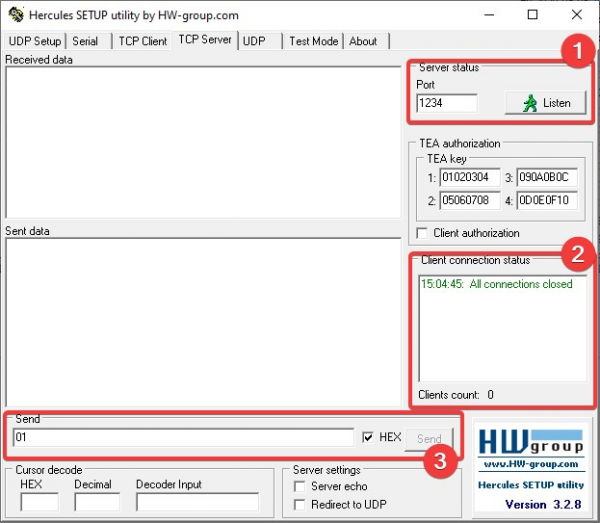
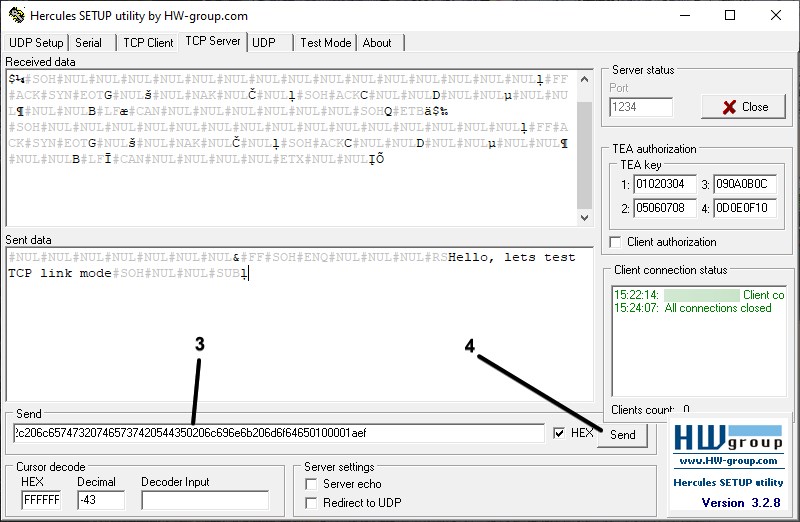
Here you have to choose TCP Server section from the upper menu. In the marked fields:
1. Write your server (PC) port and press Listen button;
2. In the Client connection status you will be able to see if a connection between server and FMU device has started successfully;
3. In the Send field you can write a message that is packed in Codec.12 format which will be sent to FMU1YX device.
Step 4. Sending from server to external device over Hercules
When sending a message from Hercules, first you have to pack it in Codec.12 format. If you want to send a message to external device over FMU1YX from server, a packed message should be pasted into the Send field in Hercules (Figure 2, marked field 3). The HEX format box should be unchecked if the text is in HEX format (for example: 00000000000000260C01050000001e48656c6c6f2c206c657473207465737420544350206c696e6b206d6f64650100001aef etc.). When you press Send button, you will see your message in the Sent data field (Terminal). If the message is sent successfully to FMU1YX, you can check it in the Terminal window.
Connect Port ½ cable one end to RS232 RX/TX cables on FMU1YX device and then connect USB side to computer. Please find which port is used for Port ½ cable in device manager. Please select correct COM Port (1). In this case we use COM21. Then press connect (2).
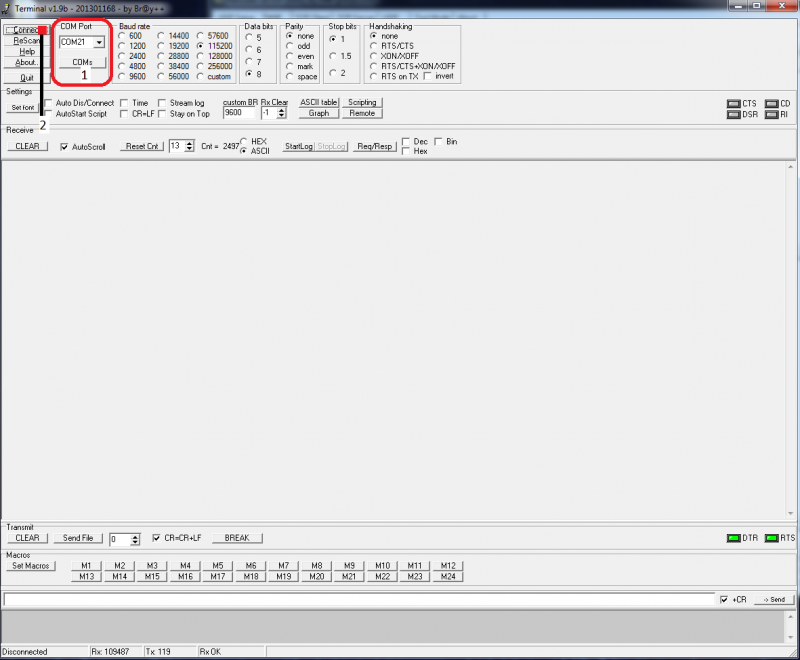
Open Hercules application and just type your message in the marked field (3) and press Send button (4). If sent successfully, you will see it in Hercules Sent data field (Figure 4). For example test text will be sent: Hello, lets test TCP link mode. In Codec.12 format it looks: 00000000000000260C01050000001e48656c6c6f2c206c657473207465737420544350206c696e6b206d6f64650100001aef
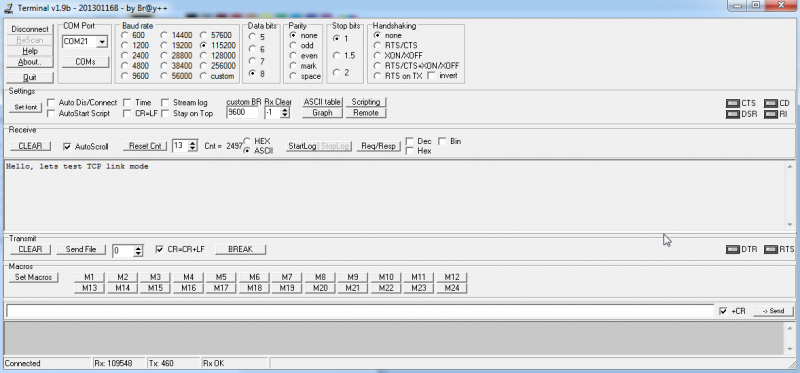
On terminal you should now receive message:
Step 5. Sending from external device to server over Terminal
For testing data sending from external device to server, enter text you want to send on Terminal and press send.
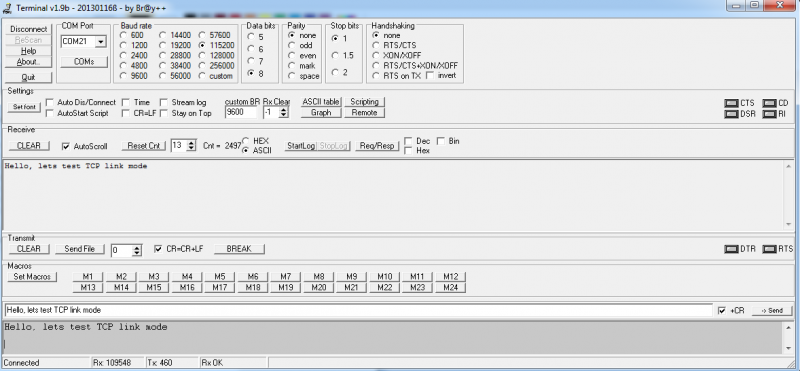
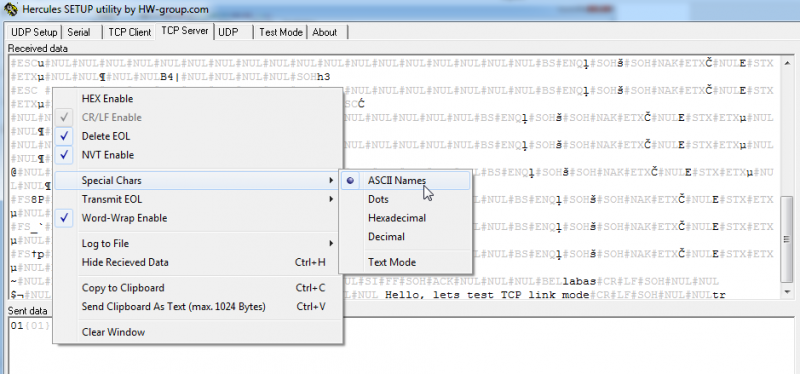
You can check if data is received to server in Hercules. Sample text: Hello, lets test TCP link mode. Please keep in mind, that special chars (ASCII Names) needs to be marked.
