Template:TLS&DTLS encryption & certificate generation: Difference between revisions
MindaugasK (talk | contribs) (Created page with "Requirements to perform the encryption and generation of the certificate: *Server with implemented TLS/DTLS functionality *OPEN VPN (or any other) software to generate certifi...") |
MindaugasK (talk | contribs) No edit summary |
||
| (7 intermediate revisions by the same user not shown) | |||
| Line 1: | Line 1: | ||
Requirements to perform the encryption and generation of the certificate: | Requirements to perform the encryption and generation of the certificate: | ||
*Server with implemented TLS/DTLS functionality | *Server with implemented TLS/DTLS functionality | ||
* | *OPENSSL (or any other) software to generate certificate key | ||
*Firmware FMB.Ver.03.27.xx | *Firmware FMB.Ver.03.27.xx | ||
== | ==OpenSSL software download & installation process== | ||
Download OpenSSL from https://wiki.openssl.org/index.php/Binaries | |||
[[File:Openssl.png]] | |||
Figure 1 | Figure 1: Website link to OpenSSL software download | ||
Once the Wiki page is open, click on the highlighted link in Figure 1 - https://slproweb.com/products/Win32OpenSSL.html. A new page will open with the multiple downloadable files. | |||
Download the latest available OpenSSL software (light version) with .exe or .msi extensions, in this case the latest one is currently "Win64 OpenSSL v3.0.5 Light". Click on EXE and the file download will start | |||
[[File:Openssl location.png|500px]] | |||
Figure 2: OpenSSL download links | |||
Once the file is downloaded, open it and the installation process will start. | |||
Upon installation, it is advisable to install the software into the default location, however this can be chosen to the user's preference. | |||
'''The installation path has to be remembered as it will be required in the later stages.''' | |||
[[File:Openssl install1.png|500px]] | |||
Figure | Figure 3: Install location | ||
Use of /bin directory is advisable for intallation process, because "Windows system directory" can become tricky and overloaded. | |||
[[File:Openssl install3.png|500px]] | |||
Figure 4: Use of /bin directory as preference. | |||
Once installation process is complete, it is required to set up a path to the system preferences so that OpenSSL install location could be identified. | |||
Press Windows key and type "This PC", a folder with computer visible drives will open. Once there, right-mouse click on the empty space will bring options window, where the user is required to click on "Properties". | |||
[[File:Properties window.png|500px]] | |||
Figure | Figure 5: This PC window with options pop up. | ||
Once clicked, a new window with system information will open, in there select "Advanced System Settings". | |||
[[File:System page.png|500px]] | |||
Figure | Figure 6: System Information window. | ||
After selecting "Advanced System Settings", a new window will open called "System Properties". In there the user is required to select "Environmental Variables" | |||
[[File:System properties.png|500px]] | |||
Figure | Figure 7: System Properties window. | ||
A new environmental variables window will open, in here all system paths will be described. Press "New" under System Variables. | |||
[[File:Env Variables.png|500px]] | |||
Figure 8: Environmental Variables window. | |||
New window will open, under name, enter "Path" and under location enter the same location chosen from Figure 3 during installation process and add \bin at the end. In this case, it is C:\Program Files\OpenSSL-Win64\bin. Once all information is entered, press OK. | |||
[[File:New variable.png|500px]] | |||
Figure 9: Creating new path variable. | |||
A new path will be created in the System Variables window. Once this is done, press OK once again on the Environment Variables window. | |||
[[File:New path.png|500px]] | |||
Figure 10: New path variable added. | |||
==TLS certificate generation process== | |||
Figure 12 | Open command prompt by pressing "Windows" key and typing cmd, once the icon is shown, right-click on it and select "Run as administrator". | ||
[[File:Cmd run.png|500px]] | |||
Figure 11: Running CMD as an administrator. | |||
A new CMD window will open, in order to test if OpenSSL is working, type in openssl and press "Enter" button. It should display some help text with various different commands. If commands are not displayed and instead theres a text "openssl command is not recognized", return to previous steps and see if the path in Environmental Variables is set correctly. | |||
[[File:Openssl check.png|500px]] | |||
Figure 12: Installation check | |||
Once the check is successfull, type in the following commands: | |||
*cd C:\Program Files\OpenSSL-Win64 | |||
*mkdir ssl | |||
*cd ssl | |||
Once this is done, your Command Prompt window should look like this: | |||
[[File:Cmd command1.png|500px]] | |||
Figure 13: Navigating to the ssl folder inside of OpenSSL | |||
Type in the following commands: | |||
Generate private key | |||
*openssl genrsa -out private-key.pem 4096 | |||
Generate public key | |||
*openssl rsa -in private-key.pem -pubout -out public-key.pem | |||
Generate certificate | |||
*openssl req -new -x509 -key private-key.pem -out cert.pem | |||
Once these commands are entered, the window should look something like this: | |||
[[File:Certificate generation1.png|500px]] | |||
Figure 14: Certificate generation no.1 | |||
Upon entering the last command, the user will be prompted to enter specific details to their company according to the instructions below | |||
*'''Country name''' - Use the two-letter code without punctuation for country, for example: US or LT | |||
*'''State or Province''' - Spell out the state completely; do not abbreviate the state or province name, for example: California | |||
*'''Locality or City''' - The Locality field is the city or town name, for example: Frankfurt, Warsawa, Vilnius. Do not abbreviate e.g. Saint Louis, not St. Louis | |||
*'''Company''' - If the company or department has an &,@, or any other symbol, using the shift key in its name, the symbol must be spelled out or omitted, in order to enroll. | |||
*'''Organisational Unit''' - The Organisational Unit (OU) field is the name of the department or organization unit making the request. To skip the OU field, press Enter on the keyboard. | |||
*'''Common Name''' - The Common Name is the Host + Domain Name. It looks like "www.example.com" or "example.com". | |||
*'''Email Address''' - E-mail address of the user. | |||
For example: | |||
[[File:Certificate generation2.png|500px]] | |||
Figure 15: Company details example. | |||
To finalize certificate creation, copy the certificate cert.pem and rename it to root.pem using command below | |||
*Windows: copy cert.pem root.pem - Linux: cp cert.pem root.pem | |||
[[File:Certificate generation3.png|500px]] | |||
Figure 16: Copying certificate.pem into root.pem file. | |||
In total, there should be 4 files inside of the SSL directory created. | |||
[[File:Certificate generation4.png|500px]] | |||
Figure 17: SSL folder with different certification files created by issuing commands. | |||
==Certificate uploading to Server== | |||
==Certificate uploading to Device== | |||
==Testing the TLS encryption between the server and the device== | |||
Latest revision as of 14:55, 14 July 2022
Requirements to perform the encryption and generation of the certificate:
- Server with implemented TLS/DTLS functionality
- OPENSSL (or any other) software to generate certificate key
- Firmware FMB.Ver.03.27.xx
OpenSSL software download & installation process
Download OpenSSL from https://wiki.openssl.org/index.php/Binaries
Figure 1: Website link to OpenSSL software download
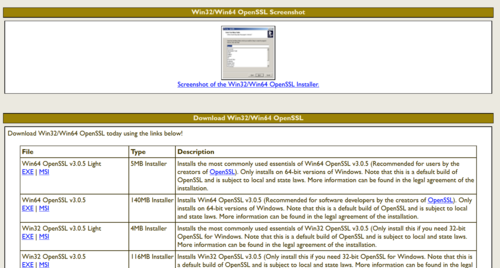
Once the Wiki page is open, click on the highlighted link in Figure 1 - https://slproweb.com/products/Win32OpenSSL.html. A new page will open with the multiple downloadable files.
Download the latest available OpenSSL software (light version) with .exe or .msi extensions, in this case the latest one is currently "Win64 OpenSSL v3.0.5 Light". Click on EXE and the file download will start
Figure 2: OpenSSL download links
Once the file is downloaded, open it and the installation process will start.
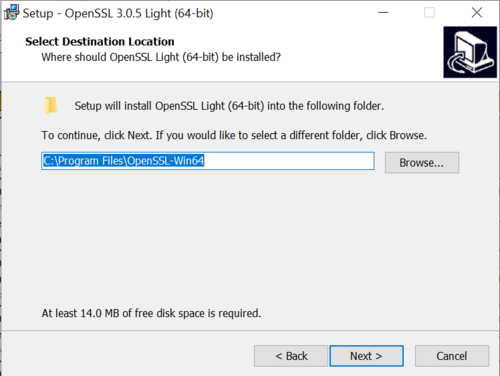
Upon installation, it is advisable to install the software into the default location, however this can be chosen to the user's preference.
The installation path has to be remembered as it will be required in the later stages.
Figure 3: Install location
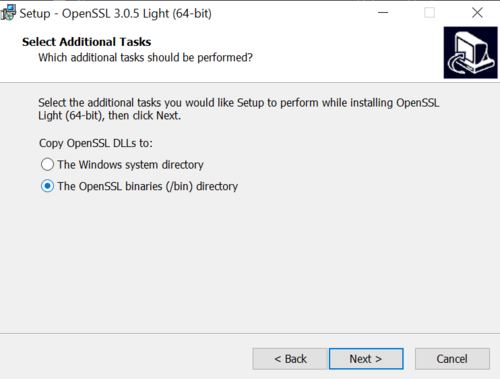
Use of /bin directory is advisable for intallation process, because "Windows system directory" can become tricky and overloaded.
Figure 4: Use of /bin directory as preference.
Once installation process is complete, it is required to set up a path to the system preferences so that OpenSSL install location could be identified.
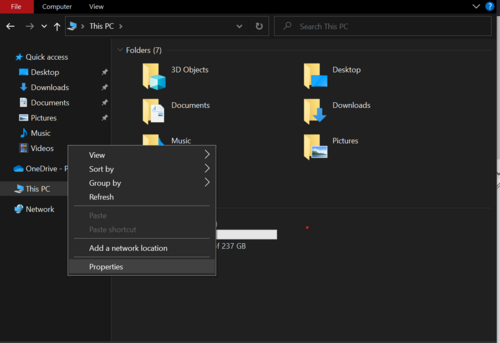
Press Windows key and type "This PC", a folder with computer visible drives will open. Once there, right-mouse click on the empty space will bring options window, where the user is required to click on "Properties".
Figure 5: This PC window with options pop up.
Once clicked, a new window with system information will open, in there select "Advanced System Settings".
Figure 6: System Information window.
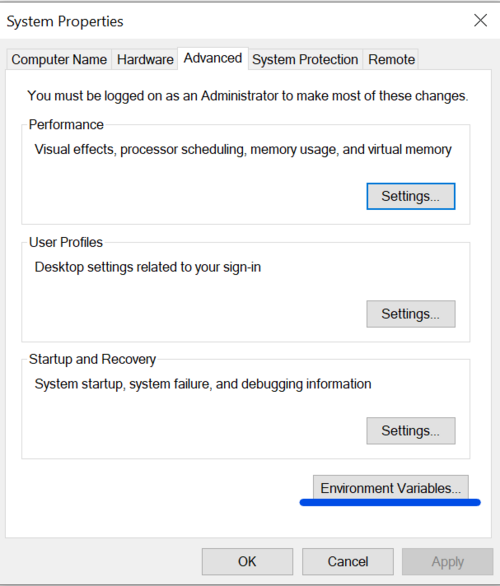
After selecting "Advanced System Settings", a new window will open called "System Properties". In there the user is required to select "Environmental Variables"
Figure 7: System Properties window.
A new environmental variables window will open, in here all system paths will be described. Press "New" under System Variables.
Figure 8: Environmental Variables window.
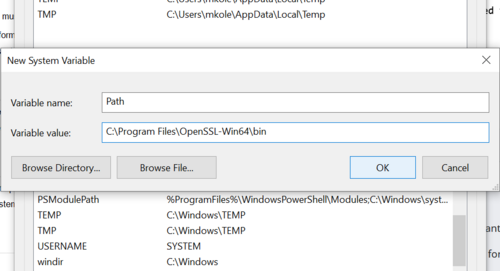
New window will open, under name, enter "Path" and under location enter the same location chosen from Figure 3 during installation process and add \bin at the end. In this case, it is C:\Program Files\OpenSSL-Win64\bin. Once all information is entered, press OK.
Figure 9: Creating new path variable.
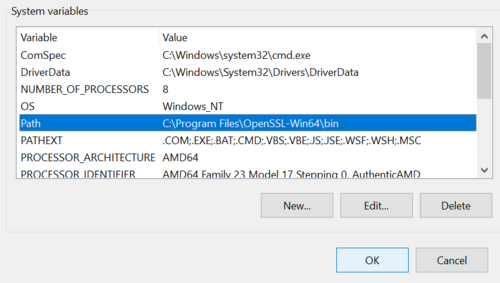
A new path will be created in the System Variables window. Once this is done, press OK once again on the Environment Variables window.
Figure 10: New path variable added.
TLS certificate generation process
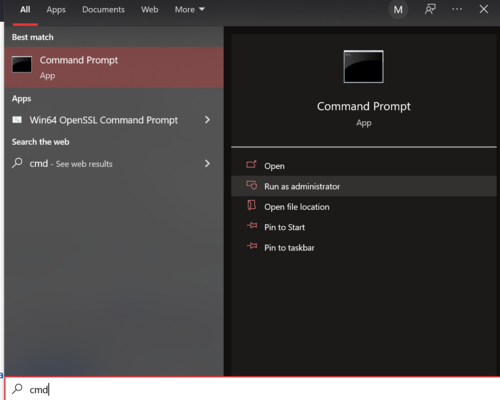
Open command prompt by pressing "Windows" key and typing cmd, once the icon is shown, right-click on it and select "Run as administrator".
Figure 11: Running CMD as an administrator.
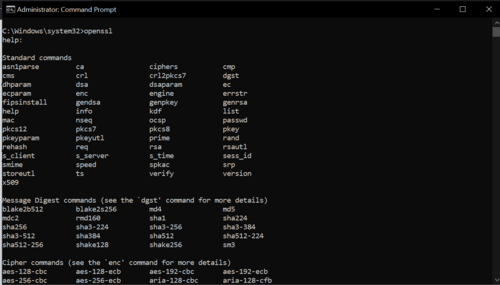
A new CMD window will open, in order to test if OpenSSL is working, type in openssl and press "Enter" button. It should display some help text with various different commands. If commands are not displayed and instead theres a text "openssl command is not recognized", return to previous steps and see if the path in Environmental Variables is set correctly.
Figure 12: Installation check
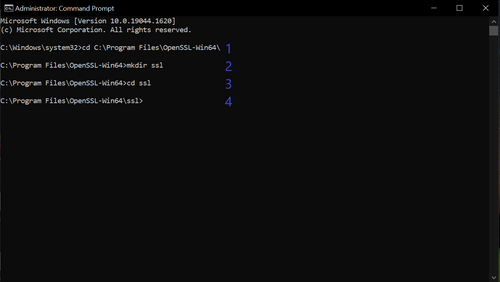
Once the check is successfull, type in the following commands:
- cd C:\Program Files\OpenSSL-Win64
- mkdir ssl
- cd ssl
Once this is done, your Command Prompt window should look like this:
Figure 13: Navigating to the ssl folder inside of OpenSSL
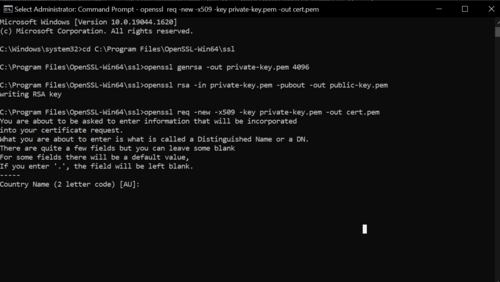
Type in the following commands:
Generate private key
- openssl genrsa -out private-key.pem 4096
Generate public key
- openssl rsa -in private-key.pem -pubout -out public-key.pem
Generate certificate
- openssl req -new -x509 -key private-key.pem -out cert.pem
Once these commands are entered, the window should look something like this:
Figure 14: Certificate generation no.1
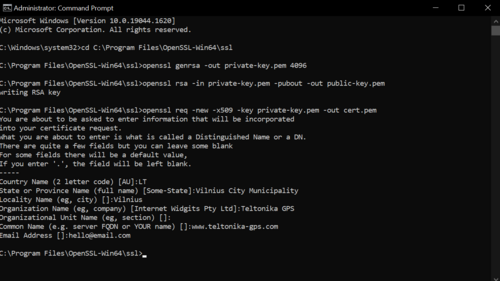
Upon entering the last command, the user will be prompted to enter specific details to their company according to the instructions below
- Country name - Use the two-letter code without punctuation for country, for example: US or LT
- State or Province - Spell out the state completely; do not abbreviate the state or province name, for example: California
- Locality or City - The Locality field is the city or town name, for example: Frankfurt, Warsawa, Vilnius. Do not abbreviate e.g. Saint Louis, not St. Louis
- Company - If the company or department has an &,@, or any other symbol, using the shift key in its name, the symbol must be spelled out or omitted, in order to enroll.
- Organisational Unit - The Organisational Unit (OU) field is the name of the department or organization unit making the request. To skip the OU field, press Enter on the keyboard.
- Common Name - The Common Name is the Host + Domain Name. It looks like "www.example.com" or "example.com".
- Email Address - E-mail address of the user.
For example:
Figure 15: Company details example.
To finalize certificate creation, copy the certificate cert.pem and rename it to root.pem using command below
- Windows: copy cert.pem root.pem - Linux: cp cert.pem root.pem
Figure 16: Copying certificate.pem into root.pem file.
In total, there should be 4 files inside of the SSL directory created.
Figure 17: SSL folder with different certification files created by issuing commands.


