DSM Configuration: Difference between revisions
| (20 intermediate revisions by 4 users not shown) | |||
| Line 1: | Line 1: | ||
__TOC__ | __TOC__ | ||
==Device configuration== | ==DSM calibration== | ||
If it is the first DSM launch, please make sure to calibrate the device, and change the important settings, to ensure the correct device working: [[DSM Calibration]] | |||
==Device configuration for FMx640== | |||
On this page, you will be able to find information about the gerenal configuration and connection of DSM camera with the FMX640 tracking device. Information about different parameters required to set up the DSM camera are also described in this page. To start off, firstly follow the instructions on how to connect DSM camera with the FMX640 device, once the camera is connected to the tracking device, connect FMX640 to computer and open the required configurator application. Select your device and follow instructions below: | On this page, you will be able to find information about the gerenal configuration and connection of DSM camera with the FMX640 tracking device. Information about different parameters required to set up the DSM camera are also described in this page. To start off, firstly follow the instructions on how to connect DSM camera with the FMX640 device, once the camera is connected to the tracking device, connect FMX640 to computer and open the required configurator application. Select your device and follow instructions below: | ||
| Line 20: | Line 24: | ||
[[File:DSM server.jpg|300px]] | [[File:DSM server.jpg|300px]] | ||
==DSM configuration for FMx650== | |||
'''(!) Required firmware version - 03.00.14.Rev.114'''. [[DSM_Firmware_errata|Firmware errata.]] | |||
*Make sure '''Data Protocol''' is set to [[Codec#Codec_8_Extended | Codec 8 Extended]] | |||
[[Image:Data_protocol.gif|300px]] | |||
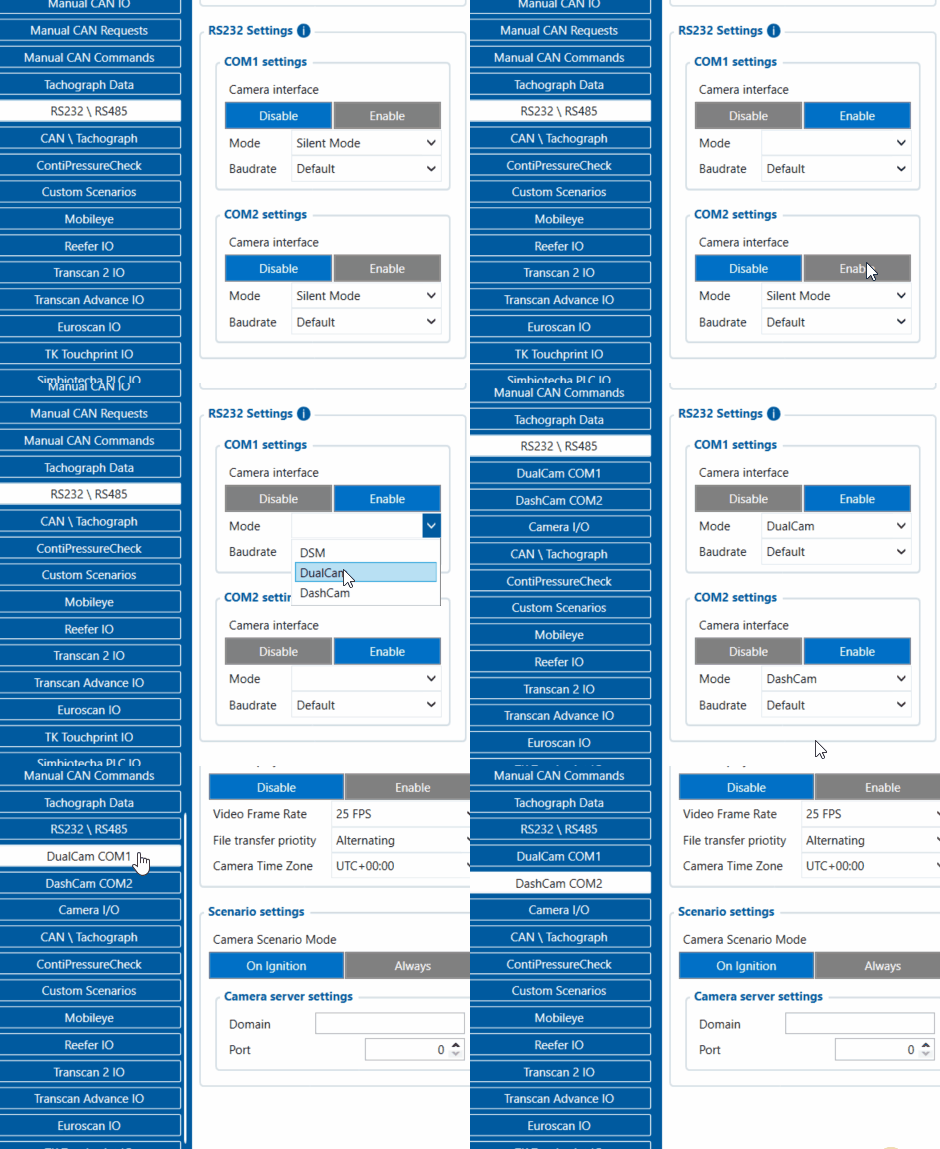
*In ''RS232 \ RS485 settings tab'', make sure to enable '''Camera interface''' by "Enable", and select '''DSM''' in the Mode drop-down menu, afterwards '''DSM COM1''' and '''Camera I/O''' should appear in the tab list. | |||
[[Image:DSM config.gif|600px]] | |||
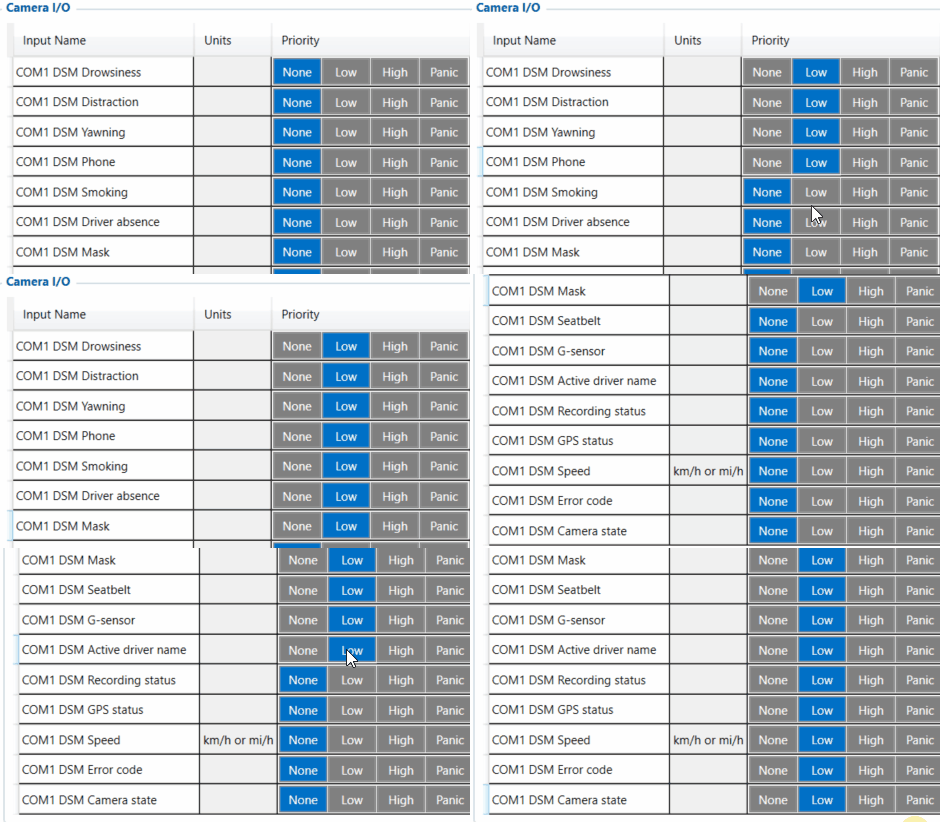
*Make sure to change '''Camera I/O''' camera state '''Priorities''' to ''Low'' | |||
''' | |||
[[File:DSM IO.gif|500px]] | |||
''' | |||
*In appeared ''DSM COM1'' tab, make sure to '''configure everything by your needs''', and do not forget to complete the '''"Domain"''' and '''"Port"''' settings in ''File upload settings'' | |||
[[File:DSM COM1.png|500px]] | |||
*'''''NOTE:''''' ''This is a base setup for the device to work properly. Other device configuration is made according to your needs. | |||
===Connecting two cameras simultaneously for FMx650=== | |||
------------------ | |||
The new feature for FMx650 DSM configuration, which is available from '''03.00.14.Rev.114 iCamera''' allows you to connect two of your cameras at once. Method for connection and configuration stays the same, for this you are only required to choose '''two''' cameras in '''"RS232 \ RS485"''' tab from the configurator. | |||
In the new functionality, you are able to connect any combo of the cameras by your wish, as an example: you are able to connect ''DSM/Dualcam'', ''DashCam/DualCam'', ''DSM/DSM'', ''DualCam/DualCam'' and etc. | |||
[[File:Twincamera.gif|500px]] | |||
==General settings== | ==General settings== | ||
| Line 50: | Line 86: | ||
*Vibration - Upon Drowsiness event activation, vibration can also be activated. | *Vibration - Upon Drowsiness event activation, vibration can also be activated. | ||
*Sensitivity - this parameter is for the Drowsiness sensitivity setting 1-3 (1- lowest, 3 - highest). | *Sensitivity - this parameter is for the Drowsiness sensitivity setting 1-3 (1- lowest, 3 - highest). | ||
*Automatic transmit - Transmits images | *Automatic transmit - Transmits images to the server when the event is active. Also has working speed parameter which sets the minimum required speed for the event to become enabled, leave 0 for this setting to be off. | ||
==Distraction== | ==Distraction== | ||
| Line 58: | Line 94: | ||
*Vibration - Upon Distraction event activation, vibration can also be activated. | *Vibration - Upon Distraction event activation, vibration can also be activated. | ||
*Sensitivity - this parameter is for the Distraction sensitivity setting 1-3 (1- lowest, 3 - highest). | *Sensitivity - this parameter is for the Distraction sensitivity setting 1-3 (1- lowest, 3 - highest). | ||
*Automatic transmit - Transmits images | *Automatic transmit - Transmits images to the server when the event is active. Also has working speed parameter which sets the minimum required speed for the event to become enabled, leave 0 for this setting to be off. | ||
*'''Please note''' that even if the distraction detection speed is set to 0 km/h, the function is not limited to activation above 10 km/h. The 10 km/h threshold is related to the auto-calibration process. | |||
==Phone== | ==Phone== | ||
| Line 66: | Line 103: | ||
*Vibration - Upon Phone event activation, vibration can also be activated. | *Vibration - Upon Phone event activation, vibration can also be activated. | ||
*Sensitivity - this parameter is for the Phone sensitivity setting 1-3 (1- lowest, 3 - highest). | *Sensitivity - this parameter is for the Phone sensitivity setting 1-3 (1- lowest, 3 - highest). | ||
*Automatic transmit - Transmits images | *Automatic transmit - Transmits images to the server when the event is active. Also has working speed parameter which sets the minimum required speed for the Phone event to become enabled, leave 0 for this setting to be off. | ||
==Smoking== | ==Smoking== | ||
| Line 74: | Line 111: | ||
*Vibration - Upon Smoking event activation, vibration can also be activated. | *Vibration - Upon Smoking event activation, vibration can also be activated. | ||
*Sensitivity - this parameter is for the Smoking sensitivity setting 1-3 (1- lowest, 3 - highest). | *Sensitivity - this parameter is for the Smoking sensitivity setting 1-3 (1- lowest, 3 - highest). | ||
*Automatic transmit - Transmits images | *Automatic transmit - Transmits images to the server when the event is active. Also has working speed parameter which sets the minimum required speed for the Smoking event to become enabled, leave 0 for this setting to be off. | ||
==Yawning== | ==Yawning== | ||
| Line 82: | Line 119: | ||
*Vibration - Upon Yawning event activation, vibration can also be activated. | *Vibration - Upon Yawning event activation, vibration can also be activated. | ||
*Sensitivity - this parameter is for the Yawing sensitivity setting 1-3 (1- lowest, 3 - highest). | *Sensitivity - this parameter is for the Yawing sensitivity setting 1-3 (1- lowest, 3 - highest). | ||
*Automatic transmit - Transmits footage to the server automatically upon event activation. Automatic transmission is triggered when yawning is detected at least twice within 1 minute. '''Note: DSM FW version needs to be 2.5.1.T2 or higher.''' | |||
*Working speed - Working speed parameter which sets the minimum required speed for the Smoking event to become enabled, leave 0 for this setting to be off. '''Note:''' This parameter does not have Automatic transmit parameter, therefore, upon activation, this event is not going to be configured to send images/audio to the server, however this setting can be activated in '''Event settings''' under Automatic transmit (Global) parameter. | *Working speed - Working speed parameter which sets the minimum required speed for the Smoking event to become enabled, leave 0 for this setting to be off. '''Note:''' This parameter does not have Automatic transmit parameter, therefore, upon activation, this event is not going to be configured to send images/audio to the server, however this setting can be activated in '''Event settings''' under Automatic transmit (Global) parameter. | ||
| Line 94: | Line 132: | ||
*Periodic image sending - Periodic image sending can be sent in order to send images to the server at a configurable time period. | *Periodic image sending - Periodic image sending can be sent in order to send images to the server at a configurable time period. | ||
*Image sending trigger - Triggers can be set in order to activate image sending. Crash/Towing/Idling/Geofence/Unplug/Green driving are actual features of the FMX640 family devices and are configured under '''[[FMC640_Features_settings | Features]] / [[FMC640_Accelerometer_Features_settings | Accelerometer Features]] / [[FMC640_Manual_Geofence_zones | Geofence]] / [[FMC640_Trip/Odometer_settings | Trip/Odometer]]''' Tabs. | *Image sending trigger - Triggers can be set in order to activate image sending. Crash/Towing/Idling/Geofence/Unplug/Green driving are actual features of the FMX640 family devices and are configured under '''[[FMC640_Features_settings | Features]] / [[FMC640_Accelerometer_Features_settings | Accelerometer Features]] / [[FMC640_Manual_Geofence_zones | Geofence]] / [[FMC640_Trip/Odometer_settings | Trip/Odometer]]''' Tabs. | ||
==Crash Detection Functionality using DOUT== | |||
'''The crash detection feature''' is a crucial capability provided by our device. It enhances evidential documentation through video or photo evidence in the event of a crash. However, activating this functionality necessitates a direct connection of the camera to a power source. Nonetheless, such a direct connection can lead to '''battery drainage'''. | |||
To circumvent this issue, we recommend utilizing DOUT and a relay for connection. This setup enables control via SMS or GPRS command, or through predefined scenarios within our device. By activating DOUT post-ignition, the camera receives power, allowing it to function and record evidence even after the ignition is turned off following a crash. '''For your convenience, the connection scheme can be found here: [[DSM First Start]]''' | |||
'''It is important to note that in the event of a fatal crash where fatalities may occur,''' we cannot guarantee the retrieval of video or photo evidence due to the severity of the accident. Moreover, both the camera and the device itself may sustain irreparable damage in such instances | |||
[[Category:DSM]] | [[Category:DSM]] | ||
Latest revision as of 10:33, 18 August 2025
Main Page > Video Solutions > DSM > DSM ConfigurationDSM calibration
If it is the first DSM launch, please make sure to calibrate the device, and change the important settings, to ensure the correct device working: DSM Calibration
Device configuration for FMx640
On this page, you will be able to find information about the gerenal configuration and connection of DSM camera with the FMX640 tracking device. Information about different parameters required to set up the DSM camera are also described in this page. To start off, firstly follow the instructions on how to connect DSM camera with the FMX640 device, once the camera is connected to the tracking device, connect FMX640 to computer and open the required configurator application. Select your device and follow instructions below:
- It is necessary to change Data Protocol to Codec 8 Extended in the "System" tab.
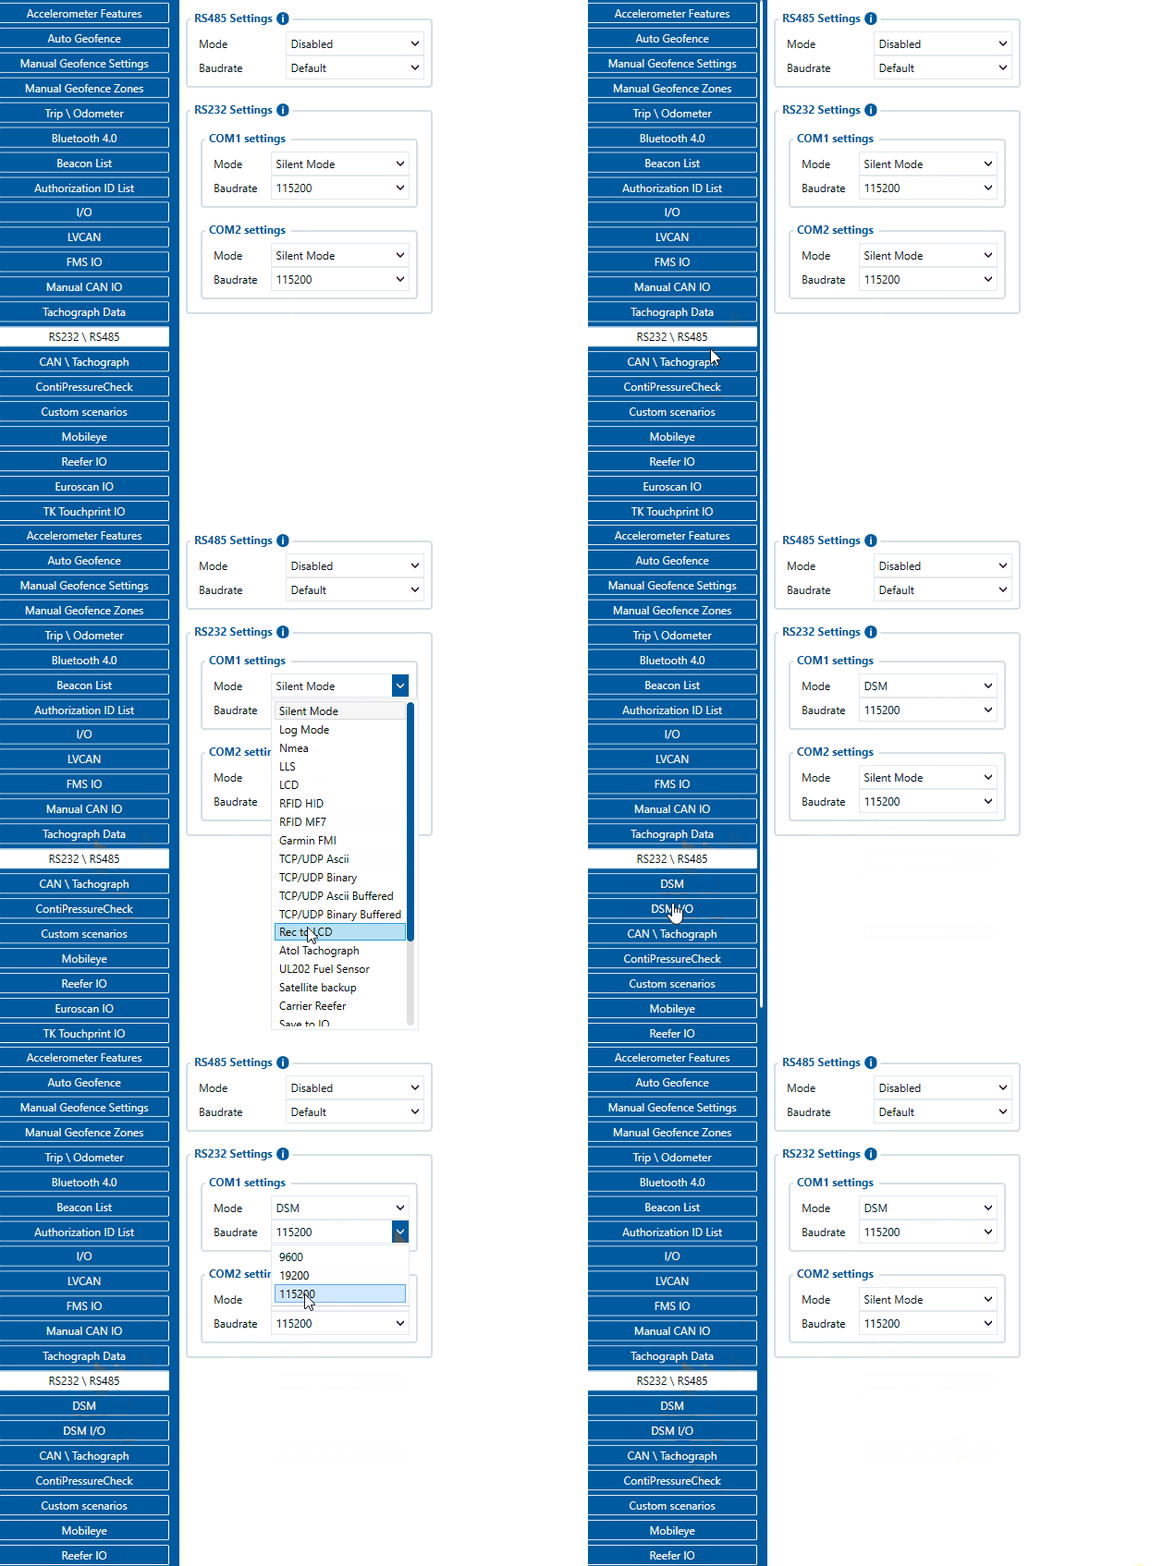
- In RS232\RS485 settings under RS232 Settings navigate to COM1 settings and in Mode parameter selection, open the drop-down menu and select DSM, please also keep the baudrate set to default which is 115200
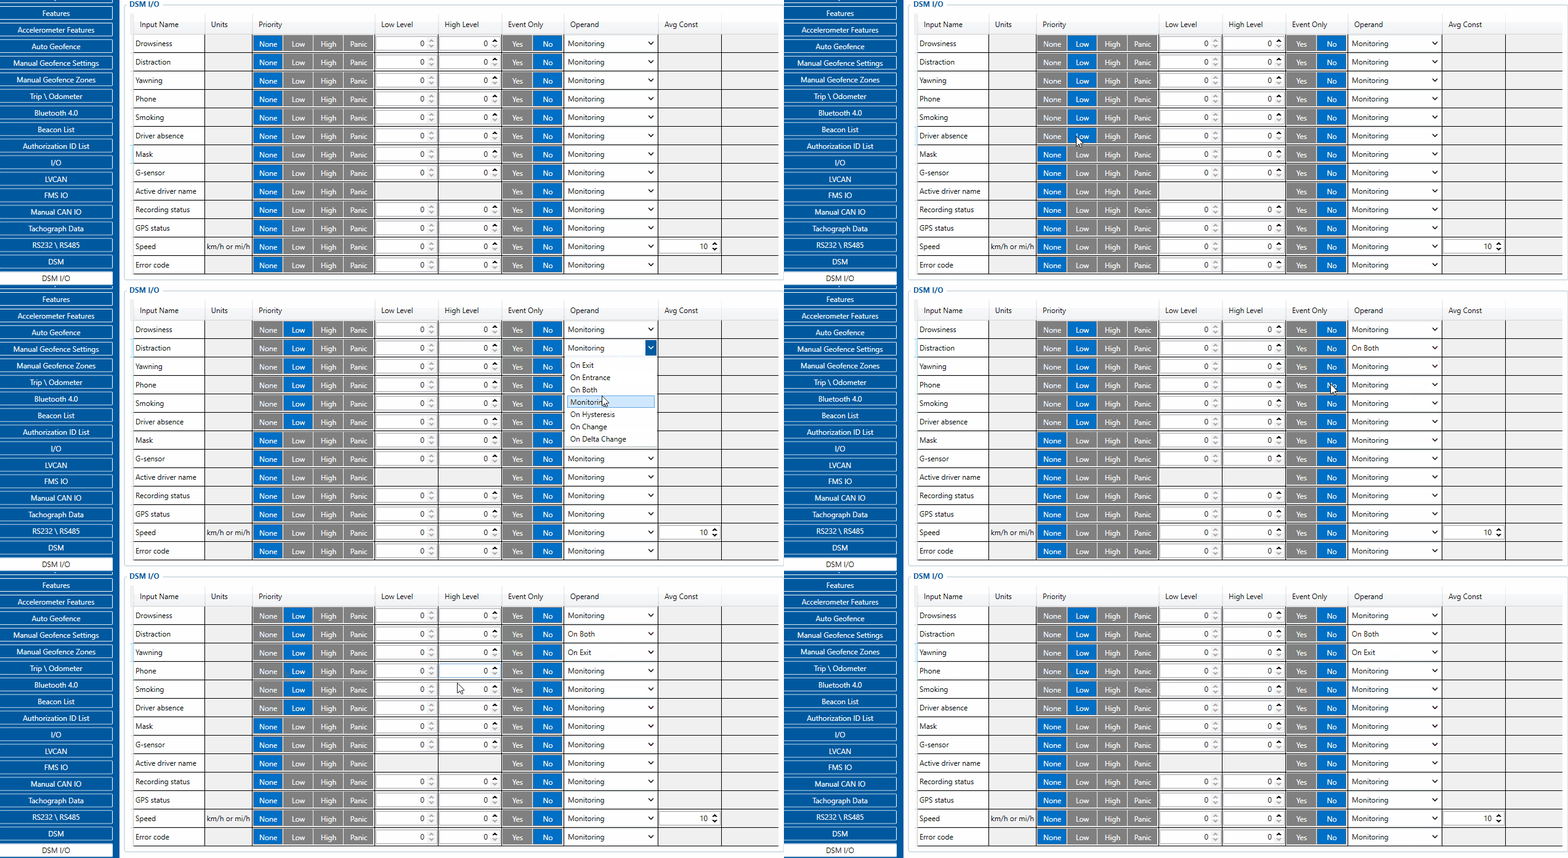
- Make sure to change DSM I/O feature Priorities to Low, High or Panic (Based on your needs). Also set operand and low/high settings in order to receive events based on specific conditions, e.g.: Yawning - Low priority - Low/High level 0 - Operand On Exit. This would mean that if the person yawns, the camera will detect this scenario, the parameter level will jump from 0 to 1 and will exit the configured high level which is set on exit. This will generate an event and send it to the configured server.
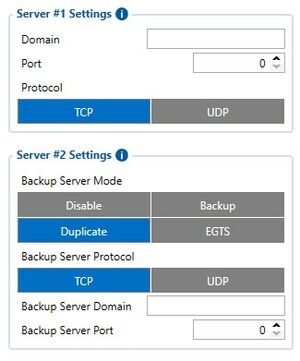
- In order to receive event data, a server has to be configured. Navigate to GPRS settings and enter the server details under Server #1 Settings. Details such as domain name and port number are required to be entered.
DSM configuration for FMx650
(!) Required firmware version - 03.00.14.Rev.114. Firmware errata.
- Make sure Data Protocol is set to Codec 8 Extended
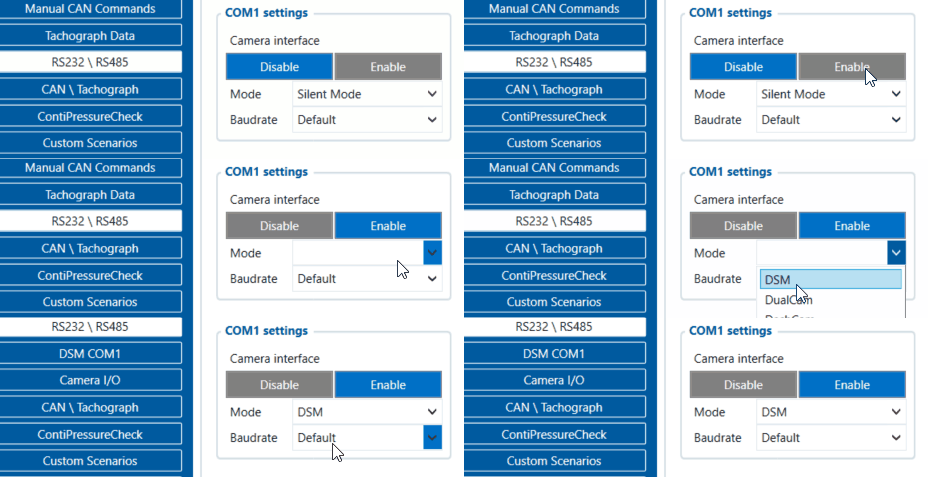
- In RS232 \ RS485 settings tab, make sure to enable Camera interface by "Enable", and select DSM in the Mode drop-down menu, afterwards DSM COM1 and Camera I/O should appear in the tab list.
- Make sure to change Camera I/O camera state Priorities to Low
- In appeared DSM COM1 tab, make sure to configure everything by your needs, and do not forget to complete the "Domain" and "Port" settings in File upload settings
- NOTE: This is a base setup for the device to work properly. Other device configuration is made according to your needs.
Connecting two cameras simultaneously for FMx650
The new feature for FMx650 DSM configuration, which is available from 03.00.14.Rev.114 iCamera allows you to connect two of your cameras at once. Method for connection and configuration stays the same, for this you are only required to choose two cameras in "RS232 \ RS485" tab from the configurator.
In the new functionality, you are able to connect any combo of the cameras by your wish, as an example: you are able to connect DSM/Dualcam, DashCam/DualCam, DSM/DSM, DualCam/DualCam and etc.
General settings
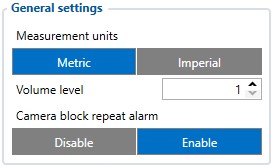
- Measurement Units - can either be metric or imperial, Global standard are metric units while in some cases like US and UK - measurement standard is Imperial units.
- Volume level - sets the volume level of DSM camera alerts
- Camera block repeat alarm - DSM camera will release a warning sound if the camera is blocked. This setting allows the camera to repeat warnings until the camera view is clear.
Image/recording settings
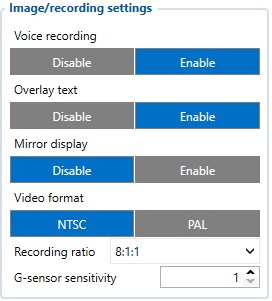
- Voice recording - Enable voice recording on event activation.
- Overlay text - Shows overlay text for time and date on the picture.
- Mirror display - A choice whether the camera should take mirrored images or not.
- Video format - A choice of video format depending on the region.
- Recording ratio - Choose what type of files should occupy the SD card mostly. 1st number is continuous footage, 2nd one is g-sensor data and 3rd is DSM event footage data.
- G-sensor sensitivity - Camera has its own sensor to detect crashes and its sensitivity can be adjusted.
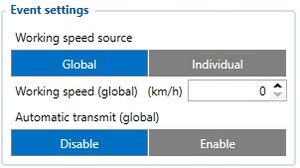
Event settings
- Working speed source - Global setting will set the same speed limit for all of the settings which require speed limit for activation while Individual settings will allow each parameter to have its own configurable speed limit setting for their events.
- Automatic transmit (global) - Global setting for automatic image transmission when the event is active, only works for events that do not have this setting (Yawning).
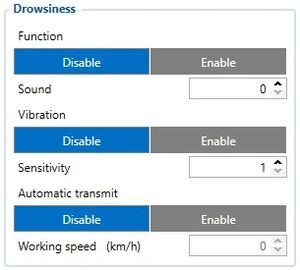
Drowsiness
- Activation - Enables or disables Drowsiness function, Sound type of each event can also be changed (0,1,2 or 3 (voice) types).
- Vibration - Upon Drowsiness event activation, vibration can also be activated.
- Sensitivity - this parameter is for the Drowsiness sensitivity setting 1-3 (1- lowest, 3 - highest).
- Automatic transmit - Transmits images to the server when the event is active. Also has working speed parameter which sets the minimum required speed for the event to become enabled, leave 0 for this setting to be off.
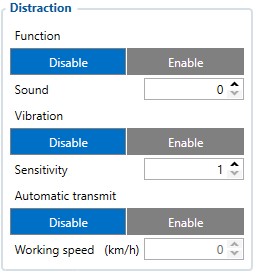
Distraction
- Activation - Enables or disables Distraction function, Sound type of each event can also be changed (0,1,2 or 3 (voice) types).
- Vibration - Upon Distraction event activation, vibration can also be activated.
- Sensitivity - this parameter is for the Distraction sensitivity setting 1-3 (1- lowest, 3 - highest).
- Automatic transmit - Transmits images to the server when the event is active. Also has working speed parameter which sets the minimum required speed for the event to become enabled, leave 0 for this setting to be off.
- Please note that even if the distraction detection speed is set to 0 km/h, the function is not limited to activation above 10 km/h. The 10 km/h threshold is related to the auto-calibration process.
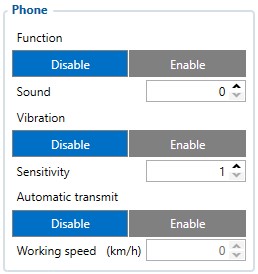
Phone
- Activation - Enables or disables Phone function, Sound type of each event can also be changed (0,1,2 or 3 (voice) types).
- Vibration - Upon Phone event activation, vibration can also be activated.
- Sensitivity - this parameter is for the Phone sensitivity setting 1-3 (1- lowest, 3 - highest).
- Automatic transmit - Transmits images to the server when the event is active. Also has working speed parameter which sets the minimum required speed for the Phone event to become enabled, leave 0 for this setting to be off.
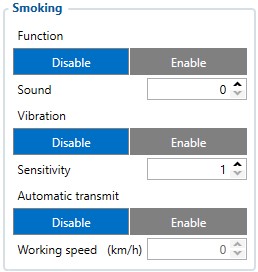
Smoking
- Activation - Enables or disables Smoking function, Sound type of each event can also be changed (0,1,2 or 3 (voice) types).
- Vibration - Upon Smoking event activation, vibration can also be activated.
- Sensitivity - this parameter is for the Smoking sensitivity setting 1-3 (1- lowest, 3 - highest).
- Automatic transmit - Transmits images to the server when the event is active. Also has working speed parameter which sets the minimum required speed for the Smoking event to become enabled, leave 0 for this setting to be off.
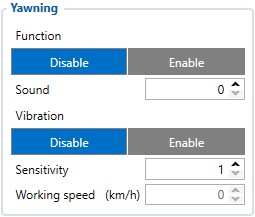
Yawning
- Activation - Enables or disables Yawning function, Sound type of each event can also be changed (0,1,2 or 3 (voice) types).
- Vibration - Upon Yawning event activation, vibration can also be activated.
- Sensitivity - this parameter is for the Yawing sensitivity setting 1-3 (1- lowest, 3 - highest).
- Automatic transmit - Transmits footage to the server automatically upon event activation. Automatic transmission is triggered when yawning is detected at least twice within 1 minute. Note: DSM FW version needs to be 2.5.1.T2 or higher.
- Working speed - Working speed parameter which sets the minimum required speed for the Smoking event to become enabled, leave 0 for this setting to be off. Note: This parameter does not have Automatic transmit parameter, therefore, upon activation, this event is not going to be configured to send images/audio to the server, however this setting can be activated in Event settings under Automatic transmit (Global) parameter.
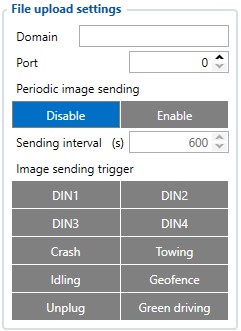
File upload settings
This section is meant for image sending only, parameter data sending if configured, is done through GPRS settings tab where most of data is configured for sending.
- Domain - Domain name where the image/audio files should be sent, can be a website or IP address (e.g. 123.123.12.198).
- Port - Port number which is assigned to a domain name and works as an entry point to the server.
- Periodic image sending - Periodic image sending can be sent in order to send images to the server at a configurable time period.
- Image sending trigger - Triggers can be set in order to activate image sending. Crash/Towing/Idling/Geofence/Unplug/Green driving are actual features of the FMX640 family devices and are configured under Features / Accelerometer Features / Geofence / Trip/Odometer Tabs.
Crash Detection Functionality using DOUT
The crash detection feature is a crucial capability provided by our device. It enhances evidential documentation through video or photo evidence in the event of a crash. However, activating this functionality necessitates a direct connection of the camera to a power source. Nonetheless, such a direct connection can lead to battery drainage.
To circumvent this issue, we recommend utilizing DOUT and a relay for connection. This setup enables control via SMS or GPRS command, or through predefined scenarios within our device. By activating DOUT post-ignition, the camera receives power, allowing it to function and record evidence even after the ignition is turned off following a crash. For your convenience, the connection scheme can be found here: DSM First Start
It is important to note that in the event of a fatal crash where fatalities may occur, we cannot guarantee the retrieval of video or photo evidence due to the severity of the accident. Moreover, both the camera and the device itself may sustain irreparable damage in such instances


