Getting started with TCT: Difference between revisions
No edit summary |
|||
| (102 intermediate revisions by 4 users not shown) | |||
| Line 19: | Line 19: | ||
|'''Graphics'''||DirectX 9 or later with WDDM 1.0 driver | |'''Graphics'''||DirectX 9 or later with WDDM 1.0 driver | ||
|- | |- | ||
|'''Internet'''||Ethernet port or Wi-Fi | |'''Internet'''||Ethernet port or Wi-Fi with network access for auto-update | ||
|} | |} | ||
| Line 25: | Line 25: | ||
Before continuing please read information below: | Before continuing please read information below: | ||
* TCT | * From TCT '''2.0.0''' onwards, only FT platform devices are supported. | ||
* For TCT '''1.X.XX''' versions auto-update feature doesn't work. | |||
==Launching TCT desktop version== | ==Launching TCT desktop version== | ||
===TCT Download Link=== | ===TCT Download Link=== | ||
Below you can find the installation file for the latest version of TCT : | Below you can find the installation file for the latest version of TCT: | ||
{| class="wikitable" | {| class="wikitable" | ||
!Version! | ! style="width:100px;" | Version | ||
!Comment | ! style="width:100px;" | Upload date | ||
! Link | |||
! Comment | |||
|- | |- | ||
|''' | | style="text-align: center;"| '''3.0.20''' | ||
|''' | | style="text-align: center;"| 2026-01-15 | ||
| [[File:Download_zip.png|x100px|link=https://github.com/teltonika-telematics/tct/releases/download/v3.0.20/TelematicsConfigurationTool.Setup.3.0.20-windows-x86_64bit.zip]] | |||
| The desktop application's underlying framework has been migrated from '''Electron.NET''' to the lightweight '''Photino.NET'''. This change is the primary reason for the major version increment. Installing TCT 3.0.0 or any subsequent version will not automatically remove previous TCT 2.0.X installations. To avoid potential conflicts and reclaim disk space, you must manually uninstall any TCT 2.0.X versions. | |||
|} | |} | ||
---- | ---- | ||
=== Installation guide=== | ===Installation guide=== | ||
Follow the steps below in order to install TCT on your PC: | Follow the steps below in order to install TCT on your PC: | ||
#Install TelematicsConfigurationTool.Setup.exe with admin privileges. | #Install TelematicsConfigurationTool.Setup.exe with admin privileges. | ||
#Accept the license agreement. | #Accept the license agreement. | ||
#Choose whether TCT should be available to all users or just to you (current user). | #Choose whether TCT should be available to all users or just to you (current user). | ||
# Select the location where you want to install TCT. By default, TCT is installed in the program files. However, you can install it anywhere you want. | #Select the location where you want to install TCT. By default, TCT is installed in the program files. However, you can install it anywhere you want. | ||
#Wait until the installation is complete and click '''Finish''' to exit installation wizard. | #Wait until the installation is complete and click '''Finish''' to exit installation wizard. | ||
---- | ---- | ||
| Line 57: | Line 59: | ||
Windows smart screen may appear during first installation. If this occurs please follow the steps below:<br />[[File:WindowsSmartScreen.png|right|421x421px]] | Windows smart screen may appear during first installation. If this occurs please follow the steps below:<br />[[File:WindowsSmartScreen.png|right|421x421px]] | ||
# Click on '''More info''' to access additional details about the application; <br /> | #Click on '''More info''' to access additional details about the application; <br /> | ||
#Make sure that the application name is '''TelematicsConfigurationTool.Setup.x.x.x.exe.''' Take into account that '''"x"''' represents the version of TCT and can differ depending on the installation file you have;<br /> | #Make sure that the application name is '''TelematicsConfigurationTool.Setup.x.x.x.exe.''' Take into account that '''"x"''' represents the version of TCT and can differ depending on the installation file you have;<br /> | ||
#Make sure that the publisher is '''TELTONIKA TELEMATICS;''' | #Make sure that the publisher is '''TELTONIKA TELEMATICS;''' | ||
| Line 83: | Line 85: | ||
Follow the steps below in order to install '''Teltonika COM Driver''' : | Follow the steps below in order to install '''Teltonika COM Driver''' : | ||
#Run '''Teltonika COM_Driver''' with admin privileges' to begin the installation. | # Run '''Teltonika COM_Driver''' with admin privileges' to begin the installation. | ||
#Click the checkbox for '''TELTONIKA COM Driver''' | #Click the checkbox for '''TELTONIKA COM Driver''' | ||
#Click next and modify/configure the destination folder for installation. | #Click next and modify/configure the destination folder for installation. | ||
#Click '''Install''' and wait for the progress bar to be completed. | #Click '''Install''' and wait for the progress bar to be completed. | ||
#And finally click '''Close''' to exit the installation.<br /> | # And finally click '''Close''' to exit the installation.<br /> | ||
=== | ===Creating an Offline Configuration File=== | ||
In order to create an offline configuration file, follow the steps below: | |||
#Select a device from the list. You can use Search and Filter to find it. | |||
#Click '''Configure''' button.[[File:Offline configuration model selection.png|none|thumb|759x759px]] | |||
#Make configuration and save it by click on '''Save to file''' button.[[File:Save to file2.png|none|thumb]] <br /> | |||
===Creating an Online Configuration File=== | |||
In order to create an online configuration file, follow the steps below: | |||
#Make sure that your device is supported by TCT by checking [[Telematics Configuration Tool (TCT)|Supported Devices list]]. | |||
#Connect your device to PC. | |||
# In TCT device will appear on '''Discovered devices''' list click there '''Configure''' button.[[File:Configure discovered devices2.png|none|thumb|759x759px]] | |||
#Configure device and save the changes made to device by click on '''Save to device''' button.[[File:Save to device2.png|none|thumb]]<br /> | |||
===Editing a Configuration File=== | |||
In order to open an existing configuration file, follow the steps below: | |||
#In offline configuration section click on '''Open''' button. | |||
#Select the configuration file and click''' Open''' [[File:Selected device.png|none|thumb|759x759px]] | |||
#Wait for the configuration file to load, edit it and save the changes made by click on '''Save to file''' button.[[File:Save to file2.png|none|thumb]] <br /> | |||
=== Loading a Configuration File === | |||
Configuration file can be loaded using '''Open''' button on the start-up screen of TCT or using '''Upload file''' button once you selected a device. | |||
===Differences between Offline and Online Configuration=== | |||
[[ | Offline configuration refers to creating a configuration without any device connected. Later you can load this configuration file created in offline mode into the device remotely (via [[FOTA WEB|'''FOTA WEB''']]) or when a device is connected to your PC. On the other hand, Online Configuration refers to creating a configuration with a device connected and you can directly save the changes into the device. | ||
===User keys=== | |||
User key functionality grants access to exclusive features, including additional functionalities and specialized firmware support. | |||
To enter or view user keys, go to '''Settings''' and select '''User keys''' (functionality is available from the TCT version 2.0.10). | |||
[[File:Entering tct user key exmaple menu.png|thumb|left]] | |||
<br><br><br><br><br><br><br><br><br><br><br><br><br><br> | |||
<br><br> | |||
A new modal will open. Then copy <u> '''the full key text from "BEGIN TCT KEY" to "END TCT KEY"''' </u> and paste in '''Add new key field''', then press '''Add key''': | |||
[[File:Entering tct user key examaple.png|thumb|left|724x724px]] | |||
<br><br><br><br><br><br><br><br><br><br><br> | |||
< | <span style="color:#FF0000">'''''IMPORTANT NOTES'''''</span> | ||
*TCT User Keys have an expiration date. | |||
*User keys are available only in TCT desktop version. | |||
*In order to use User keys functionality you need a PC with an internet connection that can access: | |||
**'''Domain:''' <nowiki>https://cdn.tct.teltonika.lt</nowiki> | |||
**'''Port:''' 443 (https) | |||
==Launching TCT web version== | |||
===Supported web browsers=== | |||
Supported TCT WEB browsers are Chrome, Edge, Firefox, and Safari. | |||
We recommend using the latest version of your browser. | |||
===Start up guide=== | |||
Follow the steps below in order to start using TCT: | |||
#Open FOTA WEB in your browser. FOTA WEB link: ''https://fota.teltonika.lt/'' | |||
# Log in to the FOTA web using your login details. | |||
#Click on '''TCT web''' button on FOTA WEB side navigation. | |||
#Choose to '''Create''' a new configuration or '''Edit''' an existing file from FOTA WEB.[[File:Open TCT web version.png|thumb|alt=|none]] | |||
#Once '''Create''' button is pressed or file selected and '''Edit > Continue''' buttons is pressed, it will open a new browser tab with TCT.<br /> | |||
[[File:TCT main window.png|thumb|761x761px|alt=|none]] | |||
==Creating an Offline Configuration File== | ===Creating an Offline Configuration File=== | ||
In order to create an offline configuration file, follow the steps below: | In order to create an offline configuration file, follow the steps below: | ||
#Select a device from the list | #Select a device from the list. | ||
#Click '''Configure''' button. | #Click '''Configure''' button. | ||
[[File:Offline configuration | [[File:Offline configuration via TCT.png|left|thumb|761x761px]] | ||
<br><br><br><br><br><br><br><br><br> | |||
===Editing a Configuration File=== | |||
==Editing a Configuration File== | |||
In order to open an existing configuration file, follow the steps below: | In order to open an existing configuration file, follow the steps below: | ||
#In offline configuration section click on ''' | #In offline configuration section click on '''TCT web''' button. | ||
#Select the configuration file and click''' | #Select '''Edit''' button.[[File:Open TCT web version.png|thumb|alt=|none]] | ||
#Wait for the configuration file to load, edit it and save the changes you've made. | #Select the configuration file and click''' Continue''' button.[[File:Editing CFG via FOTA WEB.png|thumb|alt=|none]] | ||
[[File: | #Wait for the configuration file to load, edit it and save the changes you've made by clicking on '''Save to FOTA WEB''' button.[[File:Save to FOTA WEB.png|thumb|alt=|none]] | ||
# You can choose from '''Full save''' and '''Only changes''' options.[[File:How do you want to save.png|thumb|alt=|none]] | |||
#The needed to edit configuration can also be selected from the '''Files''' tab and changed by selecting '''Edit in TCT web'''. | |||
[[File:Edit in TCT web.png|left|thumb|761x761px]] | |||
<br><br><br><br> | |||
=== Loading a Configuration File === | |||
Configuration file can be loaded using '''Open''' button on the start-up screen of TCT or using '''Upload file''' button once you selected a device. | |||
Latest revision as of 15:29, 15 January 2026
Main Page > Software & Applications > Telematics Configuration Tool (TCT) > Getting started with TCTThis page will provide you with all the necessary information needed to successfully launch the TCT application on your PC for the first time. Moreover, we will cover the different types of configuration files (offline vs online) you can create with the help of TCT.
Minimum System Requirements
| OS | Windows 10; Windows 11 |
| CPU | Intel or AMD processor with 64-bit support |
| Disk Storage | 1 GB of free disk space |
| Memory | 500 MB of free RAM |
| Graphics | DirectX 9 or later with WDDM 1.0 driver |
| Internet | Ethernet port or Wi-Fi with network access for auto-update |
Important information
Before continuing please read information below:
- From TCT 2.0.0 onwards, only FT platform devices are supported.
- For TCT 1.X.XX versions auto-update feature doesn't work.
Launching TCT desktop version
TCT Download Link
Below you can find the installation file for the latest version of TCT:
Installation guide
Follow the steps below in order to install TCT on your PC:
- Install TelematicsConfigurationTool.Setup.exe with admin privileges.
- Accept the license agreement.
- Choose whether TCT should be available to all users or just to you (current user).
- Select the location where you want to install TCT. By default, TCT is installed in the program files. However, you can install it anywhere you want.
- Wait until the installation is complete and click Finish to exit installation wizard.
Information below is relevant for TCT version 1.1.80 or older.
IMPORTANT NOTES
Windows smart screen may appear during first installation. If this occurs please follow the steps below:
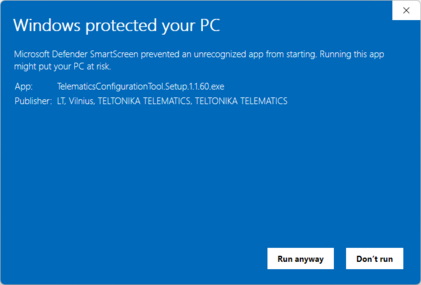
- Click on More info to access additional details about the application;
- Make sure that the application name is TelematicsConfigurationTool.Setup.x.x.x.exe. Take into account that "x" represents the version of TCT and can differ depending on the installation file you have;
- Make sure that the publisher is TELTONIKA TELEMATICS;
- If everything is correct, please click on Run anyway;
- After confirmation the installation setup will start immediately.
Teltonika COM Driver Installation
Teltonika COM Driver is a serial communication port driver for Teltonika Telematics device, It is one of the requirements for TCT to work properly, without this driver TCT will not detect your Teltonika Telematics device.
Download COM port drivers from Teltonika here.
Follow the steps below in order to install Teltonika COM Driver :
- Run Teltonika COM_Driver with admin privileges' to begin the installation.
- Click the checkbox for TELTONIKA COM Driver
- Click next and modify/configure the destination folder for installation.
- Click Install and wait for the progress bar to be completed.
- And finally click Close to exit the installation.
Creating an Offline Configuration File
In order to create an offline configuration file, follow the steps below:
- Select a device from the list. You can use Search and Filter to find it.
- Click Configure button.

- Make configuration and save it by click on Save to file button.

Creating an Online Configuration File
In order to create an online configuration file, follow the steps below:
- Make sure that your device is supported by TCT by checking Supported Devices list.
- Connect your device to PC.
- In TCT device will appear on Discovered devices list click there Configure button.

- Configure device and save the changes made to device by click on Save to device button.

Editing a Configuration File
In order to open an existing configuration file, follow the steps below:
- In offline configuration section click on Open button.
- Select the configuration file and click Open

- Wait for the configuration file to load, edit it and save the changes made by click on Save to file button.

Loading a Configuration File
Configuration file can be loaded using Open button on the start-up screen of TCT or using Upload file button once you selected a device.
Differences between Offline and Online Configuration
Offline configuration refers to creating a configuration without any device connected. Later you can load this configuration file created in offline mode into the device remotely (via FOTA WEB) or when a device is connected to your PC. On the other hand, Online Configuration refers to creating a configuration with a device connected and you can directly save the changes into the device.
User keys
User key functionality grants access to exclusive features, including additional functionalities and specialized firmware support.
To enter or view user keys, go to Settings and select User keys (functionality is available from the TCT version 2.0.10).
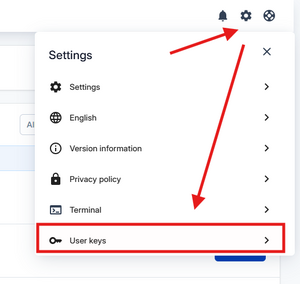
A new modal will open. Then copy the full key text from "BEGIN TCT KEY" to "END TCT KEY" and paste in Add new key field, then press Add key:

IMPORTANT NOTES
- TCT User Keys have an expiration date.
- User keys are available only in TCT desktop version.
- In order to use User keys functionality you need a PC with an internet connection that can access:
- Domain: https://cdn.tct.teltonika.lt
- Port: 443 (https)
Launching TCT web version
Supported web browsers
Supported TCT WEB browsers are Chrome, Edge, Firefox, and Safari.
We recommend using the latest version of your browser.
Start up guide
Follow the steps below in order to start using TCT:
- Open FOTA WEB in your browser. FOTA WEB link: https://fota.teltonika.lt/
- Log in to the FOTA web using your login details.
- Click on TCT web button on FOTA WEB side navigation.
- Choose to Create a new configuration or Edit an existing file from FOTA WEB.
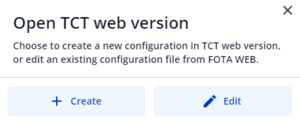
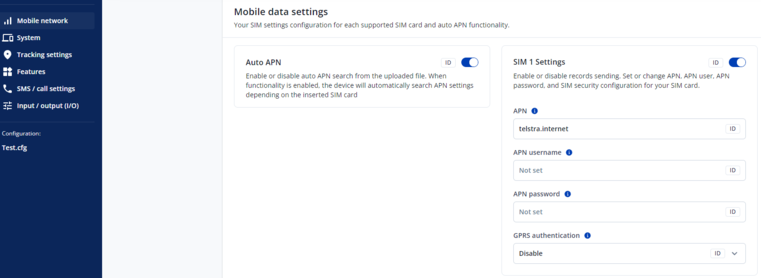
- Once Create button is pressed or file selected and Edit > Continue buttons is pressed, it will open a new browser tab with TCT.
Creating an Offline Configuration File
In order to create an offline configuration file, follow the steps below:
- Select a device from the list.
- Click Configure button.

Editing a Configuration File
In order to open an existing configuration file, follow the steps below:
- In offline configuration section click on TCT web button.
- Select Edit button.

- Select the configuration file and click Continue button.
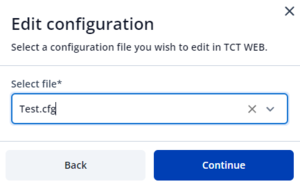
- Wait for the configuration file to load, edit it and save the changes you've made by clicking on Save to FOTA WEB button.

- You can choose from Full save and Only changes options.

- The needed to edit configuration can also be selected from the Files tab and changed by selecting Edit in TCT web.

Loading a Configuration File
Configuration file can be loaded using Open button on the start-up screen of TCT or using Upload file button once you selected a device.

