Difference between revisions of "Template:FMA202 Configurator"
From Wiki Knowledge Base | Teltonika GPS
(Created page with "*New FMA2YX module has default factory settings. Settings should be changed according to your application and your GSM operator information. *Contact sales manager to get the...") |
|||
| Line 1: | Line 1: | ||
| − | *New FMA2YX module has default factory settings. Settings should be changed according to your application and your GSM operator information. | + | *New {{{model|FMA2YX}}} module has default factory settings. Settings should be changed according to your application and your GSM operator information. |
| − | *Contact sales manager to get the latest FMA2YX Configurator version. | + | *Contact sales manager to get the latest {{{model|FMA2YX}}}Configurator version. {{{model|FMA2}}} configurator operates on Microsoft Windows OS and uses MS .Net Framework 3.5 or higher. Please ensure that MS .Net Framework 3.5 or later is installed on your PC before starting configurator. Latest MS .Net Framework version can be downloaded from official Microsoft web page. |
| − | *Module configuration is performed over USB cable. Configuration process starts from starting | + | *Module configuration is performed over USB cable. Configuration process starts from starting {{{model|FMA2}}} Configurator program and then connecting to {{{model|FMA2}}} device via Connect button located on the top left corner of configurator. If connected successfully, IMEI Version fields which were empty, now are filled with certain numbers depending on Modem IMEI and firmware version of your device (figure below). |
| − | * | + | *{{{model|FMA2}}} has one user editable profile, which can be loaded from device, and saved. User can also revert to default settings, by pressing Load Defaults button. After any modification of configuration settings it has to be saved to {{{model|FMA2}}} device, otherwise it will not be written to device. |
| − | * | + | *{{{model|FMA2}}} has 2 configuration modes: Recommended Configuration (Figure 20) and Advanced Configuration |
<br/> | <br/> | ||
{{{foto|[[Image:FMA2_Recommended_config.png|800px|center]]}}} | {{{foto|[[Image:FMA2_Recommended_config.png|800px|center]]}}} | ||
<br/> | <br/> | ||
| − | *Recommended Configuration mode uses predefined data acquisition values. In this configuration mode it is only required to enter network parameters. In Advanced Configuration mode | + | *Recommended Configuration mode uses predefined data acquisition values. In this configuration mode it is only required to enter network parameters. In Advanced Configuration mode {{{model|FMA2}}} is more configurable. |
<br/> | <br/> | ||
{{{foto|[[Image:FMA2_Advanced_Configuration.png|800px|center]]}}} | {{{foto|[[Image:FMA2_Advanced_Configuration.png|800px|center]]}}} | ||
<br/> | <br/> | ||
| − | * | + | *{{{model|FMA2}}} Configurator is divided into 4 main areas: 1 – main button area, 2 – information area, 3 –settings menu, 4 – parameters and values menu. |
<br/> | <br/> | ||
==Main Buttons description:== | ==Main Buttons description:== | ||
*“Connect” – connects device. | *“Connect” – connects device. | ||
| − | *“Load” – reads configuration parameters from | + | *“Load” – reads configuration parameters from {{{model|FMA2}}} Flash memory. |
| − | *“Save” – saves configuration parameters to | + | *“Save” – saves configuration parameters to {{{model|FMA2}}} Flash memory. |
| − | *“Load Defaults” – loads default | + | *“Load Defaults” – loads default {{{model|FMA2}}} settings that later can be modified. This procedure must be performed before entering new parameters. |
*“Save to File…” – allows user to save currently entered settings to .XML file, for later usage. | *“Save to File…” – allows user to save currently entered settings to .XML file, for later usage. | ||
*“Load from File…” – allows user to load configuration saved in .XML extension file. | *“Load from File…” – allows user to load configuration saved in .XML extension file. | ||
| − | *”Reset device” – reboots | + | *”Reset device” – reboots {{{model|FMA2}}} and displays processor firmware version. |
==Additional Buttons description:== | ==Additional Buttons description:== | ||
*“SIM PIN” - allows to enter PIN code if inserted SIM card has activated PIN code security. Note that PIN code can be entered 2 times. | *“SIM PIN” - allows to enter PIN code if inserted SIM card has activated PIN code security. Note that PIN code can be entered 2 times. | ||
*“Add Keyword/Change Keyword/Remove Keyword”– buttons are used to protect configurator from unauthorized access to configuration. | *“Add Keyword/Change Keyword/Remove Keyword”– buttons are used to protect configurator from unauthorized access to configuration. | ||
| − | *Keyword is 4 – 10 symbol length. If keyword is set, every time user reconnects | + | *Keyword is 4 – 10 symbol length. If keyword is set, every time user reconnects {{{model|FMA2}}} to USB port, user will be asked to provide valid keyword when connecting {{{model|FMA2}}} to configurator. User is given 5 attempts to enter keyword. After entering valid keyword, counter resets to 5. |
| − | *If user disconnects | + | *If user disconnects {{{model|FMA2}}} using “Disconnect” button and does not disconnect from USB port, after reconnecting using “Connect” button, configurator does not ask for keyword. |
{| class="wikitable" style="border-style: solid; border-width: 0px" | {| class="wikitable" style="border-style: solid; border-width: 0px" | ||
Latest revision as of 12:22, 6 September 2018
- New FMA2YX module has default factory settings. Settings should be changed according to your application and your GSM operator information.
- Contact sales manager to get the latest FMA2YXConfigurator version. FMA2 configurator operates on Microsoft Windows OS and uses MS .Net Framework 3.5 or higher. Please ensure that MS .Net Framework 3.5 or later is installed on your PC before starting configurator. Latest MS .Net Framework version can be downloaded from official Microsoft web page.
- Module configuration is performed over USB cable. Configuration process starts from starting FMA2 Configurator program and then connecting to FMA2 device via Connect button located on the top left corner of configurator. If connected successfully, IMEI Version fields which were empty, now are filled with certain numbers depending on Modem IMEI and firmware version of your device (figure below).
- FMA2 has one user editable profile, which can be loaded from device, and saved. User can also revert to default settings, by pressing Load Defaults button. After any modification of configuration settings it has to be saved to FMA2 device, otherwise it will not be written to device.
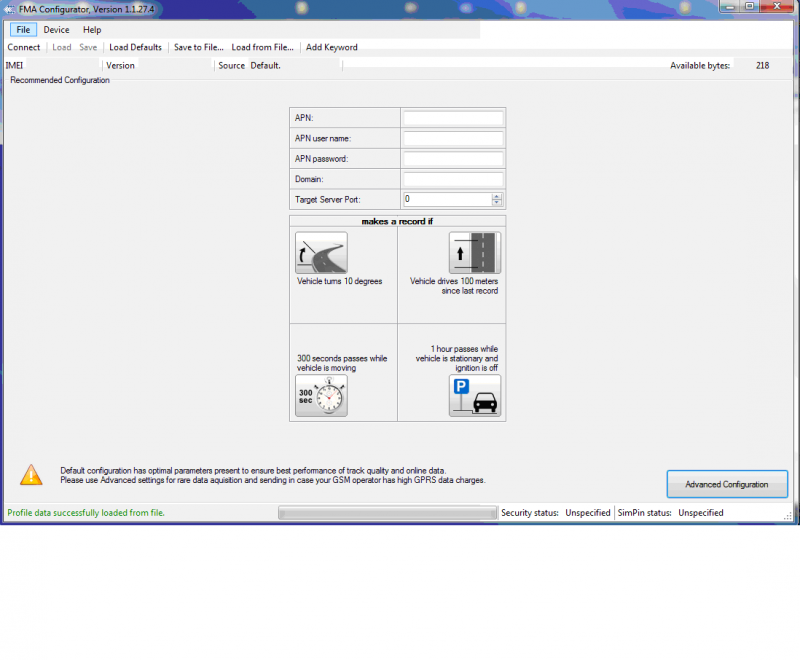
- FMA2 has 2 configuration modes: Recommended Configuration (Figure 20) and Advanced Configuration
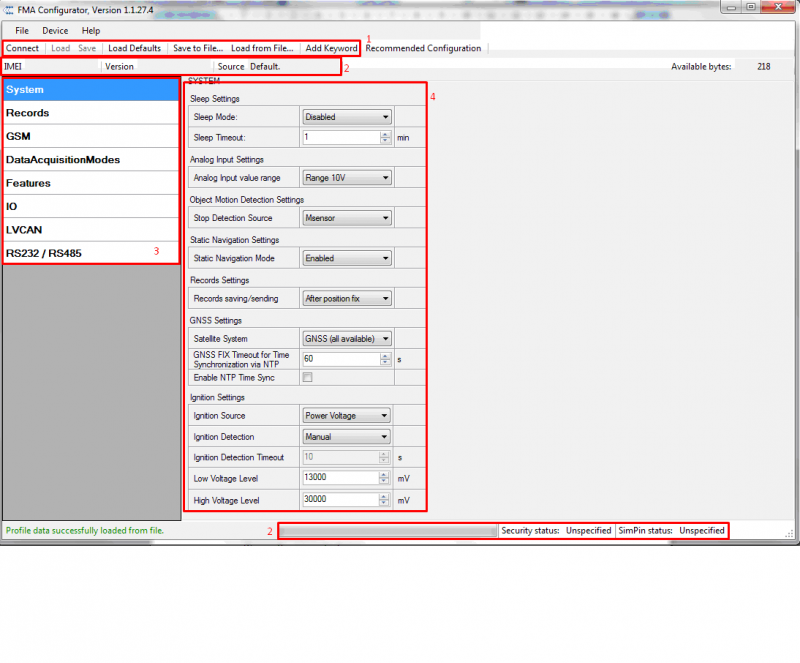
- Recommended Configuration mode uses predefined data acquisition values. In this configuration mode it is only required to enter network parameters. In Advanced Configuration mode FMA2 is more configurable.
- FMA2 Configurator is divided into 4 main areas: 1 – main button area, 2 – information area, 3 –settings menu, 4 – parameters and values menu.
Main Buttons description:
- “Connect” – connects device.
- “Load” – reads configuration parameters from FMA2 Flash memory.
- “Save” – saves configuration parameters to FMA2 Flash memory.
- “Load Defaults” – loads default FMA2 settings that later can be modified. This procedure must be performed before entering new parameters.
- “Save to File…” – allows user to save currently entered settings to .XML file, for later usage.
- “Load from File…” – allows user to load configuration saved in .XML extension file.
- ”Reset device” – reboots FMA2 and displays processor firmware version.
Additional Buttons description:
- “SIM PIN” - allows to enter PIN code if inserted SIM card has activated PIN code security. Note that PIN code can be entered 2 times.
- “Add Keyword/Change Keyword/Remove Keyword”– buttons are used to protect configurator from unauthorized access to configuration.
- Keyword is 4 – 10 symbol length. If keyword is set, every time user reconnects FMA2 to USB port, user will be asked to provide valid keyword when connecting FMA2 to configurator. User is given 5 attempts to enter keyword. After entering valid keyword, counter resets to 5.
- If user disconnects FMA2 using “Disconnect” button and does not disconnect from USB port, after reconnecting using “Connect” button, configurator does not ask for keyword.


