Camera Manual: Difference between revisions
MindaugasK (talk | contribs) No edit summary |
MindaugasK (talk | contribs) No edit summary |
||
| Line 11: | Line 11: | ||
'''3. Screws''' - option no. 2, screws which can be used to screw the camera unit into the designated place just above the windscreen (should not be used on windows). | '''3. Screws''' - option no. 2, screws which can be used to screw the camera unit into the designated place just above the windscreen (should not be used on windows). | ||
==Set-up links== | |||
[[First Start|'''First Start''']] - in this section it is described how to set up the camera before first use. It is essential to know the process as without certain set-up processes the camera will not start or certain functions will not be accessible. | |||
[[DualCam Configuration|'''DualCam Configuration''']] - this section describes the navigational way inside of the configurator which will be the main tool to set up the camera with the tracking device and make it functional. | |||
[[DualCam Communication Protocol|'''DualCam Communication Protocol''']] - is used when setting up file upload to servers for quick downloading of data. It is essential part and functionality of the FMX tracking devices family which allows the users to upload data and files from the device effortlessly. | |||
Revision as of 13:41, 11 August 2022
Main Page > Video Solutions > Teltonika DualCam > Camera ManualPackage contents

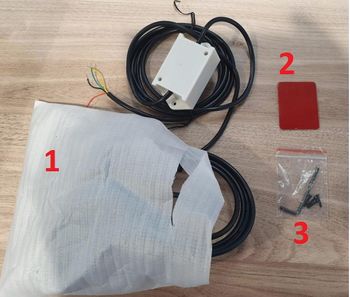
There are several components included in the DualCam package box. These components are necessary to set up the camera and make it functional part of the vehicle.


1. Teltonika DualCam - the main camera unit used to record video/pictures. This unit has cable attached to it for connection purposes e.g. powering up and data transmission.
2. Sticky Tape 3M - option no. 1, a double sided sticky tape that can be used to stick the camera unit to the windscreen, this will allow it to be taken off later on without traces.
3. Screws - option no. 2, screws which can be used to screw the camera unit into the designated place just above the windscreen (should not be used on windows).
Set-up links
First Start - in this section it is described how to set up the camera before first use. It is essential to know the process as without certain set-up processes the camera will not start or certain functions will not be accessible.
DualCam Configuration - this section describes the navigational way inside of the configurator which will be the main tool to set up the camera with the tracking device and make it functional.
DualCam Communication Protocol - is used when setting up file upload to servers for quick downloading of data. It is essential part and functionality of the FMX tracking devices family which allows the users to upload data and files from the device effortlessly.
Product Specification
| Technical data | Description |
|---|---|
| Supported by | FMC125, FMB125, FMB225, FMC225 |
| Day & Night Vision Effect | Day (Color), Night (Black & White) |
| Angle of View | Horizontal 120°, Vertical 70° |
| Dual Camera | Front and Rear (equal characteristics) |
| Camera casing dimensions | 126.2 x 36.6 x 36.6 mm |
| Camera mounting | Sticky tape (3M) or screws |
| Supported microSD card sizes | 16 GB, 32 GB, 64 GB |
| Electrical parameters | Description |
|---|---|
| Input voltage range | 9 ~ 36 V |
| Working temperature and humidity | Temperature: -30 °C ~ 85 °C
Humidity: <90% |
| Power consumption | 220 mA |
| Function parameters | Description |
|---|---|
| Real time clock (RTC) synchronization | Available over FM (via NTP, NITZ or GNSS) |
| Picture resolution | 1280 x 720 (default) (50KB transfer period 18 sec), Configurable: 160 x 120; 320 x 240; 640 x 480; 1920 x 1080 |
| IR Distance | 2 Meters |
| Cable length | RS232 (3.5 m) |
| Video compression | H.265 |
| Video resolution | 720P (20 sec. – 6MB, transfer period ~ 320 sec.) |
| Video storage | 2psc. MicroSD card (Max 64GB up to 72 hours of video) |
