|
|
| Line 17: |
Line 17: |
| '''NOTE: FMX640 device also needs SD Card to be inserted.''' | | '''NOTE: FMX640 device also needs SD Card to be inserted.''' |
|
| |
|
| ==PC Calibration==
| |
| Driver Setup (ONLY SUPPORTS WINDOWS OS)
| |
| * If connecting the DSM camera to computer, the calibration page is not available, please follow the steps below:
| |
| * Please install RNDIS driver. LINK: http://movon.co.kr/downloads/rndisdriver.zip (Windows 10)
| |
| * If the driver does not install itself automatically, please follow the guide in this document [[Media:DSM RNDIS driver installation.pdf| here]]
| |
| * Unzip the file and remember the unzipped folder location.
| |
|
| |
|
|
| |
| [[File:DSM_Calib.png | right | 320x320px]]
| |
| ==== Calibration Setup ====
| |
| * Access DSM Calibration page via PC
| |
| ** Connect DSM to PC using USB Tipe-C cable with 5 pins.
| |
| ** Power on DSM. If you hear repeated beep sound, this means DSM is properly connected to computer.
| |
| ** Activate the browser and enter into http://20.0.0.1:18087/ to access DSM calibration page. Google Chrome is recommended.
| |
| ** If you see the page below, please select language you want and sign in using following information
| |
| ‐ ID: admin ‐ Password: 1234
| |
|
| |
| ==== Calibration ====
| |
| * Select Speed Type
| |
| ** GPS Speed setting - GPS antenna is embedded on DSM. If GPS work correctly, detected is shown. If GPS doesn’t work for 5 mins, Fail is shown.
| |
|
| |
| [[File:DSM Calib2.png|400px|center-left]] [[File:DSM Calib3.png|400px|center-right]]
| |
|
| |
| ==== CAN Speed setting ====
| |
| *DSM can get speed through CAN as well.
| |
| *DSM only recognizes encrypted CAN data from our Database site; http://info.mdas.co.kr
| |
|
| |
| Please download can file from the DB and upload to system.
| |
|
| |
| [[File:Mdas1.0.png|frameless|450x450px]]
| |
|
| |
| ==== Verify Speed Signal ====
| |
| You can check the speed data is coming correct by test drive.
| |
|
| |
| If there is a deviation, please use the following correction method.
| |
|
| |
| Please click the “Correction” button when you drive at 40km/h (24mph). Then, DSM will set new speed automatically.
| |
| [[File:Mdas1.1.png|450x450px]]
| |
|
| |
| ==== Camera Setting ====
| |
|
| |
| # Calibrate camera, that face will be in center of the image in calibration page.
| |
| # After that, just go to the next step.
| |
|
| |
| [[File:Auto Camera Setting img.jpg|450x450px]]
| |
|
| |
| ==== DSM Setup ====
| |
| The camera can also be configured through its configuration, main settings that which can be seen are pointed below:
| |
|
| |
| [[File:Dms1.03.png]]
| |
|
| |
| Configurable parameters:
| |
|
| |
| *ON/OFF: Enable Drowsiness, Distraction, Phone, Smoking, Yawning.
| |
| *Sound Type: Check the warning sound and select the one you prefer. Press Play button to test Warning Alarm Sound.
| |
| *Vibrator: Enable vitration function. (On / Off)
| |
| *Sensitivity: Set the sensitivity on a scale of 1 to 3. As the level gets higher, it gets more sensitive. Yawning warning will generate when yawning for 2 seconds.
| |
| *Activation Speed:
| |
| # You can set up activation speed by DSM alert respectively.
| |
| # Set the Activation Speed ( 15 ~ 60Km/h ≒ 10 ~ 40mph). The functions will be acticvated when the vehicle is faster than this speed.
| |
| # If you select Others, you can input the activation speed in the below box. Note that the input range is between 5Km and 100km.
| |
| * DIP switch on unit: Enable DIP switch on DSM’s unit.
| |
| * Sound Level: Control the warning sound level on a scale of 1 to 4.
| |
| * Test Mode : If you want to test DSM at any speed, please select “ON” ⑨ Time-out Feature: Select if apply below time-out logic. (On / Off) * Time-out feature: An event and chime will be fired when ‘First Trigger Count’ number of triggers happen within ‘First Trigger Interval’. After the first event and chine, additional events’chimes up to ‘Max Trigger Count’ will be fired as long as they happen within ‘Max Trigger Interval’. When ‘First Trigger Interval’ or ‘Max Trigger Interval’ expire, the trigger count it reset to 0.
| |
|
| |
| ==== Driver Registration ====
| |
| Face ID or driver registration is required in order for the camera to recognize different drivers. In the DSM menu, click on "Driver Registration" and follow the steps below in order to calibrate the camera angle:
| |
|
| |
| Look into camera and click "next" once you have the distance and angle set accordingly.
| |
|
| |
| [[File:Dsmsetupnew.jpg]]
| |
|
| |
| Once this is done, name the photo with the driver ID or name and keep the document uploaded inside DSM.
| |
|
| |
| ==Mobile connection & calibration==
| |
|
| |
| =====App installation=====
| |
| Download Movon application from the app gallery. The app is called "Movon".
| |
|
| |
| [[File:Movon app.jpg]]
| |
|
| |
| ===== Login =====
| |
| Please enter the information below to log in
| |
| ID: admin
| |
| PW: 1234
| |
| Once this is done, click the link to download the vehicle CAN file from this link http://info.mdas.co.kr or press the “Vehicle CAN file” button in the application.[[File:Movon app1.jpg|387]]
| |
|
| |
| ===== Wifi setup =====
| |
| How to get into Wi-Fi Mode:
| |
|
| |
| Wi-Fi is available for 5 minutes after DSM is turned on.
| |
|
| |
| Press the button(MFB) on side of the camera for 5 seconds to activate Wi-Fi Mode (stay in Wi-Fi mode for 5 minutes).
| |
|
| |
| * If the device cannot connect to the Wi-Fi, please reboot the device and try again.
| |
| * If connecting through iPhone, please use password: 123456789.
| |
| [[File:Movon app2.jpg|200px]]
| |
| [[Category:DSM]] | | [[Category:DSM]] |
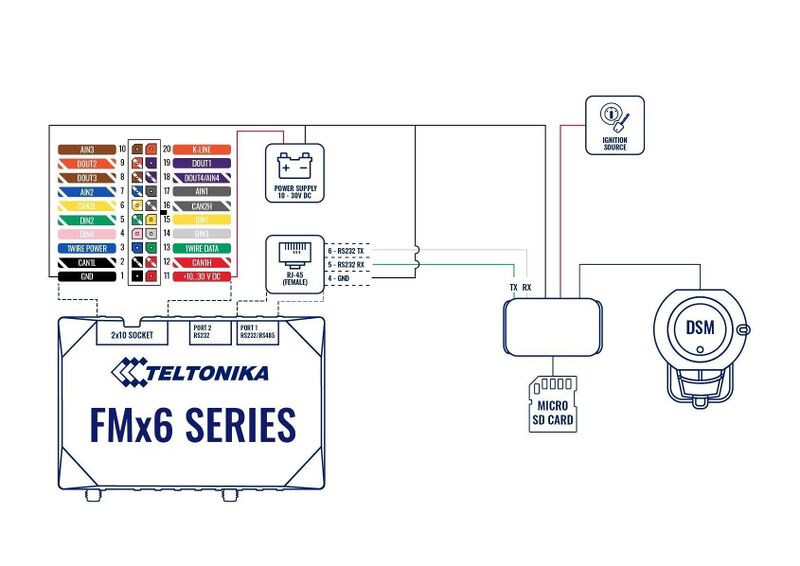
DSM connection scheme
Please note that camera must be connected to ignition source, in other way camera will drain battery.
Camera connection through a relay
If you need to receive additional data from the DSM when the ignition is off but the key is inserted and turned to ACC postition, you can do it by connecting the camera to a power source using a relay in order to control the power supply by turning on/off the camera. To find information on how to configure DOUT, please visit FMB DOUT.
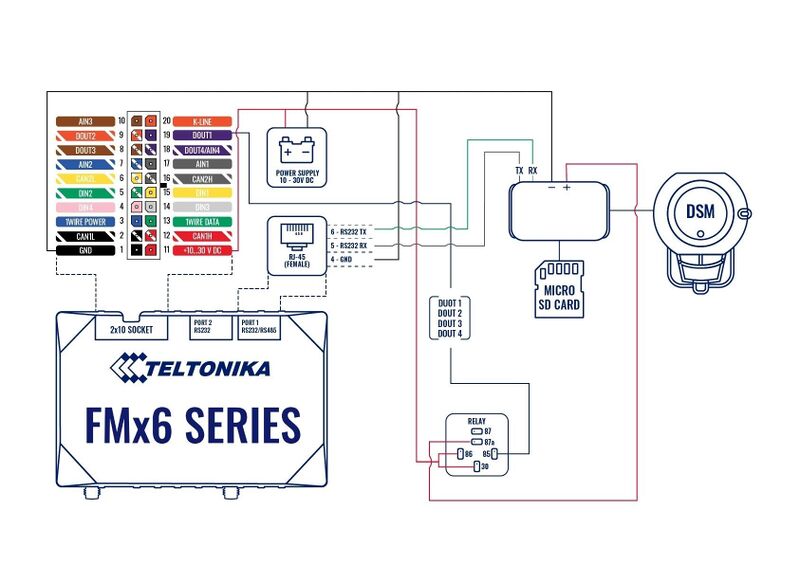
NOTE: FMX640 device also needs SD Card to be inserted.

