Template:FMT1 First start card: Difference between revisions
Appearance
| Line 22: | Line 22: | ||
[[Image:FMT100-sim-1.jpg|280px]] [[Image:FMT100-sim-2.jpg|280px]] [[Image:FMT100-sim-3.jpg|280px]] [[Image:FMT100-sim-4.jpg|280px]] | [[Image:FMT100-sim-1.jpg|280px]] [[Image:FMT100-sim-2.jpg|280px]] [[Image:FMT100-sim-3.jpg|280px]] [[Image:FMT100-sim-4.jpg|280px]] | ||
{| | |||
|- | |||
| [[File:Alert.png|left|link=]] || <b>{{{sim_type|Micro-}}}SIM card insertion/removal must be performed when device is powered off – external voltage and battery are disconnected. Otherwise {{{sim_type|Micro-}}}SIM card might be damaged or device will not detect it.</b> | |||
|} | |||
Revision as of 09:58, 25 October 2018
FMT1YX smart waterproof GNSS tracker with Blue-tooth connectivity and internal backup battery
How to insert Micro-SIM card
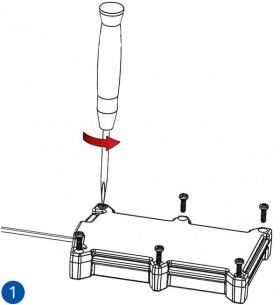
- Unscrew the screws.
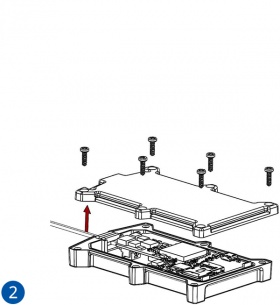
- Remove the cover.
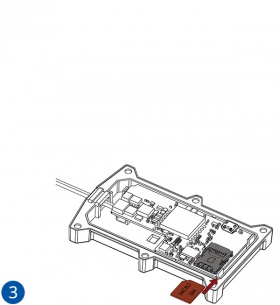
- Insert Micro-SIM card as shown with PIN request disabled or read Security info how to enter it later in Configurator. Make sure that Micro-SIM card cut-off corner is pointing forward to slot.
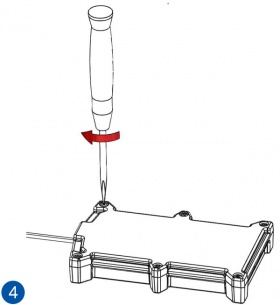
- Attach device cover and put the screws back in.
 |
Micro-SIM card insertion/removal must be performed when device is powered off – external voltage and battery are disconnected. Otherwise Micro-SIM card might be damaged or device will not detect it. |


