Teltonika FMx 640 With TCP Link Mode: Difference between revisions
Fouad Karman (talk | contribs) mNo edit summary |
Fouad Karman (talk | contribs) No edit summary |
||
| Line 2: | Line 2: | ||
==='''1.''' First you have to connect the FMx640 with the RS232. On COM1 The below picture illustrates the connection:=== | ==='''Step 1.''' First you have to connect the FMx640 with the RS232. On COM1 The below picture illustrates the connection:=== | ||
[[File:FMC640 RS232 fuad.jpg|center|thumb|500x500px|A Picture to Illustrate the Physical Connection from device side.]] | [[File:FMC640 RS232 fuad.jpg|center|thumb|500x500px|A Picture to Illustrate the Physical Connection from device side.]] | ||
==='''2.''' Second step after the connections, you must configure the FMx640:=== | ==='''Step 2.''' Second step after the connections, you must configure the FMx640:=== | ||
The FMx configurator you have to set parameters for COM1 or COM2 (depends on which COM port you are using) in global parameters window. You have to modify the server sittings to you PC IP and your TCP port. | The FMx configurator you have to set parameters for COM1 or COM2 (depends on which COM port you are using) in global parameters window. You have to modify the server sittings to you PC IP and your TCP port. | ||
| Line 25: | Line 25: | ||
==='''3.''' Establishing FMx test link with server through Hercules and sending messages with Hercule:=== | ==='''Step 3.''' Establishing FMx test link with server through Hercules and sending messages with Hercule:=== | ||
| Line 38: | Line 38: | ||
==='''4.''' Receiving messages with Hercules:=== | ==='''Step 4.''' Receiving messages with Hercules:=== | ||
In this step we need to use the terminal log. When you want to send a message from FMx 640 to the server, write it in Terminal but change your com port and select port which is assigned for COM1/COM2. | In this step we need to use the terminal log. When you want to send a message from FMx 640 to the server, write it in Terminal but change your com port and select port which is assigned for COM1/COM2. | ||
Revision as of 13:05, 21 February 2023
Main Page > EOL Products > FMB640 > FMB640 Manual > Teltonika FMx 640 With TCP Link ModeIn this mode link with external device (for example PC) using text messages can be established. FMx has to be connected to the external device through RS 232 on COM1/COM2 port of FMx. Any string of data coming to COM port will be routed to server (if link is currently active). Messages that are exchanged between FMx device and server, have to be packed in Codec.12 format. Here for TCP link establishment, we will use Hercules. For sending messages from FMx to server Terminal will be used.
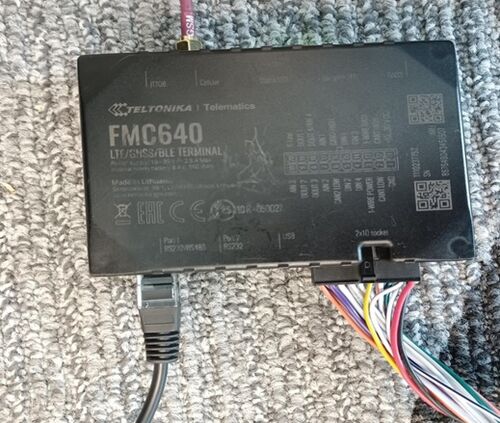
Step 1. First you have to connect the FMx640 with the RS232. On COM1 The below picture illustrates the connection:

Step 2. Second step after the connections, you must configure the FMx640:
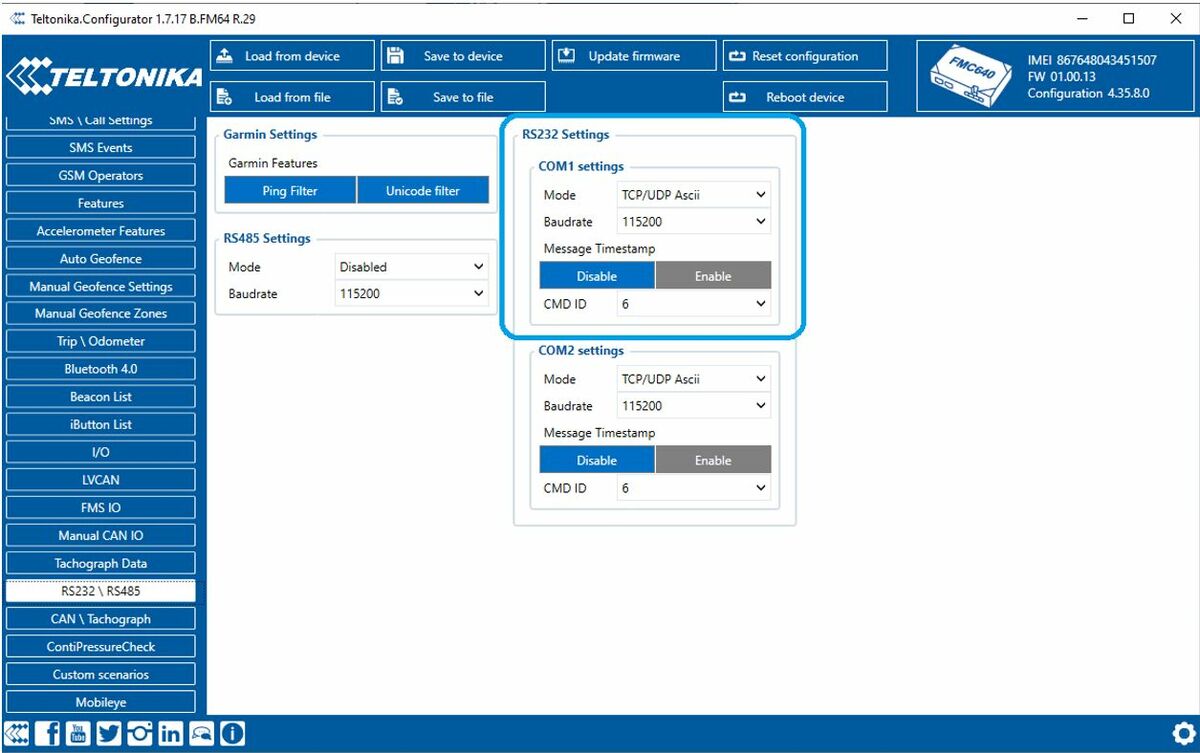
The FMx configurator you have to set parameters for COM1 or COM2 (depends on which COM port you are using) in global parameters window. You have to modify the server sittings to you PC IP and your TCP port.

· Modify the Mode from silent to TCP/UDP Ascii mode.
· Make sure that the Baud rate is matching with the baud rate in the terminal, in our example it is the sensor
Note: Try to make sure that your TCP Port is open by checking the below website:
Port Checker - Check Open Ports Online
Step 3. Establishing FMx test link with server through Hercules and sending messages with Hercule:
In this case we have a PC that is considered to be a server and an external device at the same time. When FMx is configured and connected to the external device, next that we have to do is to start Hercules which is in server side and will be used for sending and receiving messages.
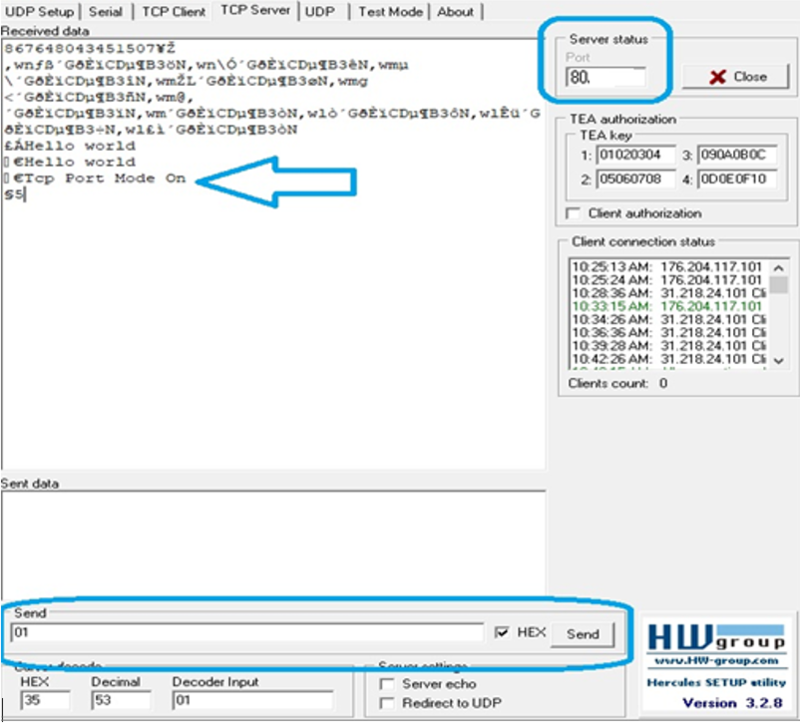
Here you have to send acknowledgement after receiving the IMEI from the device. then You have to send 01 as a server response.

You have to choose TCP Server section from the upper menu. In the marked fields.
Step 4. Receiving messages with Hercules:
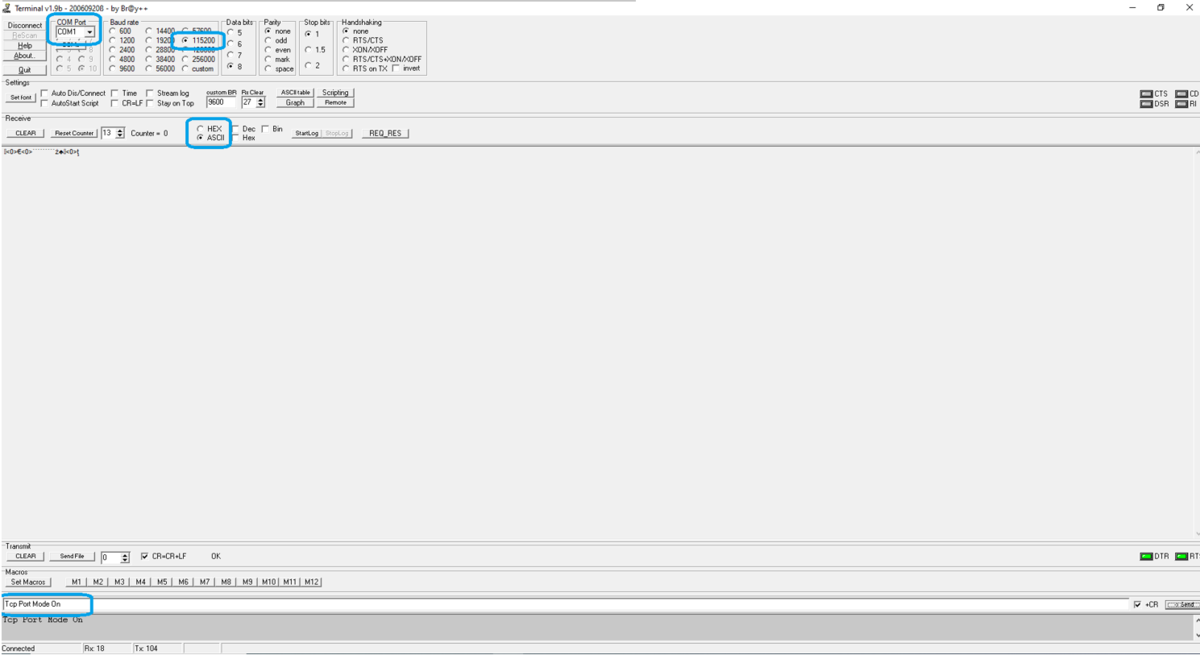
In this step we need to use the terminal log. When you want to send a message from FMx 640 to the server, write it in Terminal but change your com port and select port which is assigned for COM1/COM2.

After doing the mentioned configuration you can type your message in the marked field, check +CR and press Send button. If sent successfully, you will see it in Hercules Received data field.

The Conclusion of this test:
In this mode link with an external device for example PC using text messages can be established. We can apply this scenario on FMx640 or FMx125 which have to be connected to the external device through RS232 or RS485. Any string of data coming to device via RS232 or RS485 will be routed to the server (if the link is currently active). Messages that are exchanged between FMx device and server, have to be packed in Codec.12 format and will receive to the Hercules receiver successfully.
