Template:FM36YX Geofencing settings
Geofence
Geofencing is another feature which is highly customizable and can detect wherever car enters or leaves customized areas.
FM36YX has 5 configurable Geofence zones and it can generate an event when defined Geofence zone border is crossed.
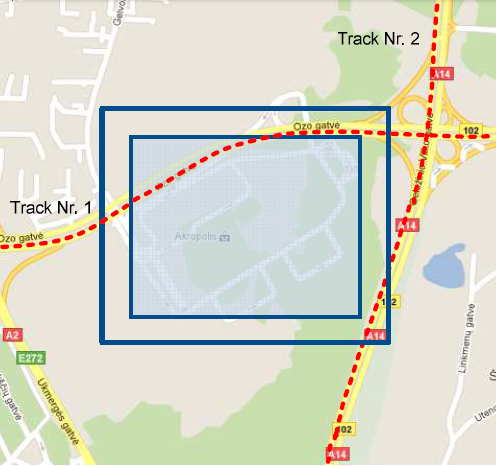
Frame border – frame border is an additional border around Geofence zone. It is additional
area around defined zone used to prevent false event recording when object stops on the border
of the area and because of GNSS errors some records are made inside area and some – outside.
Event is generated only when both borders are crossed. See figure below for details: track 1 is
considered to have entered the area while track 2 is not.

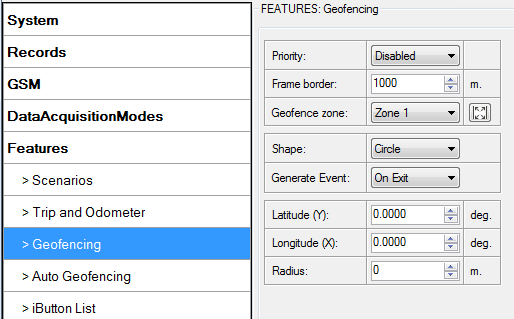
Geofencing option can be configured by following parameters visible in Figure below.
Shape – can be rectangle or circle;
Priority – priority of Geofence event: low, high or panic. These levels define priority of event information sending to server. See I/O element description for more details about priorities;
Generate event (On entrance, On exit, On Both) – choose when record will be generated;
X1 – geofence zone left bottom corner X coordinate (longitude);
Y1 – geofence zone left bottom corner Y coordinate (latitude);
X2 or R – geofence zone upper right corner X coordinate (longitude) or radius of circle when Circular zone is used (radius in meters);
Y2 – geofence zone upper right corner Y coordinate (latitude);
Autogeofence
Auto Geofencing feature if enabled is activated automatically by turning off car ignition. Next time before driving user has to disable Auto Geofencing with iButton or by turning on car ignition. In case of theft car leaves Auto Geofencing zone without authorization high priority record to AVL application is sent automatically.
AutoGeofencing settings
AutoGeofence – the last known position after movement = off. If your car’s being taken away – you can be notified. The shape and size of the geofence zones are parameters. When object will leave geofence zone device will trigger an asynchronous message.
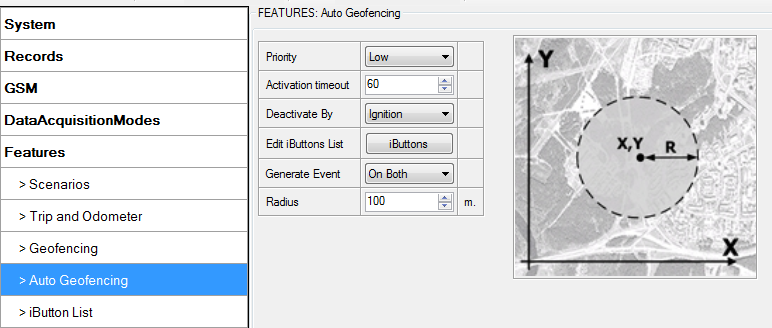
AutoGeofencing option can be configured by following parameters visible in Figure below.
Activation TMO – Time period before Geofence is activated after vehicle stops.
Deactivate By:
- Ignition – If ignition (configured Ignition Source) becomes high it will disable AutoGeofenze Zone.
- iButton – if iButton is attached it will disable AutoGeofence Zone. Edit iButton List – if list is not empty, attached iButton is tested against an iButton list, if match is found AutoGeofence zone is disabled.
Priority – Priority of generated event, which will be applied to saved record.
Exit Event – Event generation on Geofence exit.
On Both – Event generation on Geofence exit.
Note that AutoGeofencing does not require entering coordinates, instead it requires GNSS visibility. If vehicle stopped and activation timeout has passed, an AutoGeofence will be created around vehicle’s last position with set Radius value. AutoGeofence event generation works the same as Geofencing mentioned above.


