Test Dual Cam wiki
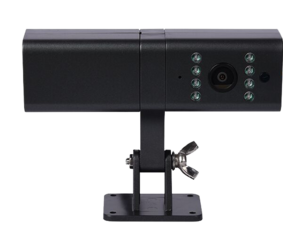
Teltonika DualCam is connected to FMB125,FMC125 and FMB225, FMC225 devices using the RS232 interface.

- First Start
- Camera Manual
- DualCam Configuration
- DualCam Data Sending Parameters ID
- Data image/video review
- DualCam Firmware errata
Video file conversion
Video files and conversion
Videos downloaded from the camera are in the raw h265 format. By default, they could be viewed using the ZMVideoPlayer program in the h265 format. If the videos are needed in a more common format, they can be converted.
Video conversion example and settings
For converting DualCam h265 videos to a more popular mp4 video format, a free open-source converter FFmpeg is used in the example. Although any other converter from h265 would work as well.
To convert DualCam video properly, the converter has to know the frame rate of the video. The frame rate is configured as Config Id: 66003 and could be either 20, 25, or 30 FPS. That same value could be obtained by using the metadata command (see more details at File metadata response (CMD ID 0x000B)).
Recommended parameters using the FFmpeg for the conversion:
ffmpeg -r <fps> -i <input>.h265 -ss 00:00:0.9 -c:a copy -c:v libx264 <output>.mp4
<fps> - configured frame rate of the video;
<input> - file name of the video file from the camera;
<output> - file name of the video that will be converted to mp4.
Certifications & Approvals
Camera is configured if all of these conditions are met:
- RS232 mode is selected (DualCam)
- Camera was not configured since startup or one of the related parameters were changed (compression, framerate or OSD)
- Camera file transfer is not active
Active camera reconfiguration is accompanied by two consecutive camera shutter clicks.
If camera is disconnected and later reconnected, a device will detect it by periodic camera ping packet. Once camera is detected, the device will reissue the reconfiguration procedure.
General command structure
General communication packet structure is as in the table bellow. It consist of CMD_ID (2 bytes), Data length of a command and a payload.
| Command ID | Data length | Data |
|---|---|---|
| 2 bytes | 2 bytes | [data length] bytes |
Communication protocol
Close a session command (CMD ID 0x0000)
In case when a device connects to a server, but the server does not expect it to connect, the server will respond by sending a CLOSE command after which the connection will be terminated. This command is also used when the device connects to a server for a custom file sending and the server finishes to send all custom files to the device.
| Command ID | Data length |
|---|---|
| 0x0000 | 0x0000 |
Start file transfer command (CMD ID 0x0001)
After device received file request command from the server (0x0008) device sends START command with file data (packet count).
| Command ID | Data length | File Packets (4 bytes) | Blank field (2 bytes) |
|---|---|---|---|
| 0x0001 | 0x0006 | 0x12345678 | 0x0000 (always same value) |
File request command (CMD ID 0x0008)
After the device is connected for a file upload, the server initiates file transfer by sending a FILE REQ command.
| Command ID | Data length | File Identifier |
|---|---|---|
| 0x0008 | 2 bytes | See the table below |
The device should answer with a START command described above indicating the size and CRC of the requested file.
| File source, type | Identifier (ASCII chars) |
|---|---|
| Photo from camera, rear | %photor |
| Photo from camera, front | %photof |
| Video from camera, rear | %videor |
| Video from camera, front | %videof |
Resume file transfer command (CMD ID 0x0002)
In a response to the START command a RESUME command must be sent from server.
| Command ID | Data length | Packet offset (4 bytes) |
|---|---|---|
| 0x0002 | 0x0004 | 0x00000001 |
To begin file transfer from the start, offset should be set to 1 (4 bytes value). In case when the file transfer was interrupted, to resume file transfer, offset can be set to the desired value (1 ≤ [offset] ≤ [file packets]).
Synchronize file transfer command (CMD ID 0x0003)
In a response to the RESUME command a SYNC command is sent from device.
| Command ID | Data length | File offset (4 bytes) |
|---|---|---|
| 0x0003 | 0x0004 | 0x00000001 |
By sending the SYNC command it is ensured that the next data command will contain file data starting from the specified offset.
File data transfer command (CMD ID 0x0004)
After sending a SYNC command, a file data transfer is started by sending DATA commands.
| Command ID | Data length | File data (up to 1024 bytes) | Data CRC (2 bytes) |
|---|---|---|---|
| 0x0004 | 0x0402 | ... | ... |
A File data is split into 1024 byte parts, each part wrapped into a DATA command and is sent.
Note: if a command with a bad CRC is received, RESUME command should be sent with the last valid file offset, after receiving a RESUME command, the server will stop sending DATA commands and continue communication from “Resume file transfer” step.
CRC polynomial expression: 0x8408
The initial value, when calculating CRC, is the previously received packet (CMD ID 0x0004) CRC value.
File transfer status command (CMD ID 0x0005)
After a file transfer is completed and no more files are required from the device, a server should send a COMPLETED command to the device (this command does not work after executing repeat init command0 x0009 – in this case, the server should send a CLOSE SESSION 0x0000 command mentioned before).
| Command ID | Data length | Status (4 bytes) |
|---|---|---|
| 0x0005 | 0x0004 | 0x00000000 |
In case of the server using invalid arguments, commands or not following the file request flow, the device will send this command with a Status field set to one of the few possible error codes. A list of possible ones is provided below.
| Status value (hexadecimal) | Description | Notes |
|---|---|---|
| 0x00000000 | File transfer process completed | Sent from server |
| 0x00000002 | Failed to close GPRS | Sent from device |
| 0x00000003 | Failed to close socket | Sent from device |
| 0x00000005 | Invalid response from server to init packet | Sent from device |
| 0x00000011 | This error code forces the device to disconnect from server | Sent from device. Possible causes:
|
After a COMPLETED command device should disconnect from the server.
Initialization packet repeat command (CMD ID 0x0009)
When sent, the initialization packet is repeated. This is used, when all of the files are downloaded and an additional check is carried out for any additional files, that may have been captured during the download operation.
Query file metadata request (CMD ID 0x000A)
This command is used for retrieving extra information about a selected file. A file identifier is used to determine which file’s information will be received. File identifiers are identical and used in the same way as in the File Request Command (0x0008).
| Command ID (2 bytes) | Data length (2 bytes) | File Identifier (7 bytes) |
|---|---|---|
| 0x000A | 0x0007 | 0xFFFFFFFFFFFFFF |
Can be sent after the initialization packet or after the file transfer is complete. It is not a mandatory command and doesn’t have to be used. The response for this command is 0x000B (more details below).
Note: 0x000A command was added since 03.27.04.Rev.104 firmware version and would not work with older versions.
File metadata response (CMD ID 0x000B)
0x000B is a response command to the request command 0x000A.
Response command returns information about a specified file: file type, timestamp, trigger, and video length. Complete command’s structure:
| Command ID (2 bytes) | Data length (2 bytes) | Command version (1 byte) | File type (1 byte) | Timestamp (8 bytes) | Trigger (1 byte) | Video length (2 bytes) |
|---|---|---|---|---|---|---|
| 0x000B | 0x000D | 0xFF | 0xFF | 0xFFFFFFFFFFFFFF | 0xFF | 0xFFFF |
Note: 0x000B command was added since 03.27.04.Rev.104 firmware version and would not work with older versions.
Response command meta data:
| Data | Description |
|---|---|
| Command version | Iteration of the command itself to determine to parse of the data |
| File type | Media type for confirming which file’s metadata is received. Byte structure is the same as byte 3 in the initialization packet settings data |
| Timestamp | Timestamp at the time of the trigger. Same used in a corresponding SOS record |
| Trigger | Trigger values. Same values as video sending trigger in SOS record. |
| Video length | Duration of the video in seconds. If the file type is a photo, this value is 0x0000. |
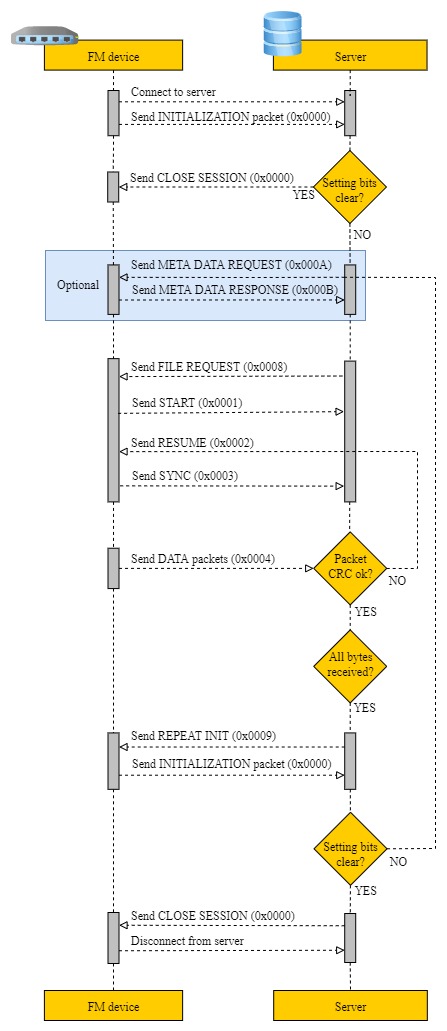
File transfer visual flow
DualCam update procedure
NOTE: This update procedure is for the DualCam which has 1.9.3 firmware version, if you already have DualCam firmware version 2.2.1, 2.2.2 or 2.2.3 skip to step 10.
Firmware download for FMX125 and DualCam:
Link: https://drive.teltonika.lt/d/e5c4b09a60b74fa5b6a0/
Password: 3RpOAf96
DualCam firmware video update
Before the update, FMx125 has to be updated first. The latest camera firmware requires 03.27.13.Rev.362 or newer firmware. After FMx125 update, update of the camera can start:
1 Connect the camera to the FMx125. Power up, wait for the configuration finish (about 30 seconds after power up).
2 Ensure, that power supply at all times has stable 14V and not less that 2.5A output. If update is performed with the camera, that is installed in the vehicle, it is strongly recommended to have the engine running for stable alternator power supply.
3 Make sure that the camera works and responds (for example, try getting an image or try sending “camgetver” and check whether for both front and rear camera firmware versions are returned).
4 Format the SD cards of both cameras using SMS command "camget_sdformat:<cam id>". Cam id is the same as in “camreq”: 1 - Front Camera, 2 - Rear Camera. For example:
camget_sdformat:1
camget_sdformat:2
Our device will return success if the format goes well. The result returned of a successful SD card format: Camera front/rear SD Card format success
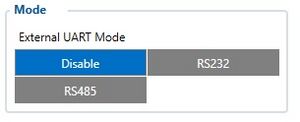
5 After the cards are formatted, power off everything, disconnect the camera from FMx125 and take out the SD cards. If disconnecting FMx125 from the DualCam is not possible, disable external UART mode from the configuration:
6 After taking out SD cards, write the firmware file of V2.2.0 to the root of both (front/rear) SD cards. Do not rename the firmware file, it has to be as it is, "JPEG_IPC_APP".
7 Put the cards back in, power the camera on. Do not reconnect the camera to the FMx125 or configure RS232 mode back yet.
8 Wait 60-90s for 2.2.0 version (for 2.2.3 version wait 120s). You should hear a click from the rear camera after the update succeeds. That click sound indicates restart of the rear camera which happens after successful firmware update.
9 Even if you don't hear the clicking sound, reconnect the camera to the FMx125 (or reconfigure RS232 mode back to DualCam) after few minutes anyway and send SMS “camgetver” command to check the versions.
At this point the command should return “Front/Rear camera camgetver failed.” If it does, it does not mean a problem, because V2.2.0 is a transitional firmware and it does not return version. Therefore, if the camera was returning V1.9.3/1.9.2 or other 1.9.X version, this means it has updated to the V2.2.0 successfully and update procedure can continue.
10 Format SD cards again as it is in step 4 and disconnect from the camera the FMx125. After that go with step 11.
11 Take the cards out and write the firmware files of V2.2.1 V2.2.2 and V2.2.3 to the root of both SD cards. The file name is“ALL221_IPC_BIN”, “ALL222_IPC_BIN” and “ALL223_IPC_BIN”. Again, do not rename it. (You must write 3 files to the SD card)
12 Repeat steps 7, and 8. After that go with step 13.
Note: Only for 2.2.3 version wait 120 second
13 Now, if all went successfully, return to the “camgetver” should return this: Front camera V2.2.3. Rear camera V2.2.3.
If it does, that means the camera is updated to V2.2.3 successfully.
14 After the update, it would be advisable to format SD cards again.
Potential issues and solutions
Update is pretty straightforward most of the time. However, sometimes the update does not trigger. In case it doesn’t and the camera does not update, check whether it is really disconnected from FMx125 device. If it is, do not power off the camera at first. Keep it powered on and take out and put back in both SD cards. After this, wait 60-90s again and check the firmware version using “camgetver”.
If it still is not updated, disconnect from FMx125, power the camera off for at least 20 seconds and power it back on. Wait for a few minutes and then re-insert the cards again. Reconnect and check the firmware version using “camgetver”.
Can also note that if just one camera updates, only front or only rear, all mentioned solutions and steps could be done to only camera.
Reminder, that the rear camera is with IR LEDs and light sensor and the front one is without them.
Troubleshoot
DualCam Checks
- Check RS232 configuration, baud rate, etc. Default values should be set for the DualCam.
- See if both cameras are working. Try sending separate picture requests and check the result. “camreq:1:1” for the front camera and “camreq:1;2” for the rear camera. Possible responses to "camreq" command - Camera request command
Check camera IO values in the configurator.
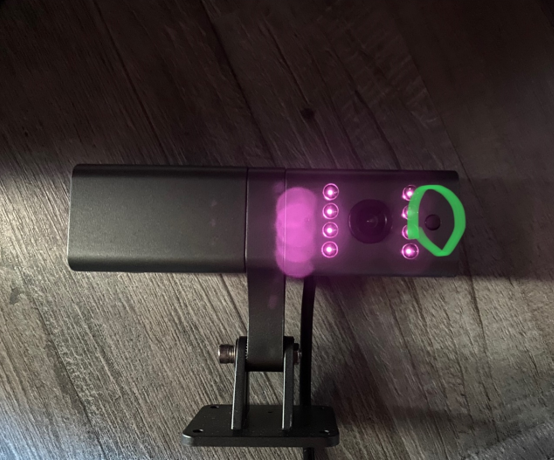
- See if the camera is physically enabled, gets power, and re-check the RS232 connections. You can also test if the camera is physically enabled by covering the light sensor on the rear camera (marked green in the picture below). The rear camera’s IR LEDs should turn on by doing so in a dark environment.
- If the camera seems to be enabled, check the SD card content. See if there are any files and review the footage using TF CardVideoPlayer v1.14. If there is some footage from the time the camera was turned on. The actual time in the camera might differ, therefore check older dates to see if there are any videos.
- If some recent video files were found, it means that the camera is working, but not responding to RS232 commands. Otherwise, the camera is either not working or not responding to commands and does not detect SD card.
Possible solutions
- Camera might have a problem detecting SD card. Format microSD card using FAT32 file system. Try different cards. Try re-inserting the cards while the camera is turned on. Also, keep in mind that the smallest supported card is 16 GB.
- Physical camera restart. Disconnect the camera’s power supply and disconnect from the FMX125 device. Leave the camera for a few minutes like that and power it on but do not connect to the FMX125 for a few minutes. After some time, reconnect the device and check if the camera responds.
- Try firmware update:
- Upload firmware to both SD cards. The firmware file has to be the exact name “JPEG_IPC_APP” name without any extensions.
- Disconnect the camera from the FMX125 device.
- Power the camera off.
- Put the SD cards in.
- Turn the power on but do not connect to the FMX125.
- Wait for 3-5 minutes.
- Turn off the power and reconnect to the FMX125 device.
- Power on the camera with the FMX125 device.
- Check whether Codec8 Extended is enabled. Without Codec8 Extended, parameters of AVL ID 497, 498, 499 WILL not be sent.
If nothing helps and the camera is still not working or working incorrectly, log data using 2;3;9;1 filter and collect the log files.
Camera firmware version
Additional SMS/GPRS command for cameras’ firmware checking. Since both cameras are separate, there are two versions returned.
| Command | Arguments | Explanation |
|---|---|---|
| camgetver | None | Used to check firmware versions.
Returns version in the format: V<major>.<minor>.<revision>. For example, V1.9.3. Because there are two cameras, two versions are returned. The complete response would look like this: Front camera V1.9.3. Rear camera V1.9.3. If there are problems reading the version or if the camera is not responding/connected, the return would be this: The front camera camgetver failed. The rear camera camgetver failed. |
Camera request command
A new camera request has been added, which allows the server to request files from a camera. The format is as provided below in the table:
| Command | Arguments | Explanation |
|---|---|---|
| camreq: | <file_type>,<file_source>,<timestamp>,<duration>
,<domain>,<port> |
Captures appropriate file with the provided details. If the connection to server is opened, them files immediately become available for download. If not, then connection is tried to be made. If <domain> and <port> parameters are included, the device will send footage of the command to that address. |
The arguments are as follows:
- <file_type>
- 0 - Video
- 1 - Photo
- <file_source>
- 1 - Front camera
- 2 - Rear camera
- 3 - Both cameras
- <timestamp>
- Unix timestamps in decimal (not required for photo download)
- <duration>
- Video duration in seconds from provided timestamps (not required for photo download), (max 30 sec)
Structure examples:
camreq:<file type>,<file source>(if video, add ",<timestamp>,<duration>)
However, if there is a need to send to the specific server without configuring, you can add two extra parameters. The complete structure:
camreq:<file type>,<file source>(if video, add ",<timestamp>,<duration>),<domain>,port
For example: camreq:0,1,1624960616,5,212.59.13.226,7160
| Conditions | Command response | ||
|---|---|---|---|
| Request successful and server connection successful. Device is ready to send selected file | Photo request from source <1-3>.
(If photo request)
(If video request) |
Preparing to send file from timestamp <timestamp of the file> | |
| Request successful but the device was already connected to the server. Device is ready to send selected file | Already connected. Preparing to send file from timestamp <timestamp of the file> | ||
| Request received but the capture failed | Error: capture failed | ||
| Request received but the device cannot proceed with the capture and sending because ignition is off | Error: Cannot capture because ignition is off | ||
| Request received but the previously captured and prepared photo/video was not sent. New media is not captured. The device is ready to send the previous capture | Warning: Photo / Video already captured previously, trying to send it | ||
| Request received but the device was already connected to the server. New media is not captured. The device is ready to send previous capture | Already connected. Warning: Photo / Video already captured previously, trying to send it | ||
| Request received but the camera doesn’t acknowledge sent command. Nothing will be sent | Error: DualCam NAK | ||
| Request received but the camera is not connected or not working | Error: DualCam not present | ||
| Request received but the camera is not connected or not working | Error: requested file does not exist | ||
| Request received but the device cannot connect to the server | Error: connect to server | ||
| Request received but the modem is not ready for operation (network or modem issue) | Error: modem not ready to start send | ||
| Request received but the device cannot proceed with the capture and sending because the camera is being reconfigured | Cannot send, DualCam configuration is in progress | ||
| Request received but file capture time was exceeded. | Error: Media request timeout | ||
| Request received but capture completed incorrectly | Error: Media request problem | ||
| File type parameter incorrect in the request command | Error: Invalid | File Type | argument in camera request cmd! |
| File Source parameter incorrect in the request command | File Source | ||
| Timestamp parameter incorrect in the request command | Timestamp | ||
| Duration parameter incorrect in the request command | Duration | ||
| Cannot proceed with the request, ignition is off | Error: Ignition not detected! | ||
| Request command structure incorrect | Error: Invalid camera request command! | ||
| RS232 and DualCam mode is not enabled | Error: DualCam is not configured! | ||
| Front or rear camera not found | Error: Front / Rear Camera not present | ||


