Template:Mounting recommendations
Revision as of 08:57, 13 May 2019 by Danielekrau (talk | contribs)
Mounting recommendations
- Connecting wires
- Wires should be connected while the module is not plugged in. Wires should be fastened to the other wires or non-moving parts. Try to avoid heat emitting and moving objects near the wires.
- Wires should be fastened to stable wires or other non-moving parts. Any heat emitting and/or moving objects should be kept away from the wires.
- The connections should not be seen very clearly. There should be no exposed wires. If factory isolation was removed while connecting wires, the isolation material should be applied.
- If the wires are placed in the exterior or in places where they can be damaged or exposed to heat, humidity, dirt, etc., additional isolation should be applied and the wires should not be loose.
- Wires cannot be connected to the board computers or control units.
- Connecting power source
- Be sure that after the car computer goes to sleep mode, power might be still available on the power wires. Be sure that after the car computer falls asleep, power is still available on chosen wire. Depending on car, this may happen in 5 to 30 minutes period.
- When module is connected, measure voltage again to make sure it did not decrease.
- It is recommended to connect to the main power cable in the fuse box.
- 3 A, 125 V external fuse shall be used. Use 3A, 125V external fuse.
- Connecting ignition wire
- Be sure to check if it is a real ignition wire i. e. power does not disappear after starting the engine.
- Check if this is not an ACC wire (when key is in the first position, most of the vehicle electronics are available).
- Check if power is still available when you turn off any of vehicles devices.
- Ignition is connected to the ignition relay output. As alternative, any other relay, which has power output when ignition is on, may be chosen.
- Connecting ground wire
- Ground wire is connected to the vehicle frame or metal parts that are fixed to the frame.
- If the wire is fixed with the bolt, the loop must be connected to the end of the wire.
- For better contact scrub paint from the spot where loop is going to be connected.
{
Mounting recommendations
Device fastening
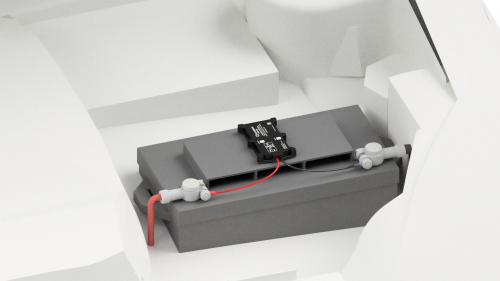
- Locate the battery in your vehicle. If present remove the battery cover to access the battery.
- There is a double sided tape on the back of the device, use it to attach the device on the battery, so that the GNSS antenna and LEDs indicators are facing up.
Connecting power wire
- Device power wire is designed to be directly connected to the positive terminal fastener of the vehicle battery.
Connecting ground wire
- Device ground wire is designed to be directly connected to the negative terminal fastener of the vehicle battery.
Safety information
This message contains information on how to operate FMB1YX safely. By following these requirements and recommendations, you will avoid any dangerous situations. You must read these instructions carefully and follow them strictly before operating the device!
- The device uses a 10 V...30 V DC power supply. The nominal voltage is 12 V DC. The allowed range of voltage is 10 V...30 V DC.
- To avoid mechanical damage, it is advised to transport the FMB1YX device in an impactproof package.
- Before dismounting the device from the vehicle, ignition MUST be OFF.


