Geofence Solution in the Event of Pandemic
Project description
One of the more advanced features of GPS trackers is the ability to create Geofence scenarios in a real-time with triggered alerts. Geofences are designated areas or zones that can be defined on a map or as a distance from the specific location. The feature may help to comply with some pandemic lockdown measures and greatly benefit private car owners, families, corporate fleet managers and business owners. All Teltonika GPS tracker models have Geofence as a standard feature.
What you need for a solution?
- Geofence solution is supported by all Teltonika devices. To show this scenario, we will be using the FMM130 model.
- The SIM card in order to receive data to your server.
- Teltonika Configurator to make the configurations for your Teltonika device.
- FOTA WEB to send the configurations to your device remotely.
Installation
Since Geofence can be used in all of Teltonika devices, it is important to follow your specific device mounting recommendations. This is because if you were to install the tracker following the instructions of a different one, your device may not work properly in the end. Also, we offer a wide range of trackers that have different connectors, some of the devices we offer are "Plug and Track" (devices that have OBD-II connectors), other may demand more wiring work to be done. The list of all Teltonika Fleet Management devices can be found here.
Configuration
1. Prerequisites:
1.1. Read through First start guide
1.2. Understanding what manual Geofence has to offer.
2. Configuration of Manual Geofence feature
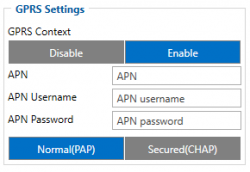
Once the first start guide is analysed, we can proceed with the Geofence configuration. To start off, we need to configure the GRPS settings.

Parameter ID – Parameter name GPRS settings:
- 2001 – APN
- 2002 – APN username (if there are no APN username, empty field should be left)
- 2003 – APN password (if there are no APN password, empty field should be left)

Server settings:
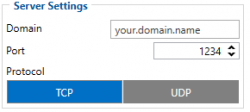
- 2004 – Domain
- 2005 – Port
- 2006 – Data sending protocol (0 – TCP, 1 – UDP)
After successful GPRS/SERVER settings configuration, FMM130 device will synchronize time and update records to the configured server. Time intervals and default I/O elements can be changed by using Teltonika Configurator.

Manual Geofence settings:
- 20100 - Feature priority (0 - Disable, 1 - Low, 2 - High, 3 - Panic)
- 20101 - Generate Event (0 - No Event, 1 - On Exit, 2 - On Entrance, 3 - On Both)
- 20102 - Eventual Records (0 - Disable, 1 - Enable)
- 20103 - Frame Border (m)
- 20104 - Shape Type (0 - Circle, 1 - Rectangle)
- 20105 - Radius (m)
- 20106 - Coordinate Y1
- 20107 - Coordinate X1
- 20108 - Coordinate Y2
- 20109 - Coordinate X2
- 20110 - Overspeeding (0 - Disable, 1 - Enable)
- 20111 - Max allowed speed (km/h)
- 7025 - Phone Number
- 8025 - SMS Text
Note: Radius is only calculated if the chosen Shape Type is a Circle. In this example, Radius cannot be seen since the shape chosen is the Rectangle. Also, Latitude Y2 and Longitude X2 are only used when Rectangle is the chosen shape.
Quickstart: From default configuration to Geofence crossing detection in one SMS: " setparam 2001:APN;2002:APN_username;2003:APN_password;2004:Domain;2005:Port;2006:0;102:1;11300:2;11304:1"
