Police Fleet Management
Introduction
To satisfy the growing demand for farming produce and tackle many challenges affecting the agriculture industry, present-day farmers have to be more innovative, efficient, competitive, but save resources at the same time. As a result, comprehensive, affordable, and customisable agricultural machinery tracking solutions combined with process monitoring and automation are becoming not only an attractive option but rather a necessity.
Solution description
Thanks to the fast-developing IoT technologies, agriculture-specific equipment, farming implements, and/or accessories tracking and management can be successfully achieved by combining GPS devices, CAN Bus data adaptors, and Bluetooth Low Energy 4.X (BLE) ID beacons. The ultimate choice for this matter - Teltonika ADVANCED category GPS tracker FMB140 with built-in CAN data reading feature and advanced software version supporting agriculture type vehicles (aka ALL-CAN300 option). The main advantage is the ability to receive specific agricultural vehicle data via the CAN bus via the Agricultural State Flag parameter. It is possible to obtain such special data as the position of the joystick, the position and status of hydraulic tools, the status of the grain tank and more. Also, using BLE sensors and beacons, you can get additional parameters that are not provided by standard sensors. This can be raising or lowering of the dump truck body and cab, temperature and humidity in the chamber. You can also track expensive equipment using BLE beacons.
What you need for a solution?
- The SIM card in order to get data to your server
- FOTA WEB to remotely send the configuration to the device.
Installation
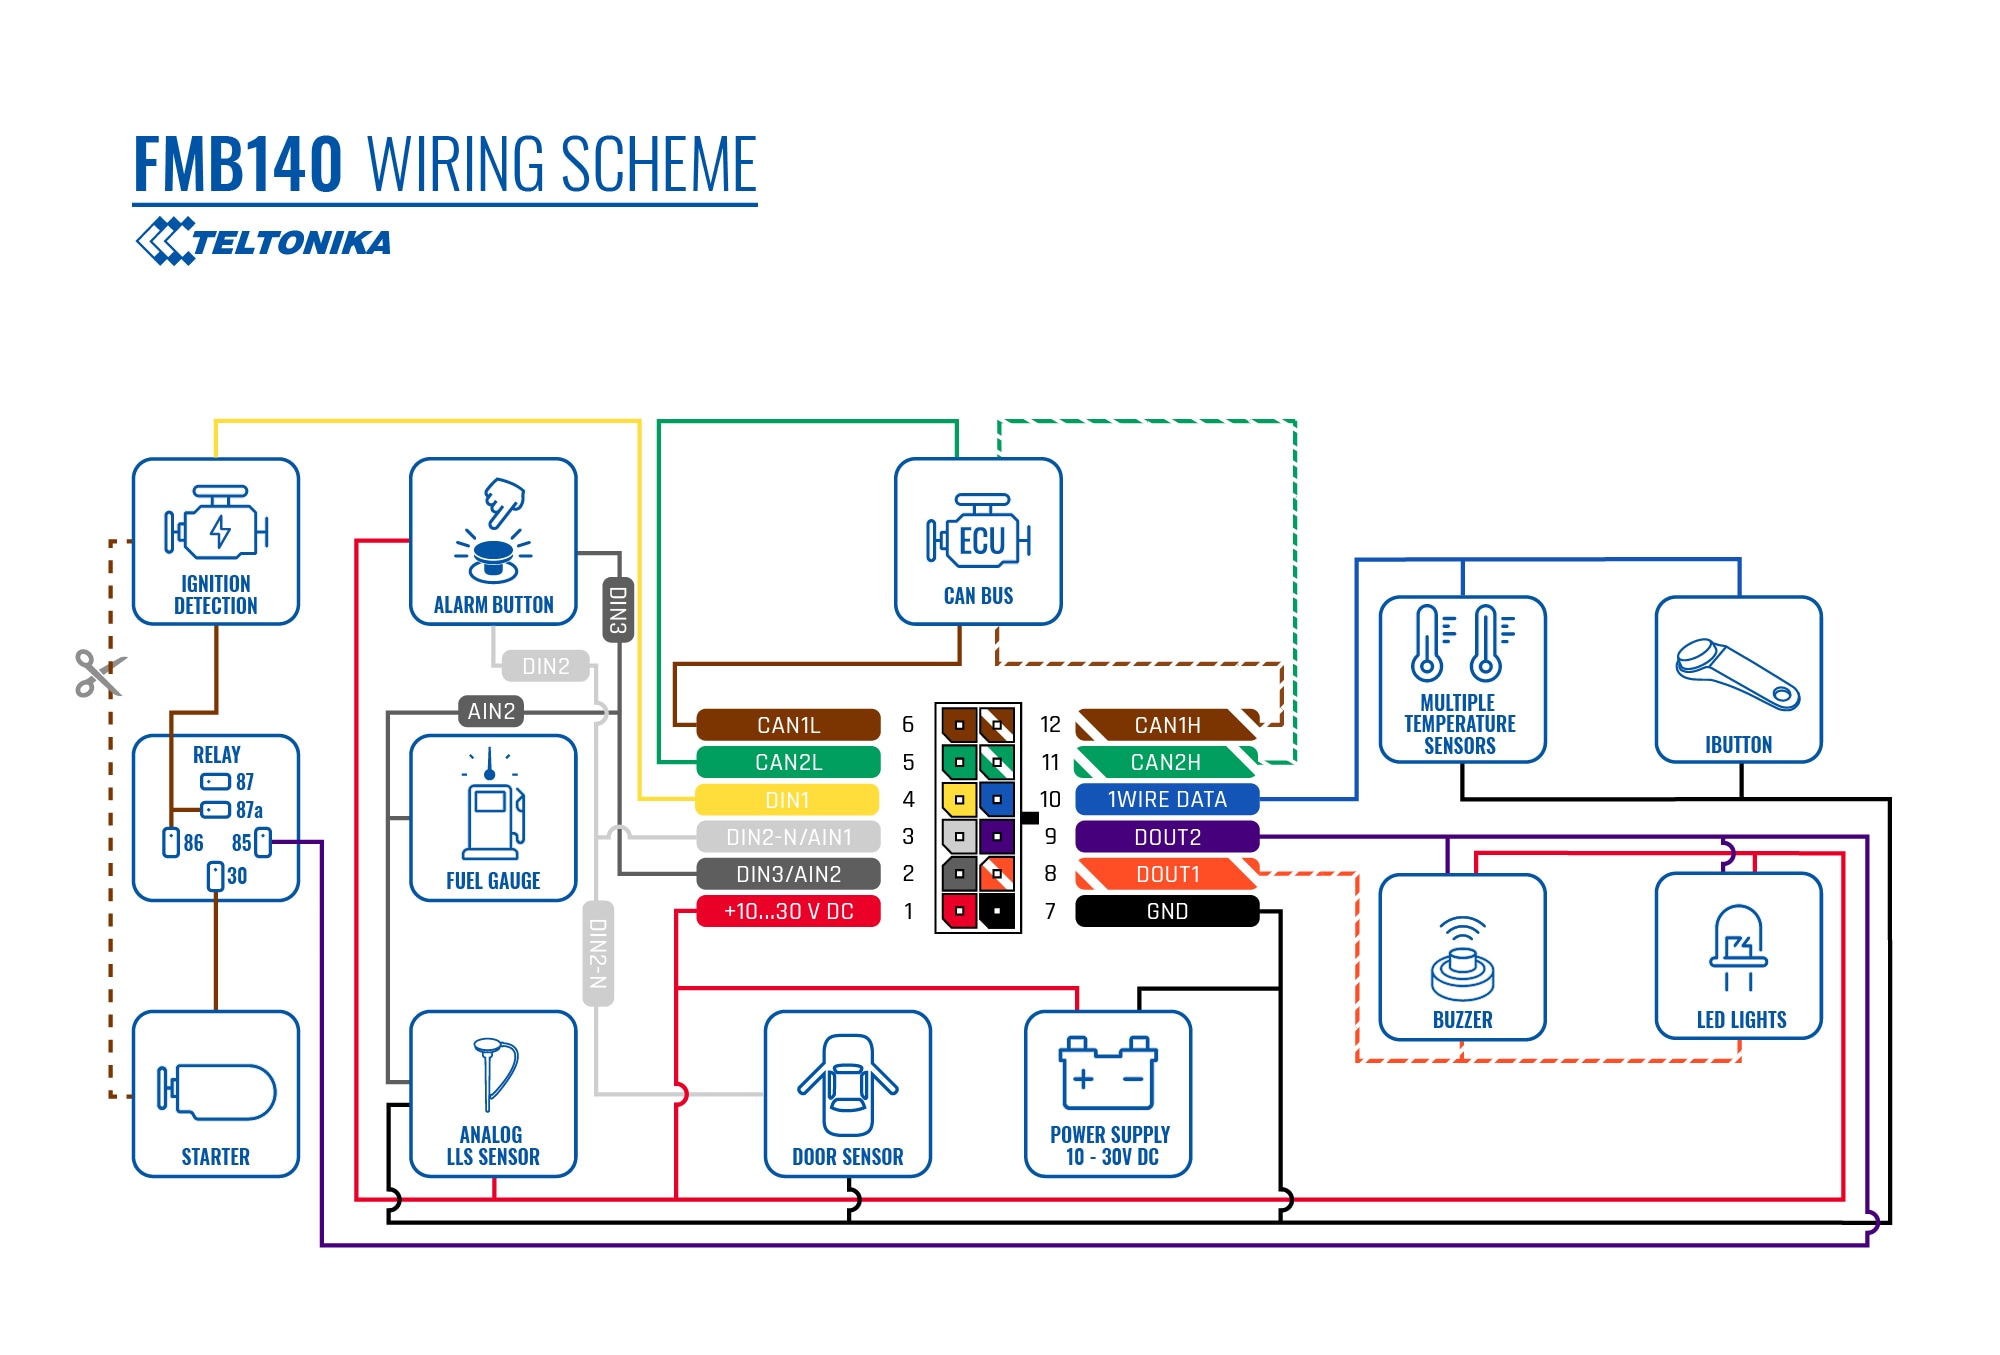
When installing FMB140 in a vehicle, follow the mounting recommendations. When connecting to the CAN bus, you must use the diagrams provided by our technical support engineers. The diagrams indicate in detail and clearly the connection points in the vehicle wiring and the required program number. It is also possible to obtain data from the vehicle CAN bus by performing an auto scan procedure. FMB140 has the function of working with wireless BLE sensors, supports connection of temperature sensors and iButton reader via 1-wire.
The installation of BLE sensors and beacons is quite simple, you need to install the sensor in a suitable place using screws or double-sided tape and install the required configuration in the tracker and sensor. This gives a huge advantage over wired sensors, since there is no need to pull wires, which means you can seriously save on the services of an electrician!
Configuration
1. Prerequisites:
1.1. Read through start guide
1.2. Understanding of possible Sleep modes.
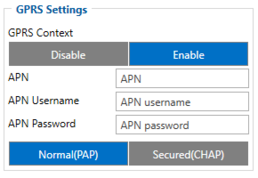
Parameter ID – Parameter name GPRS settings:
- 2001 – APN
- 2002 – APN username (if there are no APN username, empty field should be left)
- 2003 – APN password (if there are no APN password, empty field should be left)
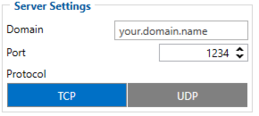
Server settings:
- 2004 – Domain
- 2005 – Port
- 2006 – Data sending protocol (0 – TCP, 1 – UDP)
After successful GPRS/SERVER settings configuration, FMB140 device will synchronize time and update records to the configured server. Time intervals and default I/O elements can be changed by using Teltonika Configurator or SMS parameters.

Data protocol settings:
- 113 – Data protocol (0 – Codec8, 1 – Codec8Extended)
Note: To get OEM parameters, you need to use Codec8Extended.
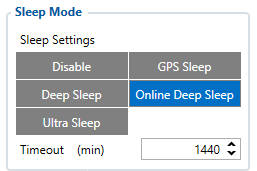
Sleep settings:
- 102 – Sleep settings (0 – Disable, 1 – Gps sleep, 2 – Deep sleep, 3 – Online Deep sleep, 4 – Ultra sleep)
Note: This scenario will not work with Deep Sleep and Ultra Sleep modes, since they disable the device's GSM module to save power.

CAN Adapter setting:
- 45002 – The program number that is indicated in the wiring diagram.

- 45001 – Send data with 0, if ignition is off(0 – Disable, 1 – Enable)
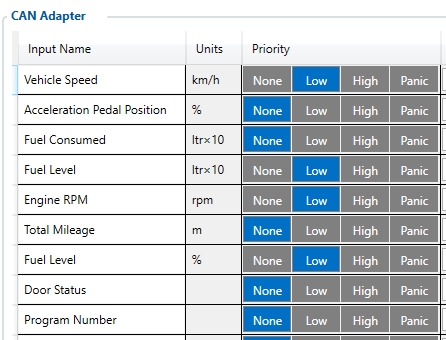
- 45100 – Vehicle speed, Priority "Low" (0 – Disabled 1 – Low 2 – High 3 – Panic )
- 45130 – Fuel level in ltr*10 , Priority "Low" (0 – Disabled 1 – Low 2 – High 3 – Panic )
- 45140 – Engine RPM, Priority "Low" (0 – Disabled 1 – Low 2 – High 3 – Panic )
- 45160 – Fuel level in %, Priority "Low" (0 – Disabled 1 – Low 2 – High 3 – Panic )
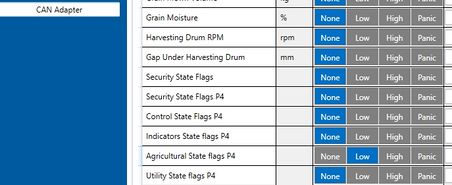
- 46060 – Agricultural State Flags, Priority "Low" (0 – Disabled 1 – Low 2 – High 3 – Panic )
Quickstart: From default configuration to AGRICULTURE AND FARMING INDUSTRY solution in one SMS:
" setparam 2001:APN;2002:APN_user;2003:APN_password;2004:Domain;2005:Port;2006:0;102:3;45002:Program number;45001:0; 45100:1; 45160:1; 45130:1; 45140:1; 46060:1; 113:1"
This SMS will set up your device to report object location to the server and possibility for read Engine RPM, Fuel level in %, Fuel level in ltr*10 and Vehicle speed parameters.
Note: Before SMS text, two space symbols should be inserted if no SMS username or password was set in SMS \ Call settings.
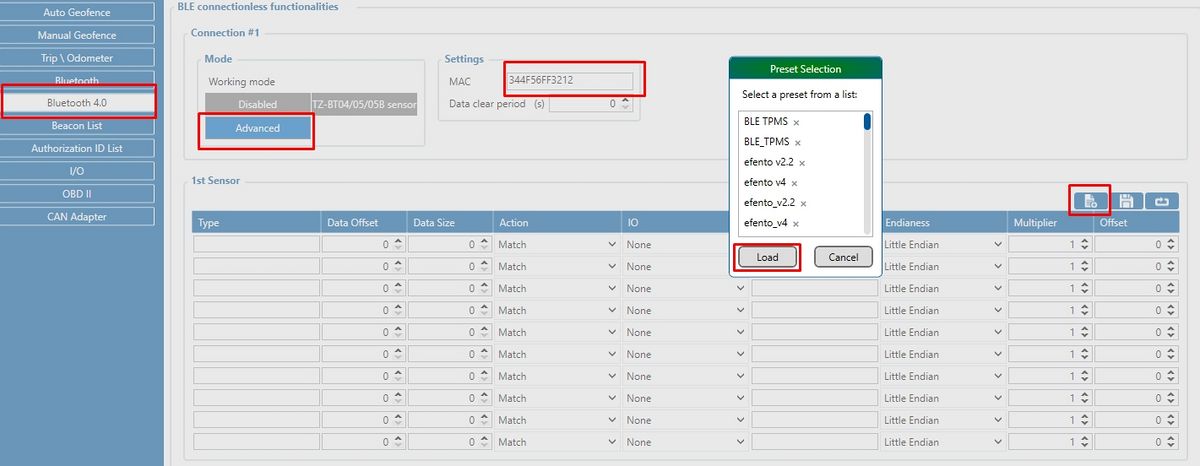
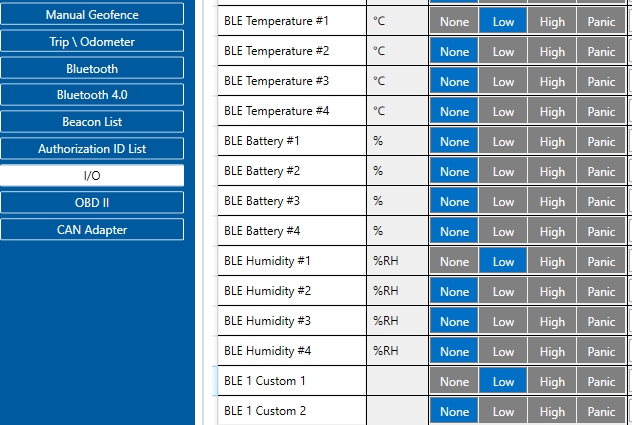
To use BLE sensors, use the configurator in online mode (tracker is connected) or offline (tracker is disabled). When using the configurator in offline mode, you can remotely download the configuration via FOTA WEB.
Parsing information
1.Prerequisites:
1.1. Open TCP/UDP port
1.2. Read Java parser first start guide
2. Parsing example:
| Unparsed received data in hexadecimal stream |
|---|
| 00000000000000848E010000017CE9B241900000000000000000000000000000000000000015000700EF0100F00100150500C800004502005100005900000900B5000000B600000042385C0
|
| AVL Data Packet Part | HEX Code Part |
|---|---|
| Zero Bytes | 00 00 00 00 |
| Data Field Length | 00 00 00 84 |
| Codec ID | 8E (Codec 8 Extended) |
| Number of Data 1 (Number of Total Records) | 01 |
| Timestamp | 00 00 01 7C E9 B2 41 90 (04.11.2021 6:45:46) |
| Priority | 00 |
| Longitude | 00 00 00 00 |
| Latitude | 00 00 00 00 |
| Altitude | 00 00 |
| Angle | 00 00 |
| Satellites | 00 |
| Speed | 00 00 |
| Event IO ID | 00 00 |
| N of Total ID | 00 21 |
| N1 of One Byte IO | 00 07 |
| 1’st IO ID | 00 EF (AVL ID: 239, Name: Ignition) |
| 1’st IO Value | 00 |
| 2’nd IO ID | 00 F0 (AVL ID: 240, Name: Movement) |
| 2’nd IO Value | 00 |
| 3’rd IO ID | 00 15 (AVL ID: 21, Name: GSM Signal) |
| 3’rd IO Value | 05 |
| 4'th IO ID | 00 C8 (AVL ID: 200, Sleep Mode) |
| 4'th IO Value | 00 |
| 5'th IO ID | 00 45 (AVL ID: 69, GNSS Status) |
| 5'th IO Value | 02 |
| 6'th IO ID | 00 51 (AVL ID: 81, Vehicle Speed) |
| 6'th IO Value | 00 |
| 7'th IO ID | 00 59 (AVL ID: 89, Fuel level) |
| 7'th IO Value | 00 |
| N2 of Two Byte IO | 00 09 |
| 1’st IO ID | 00 B5 (AVL ID: 181, GNSS PDOP) |
| 1’st IO Value | 00 00 |
| 2’nd IO ID | 00 B6 (AVL ID: 182, GNSS HDOP) |
| 2’nd IO Value | 00 00 |
| 3’rd IO ID | 00 42 (AVL ID: 66, External Voltage) |
| 3’rd IO Value | 38 5C |
| 4'th IO ID | 00 43 (AVL ID: 67, Battery Voltage) |
| 4'th IO Value | 00 00 |
| 5'th IO ID | 00 44 (AVL ID: 68, Battery Current) |
| 5'th IO Value | 00 00 |
| 6'th IO ID | 00 1A (AVL ID: 26, BLE Temperature #2) |
| 6'th IO Value | 09 0E |
| 7'th IO ID | 00 68 (AVL ID: 26, BLE Humidity #2) |
| 7'th IO Value | 00 23 |
| 8'th IO ID | 00 54 (AVL ID: 84, Fuel level) |
| 8'th IO Value | 00 00 |
| 9'th IO ID | 00 55 (AVL ID: 85, Engine RPM) |
| 9'th IO Value | 00 00 |
| N4 of Four Byte IO | 00 04 |
| 1’st IO ID | 00 F1 (AVL ID: 241, Active GSM Operator) |
| 1’st IO Value | 00 00 64 66 |
| 2’nd IO ID | 00 10 (AVL ID: 16, Total Odometer) |
| 2’nd IO Value | 00 00 00 00 |
| 3’rd IO ID | 01 D4 (AVL ID: 468, BLE 2 Custom #3) |
| 3’rd IO Value | 00 FD FF FF |
| 4'th IO ID | 00 57 (AVL ID:87, Total Mileage) |
| 4'th IO Value | 00 00 00 00 |
| N8 of Eight Byte IO | 00 01 |
| 1’st IO ID | 02 08 (AVL ID: 520, Agricultural State Flags_P4) |
| 1’st IO Value | 00 00 00 00 00 00 00 00 |
| Number of Data 2 (Number of Total Records) | 01 |
| CRC-16 | 00 00 06 47 |
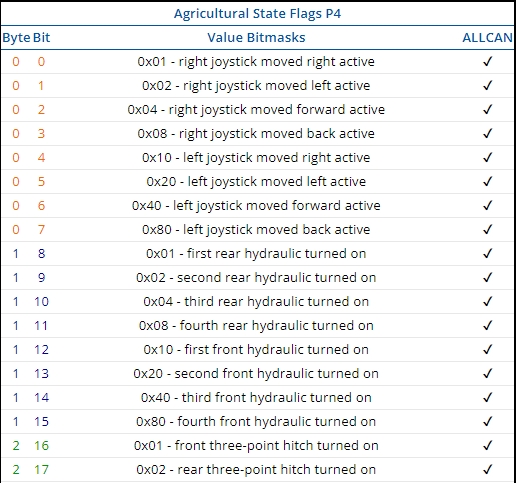
The Agricultural State Flag can be interpreted from this table, which can be found here. Each bit carries useful information that can be obtained.
Demonstration in platform
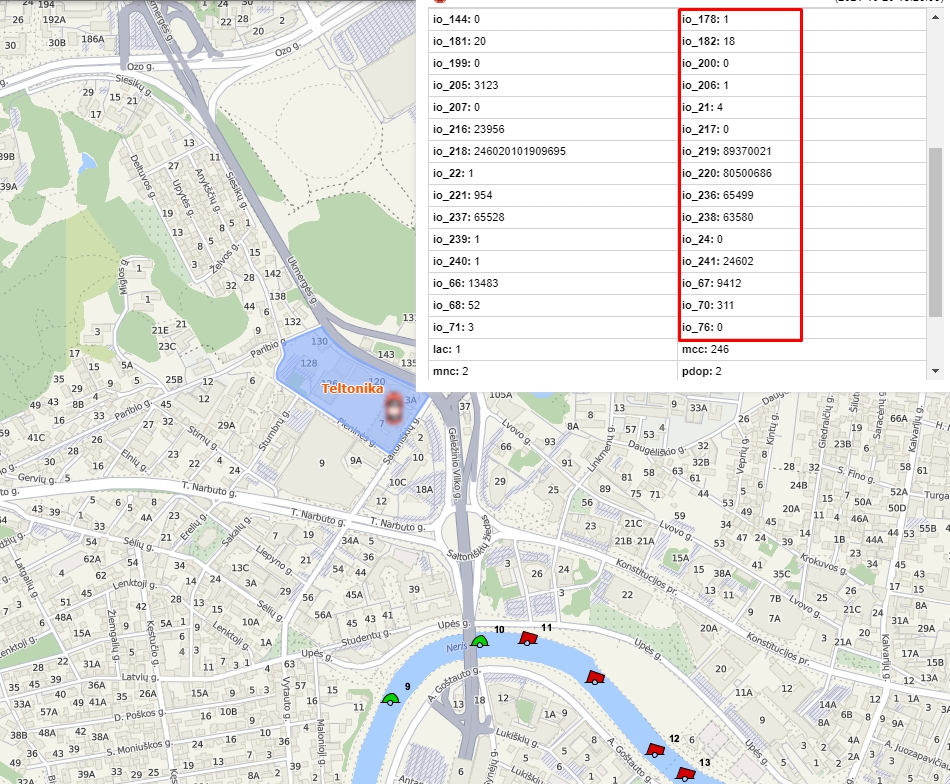
WIALON: Open WIALON → Open Messages → Select your device → Select the date interval → Select Message (data messages) → Select execute and you will see all the information.
