Difference between revisions of "EYE SENSOR Test"
Lohit.mahay (talk | contribs) |
Lohit.mahay (talk | contribs) |
||
| Line 155: | Line 155: | ||
2. Only new EYE Beacons bought with order codes that have hardware modification can hibernate standard codes are available in [https://teltonika-gps.com/products/accessories/sensors-beacons/eye eye page], for special order codes consult your sales manager. | 2. Only new EYE Beacons bought with order codes that have hardware modification can hibernate standard codes are available in [https://teltonika-gps.com/products/accessories/sensors-beacons/eye eye page], for special order codes consult your sales manager. | ||
| + | </div> | ||
| + | </div> | ||
| + | ==<p style="font-size:32px><span style="color:#0054A6">Mounting recomendations</span></p>== | ||
| + | [[File:Neweyemouning.png|858x858px]] | ||
| + | <br>[[File:New mounting recomendations 1.png|848x848px]] | ||
| + | |||
| + | ==<p style="font-size:32px><span style="color:#0054A6">EYE App Configuration</span></p>== | ||
| + | Devices work constantly and are ready to perform out of the box. Default basic Sensor settings are set to: | ||
| + | <br>• Transmitting at 2 dBm power. | ||
| + | <br>• Data advertising at 1 second intervals. | ||
| + | <br>• Eddystone and Sensors protocol | ||
| + | <br> | ||
| + | <br> If you would like to change these settings you will need to: | ||
| + | <br>1) Download and install EYE APP - Teltonika application to change sensor settings. | ||
| + | <br>[[File:QR.jpg]] | ||
| + | <div class="mw-collapsible mw-collapsed"> | ||
| + | ==<p style="font-size:32px"><span style="color:#0054A6">EYE APP Configuration</span></p>== | ||
| + | <div class="mw-collapsible-content"> | ||
| + | '''With the application you will be able to scan for visible Teltonika EYE devices, check their statuses or connect for configuration or firmware update.''' | ||
| + | <br> | ||
| + | {| | ||
| + | |- align="TOP" | ||
| + | |[[File:1.1.jpg|537x537px]] | ||
| + | | | ||
| + | | | ||
| + | | | ||
| + | |[[File:2.1.jpg|537x537px]] | ||
| + | | | ||
| + | | | ||
| + | | | ||
| + | |[[File:Correct1.1.png|530x537px]] | ||
| + | | | ||
| + | | | ||
| + | | | ||
| + | |[[File:4.1.jpg|537x537px]] | ||
| + | |} | ||
| + | |||
| + | ==== [[File:Frame 115.png|bottom|frameless|upright=0.2|link=|alt=]] Devices in view ==== | ||
| + | In this window you will see all visible devices. You have options to see devices in Short list [[File:Shortlist.jpg|30px]] or in default list. When looking at devices in default list you will be able to open Detailed view [[File:Detailed.jpg]] of devices and check transmitted data statuses. Additionaly if you are looking for specific devices you will be able to use Search [[File:Search button eye app.jpg|30px]] function to filter search options. When in this window select a device of your choice to connect and after passing pin code (default pin code is 123456) you will go to device overview window. | ||
| + | |||
| + | ==== [[File:Group 125.png|baseline|frameless|upright=0.2|link=|alt=]]Overview window ==== | ||
| + | In overview window you can see device details, check firmware version and update if available, go to device configuration settings and download the configuration. If you select to Configure device new window will open with Basic and Advanced settings. Other actions include changing the device PIN code and putting the device to sleep. A device in sleep mode will no longer be findable or connectable via the app. To wake it up, you need to attach a magnet and look for a green LED flashing. | ||
| + | |||
| + | <br> | ||
| + | |||
| + | ==== [[File:Group 116.png|sub|frameless|upright=0.2|link=|alt=]]Configure window ==== | ||
| + | In this window you can check and change device configuration settings. In main tab Basic Settings you can change main settings. Change Device name, Power signal strength, Advertising interval and Packet transmission type*. For more settings go to Advanced settings tab to enable various events. | ||
| + | |||
| + | ==== [[File:Group 117.png|sub|frameless|upright=0.2|link=|alt=]]Advanced configuration window ==== | ||
| + | |||
| + | =====<p style="font-size:16px><span style="color:#0054A6">Advanced configuration: Beacon Settings<span>===== | ||
| + | {| | ||
| + | |-style="vertical-align: top;" | ||
| + | |[[File:IBeacon ID settings.png|frameless]] | ||
| + | |[[File:Eddystone ID settings.png|frameless]] | ||
| + | |} | ||
| + | In Advanced settings tab you can can configure EYE beacon sensor parameters: Beacon information (iBeacon ID*, Eddystone ID). UUID/MINOR/MAJOR parameter can be changed for iBeacon ID*. Namespace ID/Instance ID can be changed for Eddystone ID. If you scroll down you will be able to adjust Sensor reading interval and event settings of the EYE Sensor '''Note:''' iOS doesn't show devices with iBeacon protocol | ||
| + | |||
| + | =====<p style="font-size:16px><span style="color:#0054A6">Advanced configuration: Sensor reading and events<span>===== | ||
| + | '''!NOTE:''' These settings are no longer available after EYE APP 1.2.0-60 update. | ||
| + | {| | ||
| + | |- style="vertical-align: top;" | ||
| + | |[[File:Magnetic field event.png]] | ||
| + | |[[File:Humidity event.png]] | ||
| + | |[[File:Temperature event.png]] | ||
| + | |[[File:Movement event2.png]] | ||
| + | |- | ||
| + | |'''Magnetic field event''' - adjust if the device generates events based on detection or exit (loss) of the magnet. | ||
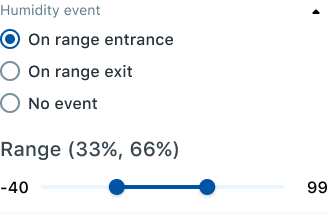
| + | |'''Humidity event''' - adjust if the device generates events based on entrance or exit to selected humidity range | ||
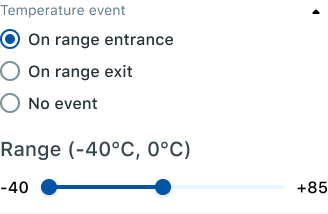
| + | |'''Temperature event''' - adjust if the device generates events based on entrance or exit to selected temperature range | ||
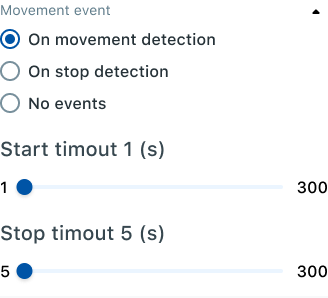
| + | |'''Movement event''' - adjust movement/stop detection and timeouts it takes to register movement / stopping | ||
| + | |- | ||
| + | |[[File:Maximum event duration.png|frameless]] | ||
| + | |[[File:Event Advertising settings.png|frameless]] | ||
| + | |[[File:Sensor reading interval.png|frameless]] | ||
| + | |- | ||
| + | |'''Maximum event duration''' - how long will one event be advertised | ||
| + | |'''Event advertising settings''' - advertising period after event detection | ||
| + | |'''Sensor reading interval''' - how often values are updated by the device | ||
| + | |} | ||
| + | <br> | ||
</div> | </div> | ||
</div> | </div> | ||
Revision as of 23:52, 5 March 2024
Main Page > Advanced Trackers > EYE SENSOR TestIntroduction
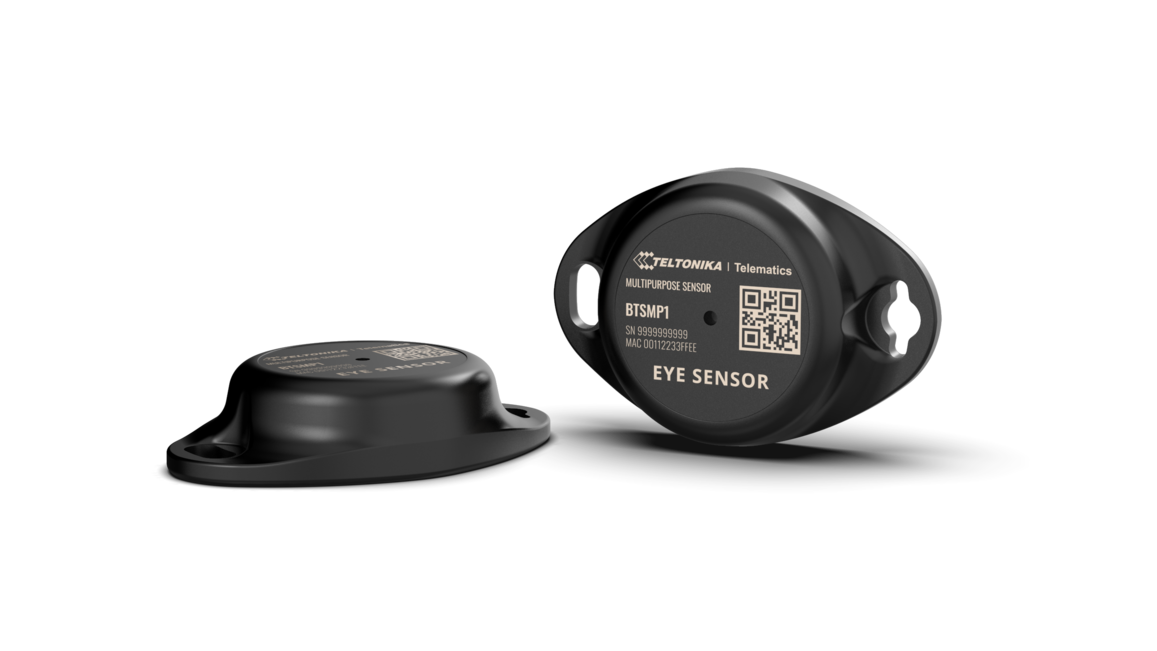
Wireless solutions open up new horizons for your business and help to keep an eye on your assets. Discover our brand-new and certified Bluetooth® Low Energy ID sensor model from Teltonika with robust waterproof casing and a long-lifetime battery. The model is designed for a low-cost fast and easy configuration and integration to save precious time, resources, and ensure accountability.
About BTSMP1
Perfect for traceability use cases, delivery tracking, monitoring of various movable objects in logistics (trailers, containers), agriculture (tractor attachments), and constructions (tools and inventory). Sensors data makes it especially suitable for cold chain refrigerator use cases. The built-in accelerometer can detect item movement, pitch and roll of the device. Magnet detection can be used for wireless open/close detection and notifications such as trailer door events, etc. EYE sensor supports iBeacon and Eddystone protocols. The device is fully compatible with the Teltonika firmware platform which provides extended functionality. Configure, scan, and update anytime anywhere with a dedicated Teltonika mobile app
Product Specification
Features
| Functionalities |
|---|
| Beacon ID, LED, Temperature, Humidity, Accelerometer, Magnet detection |
| Dimensions and weight | |
|---|---|
| Dimensions | 56,6 mm x 38 mm x 13 mm |
| Weight | 18g |
| Battery and power | |
|---|---|
| Model | CR2450 |
| Type | Type Lithium, Manganese Dioxide |
| Total Capacity | 600 mAh |
| Replaceable | No |
| Battery life (Tx=2 dBm; interval: 3 s) | 2.5+ years |
| Battery life (Tx=2 dBm; interval: 5 s), default | 4+ years |
| Battery life (Tx=2 dBm; interval: 10 s) | 5+ years |
| Connectivity | |
|---|---|
| Bluetooth® | Bluetooth® 4.2 compliant,
Bluetooth® 5.2 certified |
| Range | 80 m |
| Available transmission power levels | Up to 8 dBm |
| Sensitivity | -88 dBm |
| Casing | |
|---|---|
| Protection | IP67 |
| Mounting | Two holes to screw/leash/strip, tape |
| Customization | Custom logo upon request (Special conditions) |
| Environmental Requirements | |
|---|---|
| Humidity (non-condensing) | From 0% to 100% |
| Operational temperature | -20°C / +60°C (-4°F / +140°F) |
| Protocols compatibility | |
|---|---|
| iBeacon | Yes
*iOS doesn't show devices with iBeacon protocol |
| Eddystone | Yes |
| EYE Sensor | Yes |
Dimensions
Value-adding Features
Hibernate mode
Hibernated mode means that the EYE device is OFF when shipping from the factory, preserving battery life. PLEASE NOTE that EYE devices are available in two modes: factory-activated (ON) or Hibernated (OFF). You may order the device version which better suits your needs. Order codes are described on eye page
Value of hibernate mode
Hibernated versions of EYE devices simplify stock management for our partners while maximizing battery life.
1. Accelerated delivery times:
By stocking up on hibernated EYE devices, you ensure readiness to deploy EYE devices with full battery capacity at any moment. This proactive approach provides fastest possible service, increases your reputation for efficiency and positions you as an industry frontrunner, enhancing your competitive edge.
2. Mitigated project risks:
In scenarios where projects encounter unforeseen challenges, our hibernated EYE devices offer a buffer. Hibernate feature allows to safeguard your investments and potential revenue streams. This means that even if projects encounter delays or complications, you can still deploy EYE devices with full battery capacity, ensuring optimal performance when the time is right.
How to activate hibernated eye device?
Attach any magnet to sleeping device and wait for LED to blink.
NOTE: ANY MAGNET CAN BE USED
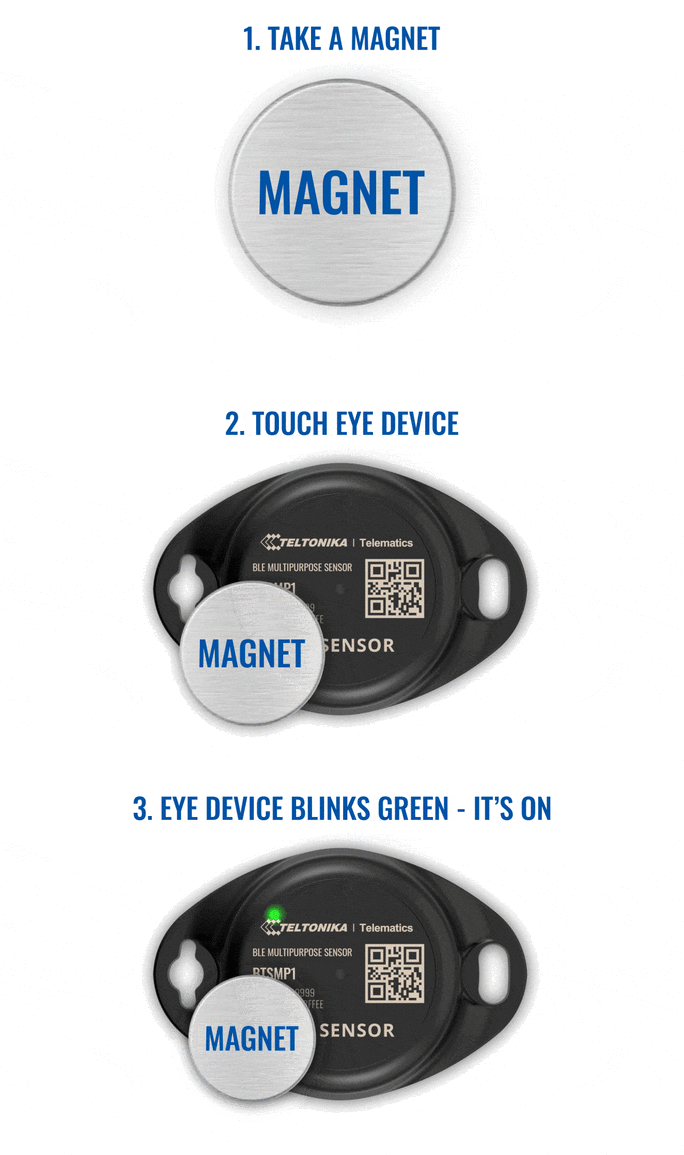
Now device is discoverable, scannable, connectable via BLE.
How to send the device to hibernate mode?
If you want to put the EYE device back to hibernate mode after accidental activation or simply pause its use, you may do that following steps below:
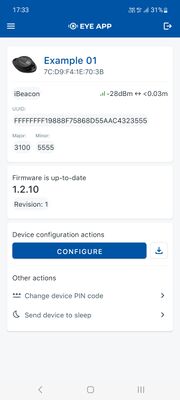
Step 1. While connected and in overview tap "Send device to sleep":
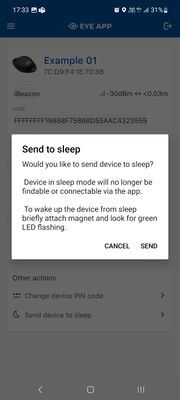
Step 2. Confirm your selection:
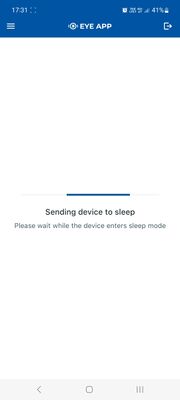
Step 3. Wait for EYE App to disconnect:
Can All devices hibernate?
1. All EYE Sensors with firmware version starting from 1.2.9.R.8 can hibernate.
2. Only new EYE Beacons bought with order codes that have hardware modification can hibernate standard codes are available in eye page, for special order codes consult your sales manager.
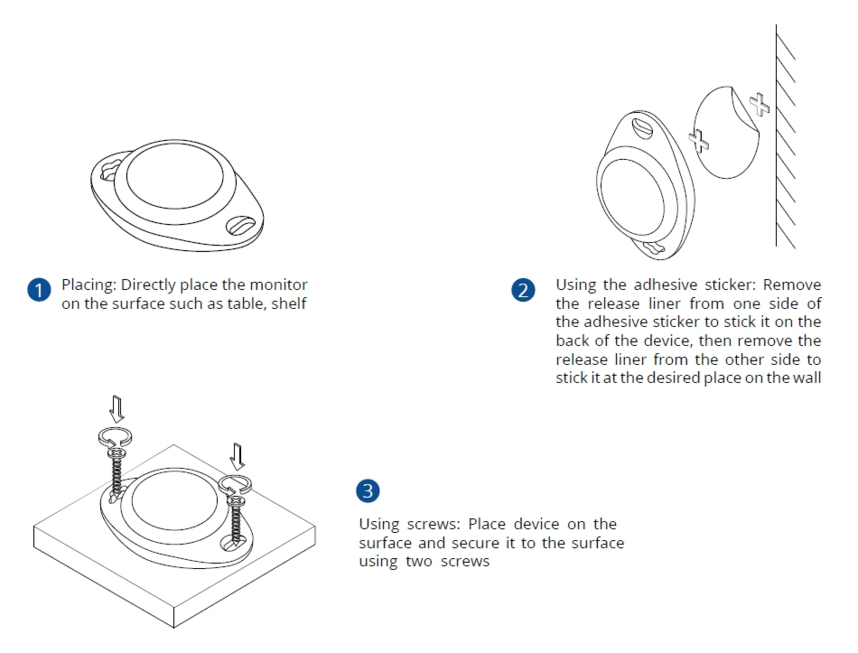
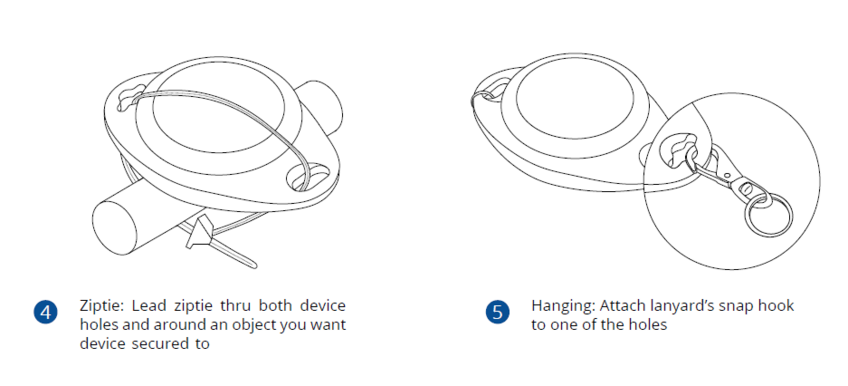
Mounting recomendations
EYE App Configuration
Devices work constantly and are ready to perform out of the box. Default basic Sensor settings are set to:
• Transmitting at 2 dBm power.
• Data advertising at 1 second intervals.
• Eddystone and Sensors protocol
If you would like to change these settings you will need to:
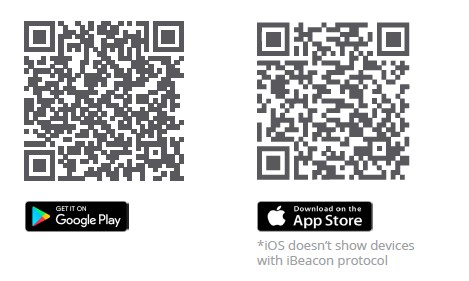
1) Download and install EYE APP - Teltonika application to change sensor settings.
EYE APP Configuration
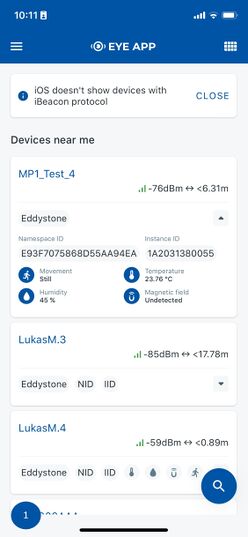
With the application you will be able to scan for visible Teltonika EYE devices, check their statuses or connect for configuration or firmware update.
|
|
|
|
 Devices in view
In this window you will see all visible devices. You have options to see devices in Short list ![]() or in default list. When looking at devices in default list you will be able to open Detailed view
or in default list. When looking at devices in default list you will be able to open Detailed view ![]() of devices and check transmitted data statuses. Additionaly if you are looking for specific devices you will be able to use Search
of devices and check transmitted data statuses. Additionaly if you are looking for specific devices you will be able to use Search ![]() function to filter search options. When in this window select a device of your choice to connect and after passing pin code (default pin code is 123456) you will go to device overview window.
function to filter search options. When in this window select a device of your choice to connect and after passing pin code (default pin code is 123456) you will go to device overview window.
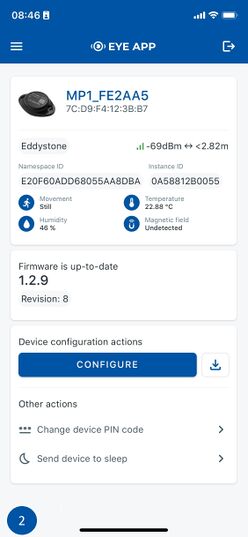
 Overview window
In overview window you can see device details, check firmware version and update if available, go to device configuration settings and download the configuration. If you select to Configure device new window will open with Basic and Advanced settings. Other actions include changing the device PIN code and putting the device to sleep. A device in sleep mode will no longer be findable or connectable via the app. To wake it up, you need to attach a magnet and look for a green LED flashing.
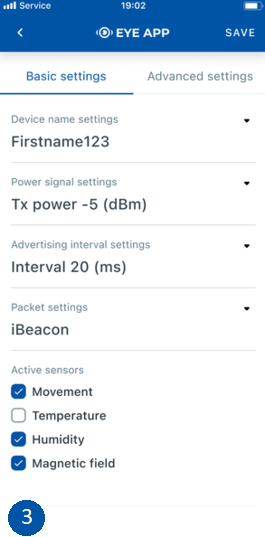
 Configure window
In this window you can check and change device configuration settings. In main tab Basic Settings you can change main settings. Change Device name, Power signal strength, Advertising interval and Packet transmission type*. For more settings go to Advanced settings tab to enable various events.
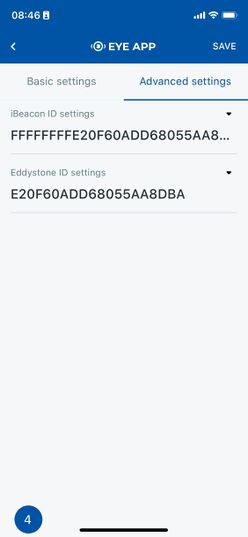
 Advanced configuration window
Advanced configuration: Beacon Settings
|
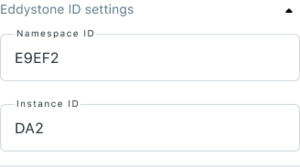
In Advanced settings tab you can can configure EYE beacon sensor parameters: Beacon information (iBeacon ID*, Eddystone ID). UUID/MINOR/MAJOR parameter can be changed for iBeacon ID*. Namespace ID/Instance ID can be changed for Eddystone ID. If you scroll down you will be able to adjust Sensor reading interval and event settings of the EYE Sensor Note: iOS doesn't show devices with iBeacon protocol
Advanced configuration: Sensor reading and events
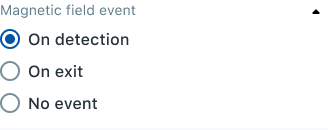
!NOTE: These settings are no longer available after EYE APP 1.2.0-60 update.
