Crash trace
Introduction
This document describes the Crash Trace data and illustrates how to parse it. Two data examples are used. Understanding raw data / Parsing raw data.
The Crash Detection Scenario monitors acceleration on each axis to detect an accident. To parse it correctly, note that “Crash Trace” must be enabled, otherwise only one eventual crash record will be generated.
Understanding RAW data
When the “Crash Trace” is enabled, device will generate and send the accelerometer data in HEX format over AVL ID 257 (Crash trace data)
| NOTE: Such RAW data is considered as a variable length value. Codec 8 Extended is required |
Hexadecimal stream of AVL Data Packet receiving and response in this example are given in hexadecimal form. The different fields of packet are separate into different table columns for better readability and some of them are converted to ASCII values for better understanding.
Received data in hexadecimal stream:
00BDCAFE0120000F3335383X38303X3X3136383X34393X8E0100000178B0C1D4450100000000000000000000000000000000F70002000100F704000000000000000101010078001
 D003F03F3001E003C03F30026004C04020022004603FD0023004603FC0024004803FC001F004303FB001F004103F10026004903FC0025004D03FF001E004303F70023004503FB001

F004103F6001C003B03F40022004703FB001E003B03F50025004A03FB001E003F03F30021004303FB0024004603FF01
Parsed:
| AVL Data Packet | ||
|---|---|---|
| AVL Data Packet Part | HEX Code Part | |
| UDP Channel Header | Length | 00 BD |
| Packet ID | CA FE | |
| Not usable byte | 01 | |
| AVL Packet Header | AVL packet ID | 20 |
| IMEI Length | 00 0F | |
| IMEI | 33 35 38 3X 38 30 3X 3X 31 36 38 3X 34 39 3X | |
| AVL Data Array | Codec ID | 8E |
| Number of Data 1 (Records) | 01 | |
| Timestamp | 00 00 01 78 B0 C1 D4 45(GMT: Thursday, April 08, 2021 09:13:16 AM) | |
| Priority | 01 | |
| Longitude | 00 00 00 00 | |
| Latitude | 00 00 00 00 | |
| Altitude | 00 00 | |
| Angle | 00 00 | |
| Satellites | 00 | |
| Speed | 00 00 | |
| Event IO ID | 00 F7 | |
| N of Total ID | 00 02 | |
| N1 of One Byte IO | 00 01 | |
| 1’st IO ID | 00 F7 (AVL ID: 239, Name: Ignition) | |
| 1’st IO Value | 00 01 | |
| N2 of Two Bytes IO | 00 00 | |
| N4 of Two Bytes IO | 00 00 | |
| N8 of Two Bytes IO | 00 00 | |
| NX of X Byte IO | 00 01 | |
| 1’st IO ID | 01 01 (AVL ID: 257, Name: Crash trace data) | |
| 1’st IO data lenght | 00 78 | |
| 1’st IO Value | 00 1D 00 3F 03 F3 00 1E 00 3C 03 F3 00 26 00 4C 04 02 00 22 00 46 03 FD 00 23 00 46 03 FC 00 24 00 48 03 FC 00 1F 00 43 03 FB 00 1F 00 41 03 F1 00 26 00 49 03 FC 00 25 00 4D 03 FF 00 1E 00 43 03 F7 00 23 00 45 03 FB 00 1F 00 41 03 F6 00 1C 00 3B 03 F4 00 22 00 47 03 FB 00 1E 00 3B 03 F5 00 25 00 4A 03 FB 00 1E 00 3F 03 F3 00 21 00 43 03 FB 00 24 00 46 03 FF | |
| Number of Data 2 (Number of Total Records) | 01 | |
IO Value is considered as the accelerometer data.
| NOTE: The crash data is packed in order as follows: |
| 1.“X” Axis data |
| 2.“Y” Axis data |
| 3.“Z” Axis data |
| Every Axis data has 2 bytes data length info. |
If you have any doubt about data packet structure, please refer to our Data Sending protocols
Processing “Crash Trace” data
Handling the Crash Trace data (AVL ID:257) as described in Understanding RAW data paragraph by axis order and data length, we will have:
Table 1. Axis values from AVL ID 257.
| AXIS X | AXIS Y | AXIS Z |
| 001D | 003F | 03F3 |
| 001E | 003C | 03F3 |
| 0026 | 004C | 0402 |
| 0022 | 0046 | 03FD |
| 0023 | 0046 | 03FC |
| 0024 | 0048 | 03FC |
| 001F | 0043 | 03FB |
| 001F | 0041 | 03F1 |
| 0026 | 0049 | 03FC |
| 0025 | 004D | 03FF |
| 001E | 0043 | 03F7 |
| 0023 | 0045 | 03FB |
| 001F | 0041 | 03F6 |
| 001C | 003B | 03F4 |
| 0022 | 0047 | 03FB |
| 001E | 003B | 03F5 |
| 0025 | 004A | 03FB |
| 001E | 003F | 03F3 |
| 0021 | 0043 | 03FB |
| 0024 | 0046 | 03FF |
Processing the “Crash Trace” data manually
As a brief example, here we have 6 axis values: Two from X axis, two from Y axis and two from Z axis. (Refers to “Table 1)
We will convert the HEX RAW data into the real axis value (mG)
001D 003F 03F3
x:29mG y:63mG z:1.011mG
001E 003C 03F3
x:30mG y:60mG z:1.011mG
Configuring the Crash Detection scenario
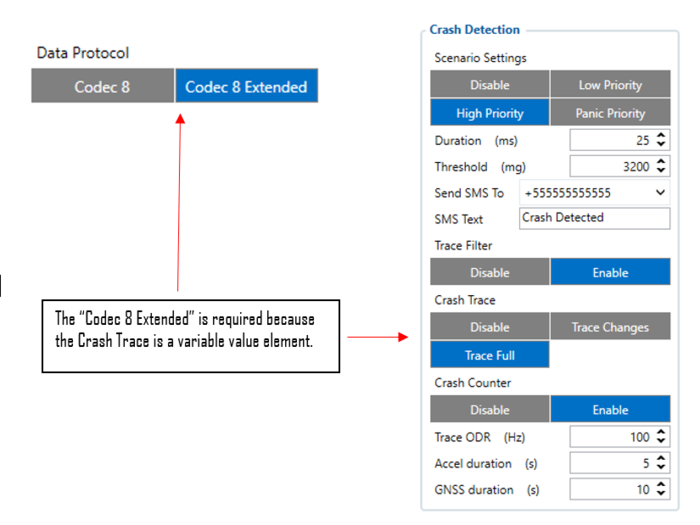
First, and according to technical details about AVL ID 257 (variable data length), run the Teltonika Configurator, go to “System” menu and chose “Codec 8 Extended” as the main Data Protocol, then go to “Accelerometer Features” menu and configure the “Crash Detection Scenario” according to your needs.
You can consult Crash Detection details at our Wiki Page.

The Parser
Crash Trace Parser
The “Parser tool” consists in one editable sheet where the Crash Data must be entered. This should be done in the “C1” cell.
Once you enter Trace Data, the parser will decode it automatically.
In cell A6 you’ll get the packet elements.
From cell A8 towards down you will get the samples count of axis packet. (“X” axis value, “Y” axis value and “Z” axis value)
In cell C8 towards down you´ll get the axis packet information
In cell D8 and E8 both towards down you will get all the axis “X” info (1byte per cell)
In cell F8 and G8 both towards down you will get all the axis “Y” info (1byte per cell)
In cell H8 and I8 both towards down you will get all the axis “Z” info (1byte per cell)

Parsing
After you insert the Crash Trace data in A1 cell, the parser will display processed info in mentioned cells.
Note that all mentioned data is given in HEX.
Cell J8 towards down will show the converted HEX Crash Data into DEC (mG) data that belong to X Axis
Cell K8 towards down will show the converted HEX Crash Data into DEC (mG) data that belong to Y Axis
Cell L8 towards down will show the converted HEX Crash Data into DEC (mG) data that belong to X Axis

Graphing
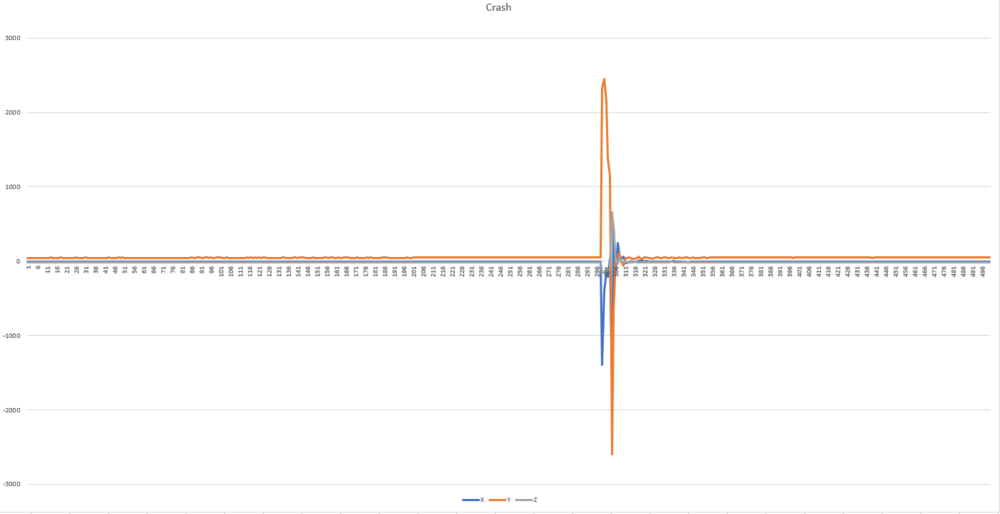
As the Crash Trace data is inserted and processed by the own tool, the graph will be built automatically.


