One of the implemented features for fleet management devices is 1-Wire data protocol, which can be used for iButton reading. It is the most straight-forward way to implement driver authorization in your vehicles.
'''1-Wire iButton readers are great in these use cases:'''
*Immobilizer - prevent anyone from starting the vehicle without scanning an iButton first.
*Authorized driving - keep track of who is driving your vehicle according to the iButton ID they use to authenticate themselves.
*AutoGeofencing – gives ability to know when car leaves customized areas without iButton authorization.
To connect the 1-wire iButton reader, simply connect the 1-Wire Signal wire from the reader to the 1-Wire Data pin on the device, and connect the ground wire to the same grounding used for the device.
[[File:IButton RFID connection2.png|frameless|682x682px]]
The reader works as soon as it is connected, but the iButton isn't used anywhere other than displayed in the iButton I/O element. In order to use it for the Immobilizer scenario, the device must have the scenario enabled. Then, iButton check can be enabled to only accept iButtons specified in the iButton list under the 1-Wire tab. </br></br>[[File:IButtonReaderConfig.png|border|frameless|682x682px]]
Note! This chapter describes the installation of an accessory supplied by Teltonika. Accessories from other manufacturers may require different steps.
To connect the accessory to your system:
Connect the ground wire to the same grounding used for the device.
Connect the 1-Wire Signal wire from the reader to the 1-Wire Data pin on the device.
PIN
NAME
DESCRIPTION
1
1-wire Data (Dallas Data)
Sends iButton ID
2
GND (-)
Ground
Tracker Configuration
The reader works as soon as it is connected, but the iButton isn't used anywhere other than displayed in the iButton I/O element. In order to use it for the Immobilizer scenario, the device must have the scenario enabled. Then, iButton check can be enabled to only accept iButtons specified in the iButton list under the 1-Wire tab.
Converting IO values to IDs
This short guide explains how to convert the iButton value in "I/O" menu to an ID usable in the iButton list in "1-Wire" menu.
Note! For FMx6 trackers, you do not need to convert these values.
Connect your 1-Wire accessory to the tracker according to the wiring scheme.
Connect the tracker to a PC, run Teltonika Configurator.
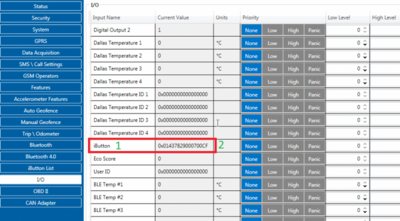
Open the "I/O" menu and find the "iButton" parameter.
Scan the 1-Wire accessory on the reader. The value in Configurator will shortly change.
Take the value (here: 01437829000700CF) and convert it using the method shown below - then you will be able to use it in the iButton List.