Difference between revisions of "FMB120 First Start"
Atabasnikov (talk | contribs) m |
|||
| (76 intermediate revisions by 18 users not shown) | |||
| Line 1: | Line 1: | ||
| − | + | [[Image:Qsg_rut950_teltonika.PNG|centre]] | |
| − | |||
| − | |||
| − | |||
| − | |||
| − | |||
| − | |||
| − | |||
| − | |||
| − | |||
| − | |||
| − | |||
| − | |||
| − | |||
| − | |||
| − | |||
| − | |||
| − | |||
| − | |||
| + | <b><font size="+10">FMB120 GNSS/GSM/Bluetooth tracker with internal GNSS/GSM antennas and internal battery</font></b> | ||
| + | |||
| + | <font size="+3">Quick Start Guide</font> [[Image:Fmb120 man.png|600px|right]] | ||
| + | |||
| + | |||
| + | |||
| + | |||
| + | |||
| + | |||
| + | |||
| + | |||
| + | |||
| + | |||
| + | |||
| + | |||
| + | |||
| + | |||
| + | |||
| + | |||
| + | |||
| + | |||
| + | |||
| + | |||
| + | |||
| + | |||
| + | |||
| + | |||
| + | |||
| + | |||
| + | |||
| + | <font size="+3"><span style=color:#104996>'''How to insert micro SIM card into FMB120'''</span></font> | ||
| + | |||
| + | <font size="+2"><span style=color:#F49E21> 1. </span> Remove FMB120 cover. </font> | ||
| + | |||
| + | <font size="+2"><span style=color:#F49E21> 2. </span> Insert SIM card as shown. SIM slot 1 is closer to PCB, SIM slot 2 is the upper one. </font> | ||
| + | |||
| + | <font size="+2"><span style=color:#F49E21> 3. </span> Attach cover. </font> | ||
| + | |||
| + | <font size="+2"><span style=color:#F49E21> 4. </span> Device is ready. </font> | ||
| + | |||
| + | |||
| + | |||
| + | [[Image:Fmb120_cover_1.png|600px|left]] [[Image:Fmb120_cover_3.png|600px]] | ||
| + | |||
| + | |||
| + | |||
| + | [[Image:Fmb120_cover_2.png|600px|left]] [[Image:Fmb120_cover_4.png|600px]] | ||
| + | |||
| + | |||
| + | |||
| + | <font size="+3"><span style=color:#104996>'''2x6 socket pinout'''</span></font> | ||
| + | [[Image:Fmb_120_2x6_pinout.png|200px|right]] | ||
{| class="wikitable" | {| class="wikitable" | ||
|+ | |+ | ||
| − | ! style=" | + | ! style="background: white; color: #F6A83E;" | Pin number |
| − | + | | style="background: white; color: #F6A83E;" | Pin name | |
| − | + | | style="background: white; color: #F6A83E;" | Description | |
| − | | | + | |- |
| + | | style="text-align: left; background: #F6F6FB;" | 1 | ||
| + | | style="text-align: left; background: #F6F6FB;" | VCC (10-30)V DC (+) | ||
| + | | style="text-align: left; background: #F6F6FB;" | Power supply (10-30 V DC). | ||
|- | |- | ||
| − | | style=" | + | | style="text-align: left; background: #F6F6FB;" | 2 |
| − | | style=" | + | | style="text-align: left; background: #F6F6FB;" | AIN 1 |
| − | | style=" | + | | style="text-align: left; background: #F6F6FB;" | Analog input, channel 1. Input range: 0-30V DC. |
|- | |- | ||
| − | | style=" | + | | style="text-align: left; background: #F6F6FB;" | 3 |
| − | | style=" | + | | style="text-align: left; background: #F6F6FB;" | AIN 2 / DIN 3 |
| − | | style=" | + | | style="text-align: left; background: #F6F6FB;" | Analog input, channel 2. Input range: 0-30V DC / Digital input, channel 3. |
|- | |- | ||
| − | | style=" | + | | style="text-align: left; background: #F6F6FB;" | 4 |
| − | | style=" | + | | style="text-align: left; background: #F6F6FB;" | DIN 2 |
| − | | style=" | + | | style="text-align: left; background: #F6F6FB;" | Digital input, channel 2. |
|- | |- | ||
| − | | style=" | + | | style="text-align: left; background: #F6F6FB;" | 5 |
| − | | style=" | + | | style="text-align: left; background: #F6F6FB;" | DIN 1 |
| − | | style=" | + | | style="text-align: left; background: #F6F6FB;" | Digital input, channel 1. |
|- | |- | ||
| − | | style=" | + | | style="text-align: left; background: #F6F6FB;" | 6 |
| − | | style=" | + | | style="text-align: left; background: #F6F6FB;" | INPUT 6 |
| − | | style=" | + | | style="text-align: left; background: #F6F6FB;" | TX EXT (LVCAN – TX). |
|- | |- | ||
| − | | style=" | + | | style="text-align: left; background: #F6F6FB;" | 7 |
| − | | style=" | + | | style="text-align: left; background: #F6F6FB;" | GND (-) |
| − | | style=" | + | | style="text-align: left; background: #F6F6FB;" | Ground. |
|- | |- | ||
| − | | style=" | + | | style="text-align: left; background: #F6F6FB;" | 8 |
| − | | style=" | + | | style="text-align: left; background: #F6F6FB;" | OUT 1 |
| − | | style=" | + | | style="text-align: left; background: #F6F6FB;" | Digital output, channel 1. Open collector output. Max. 3,3 A DC. |
|- | |- | ||
| − | | style=" | + | | style="text-align: left; background: #F6F6FB;" | 9 |
| − | + | | style="text-align: left; background: #F6F6FB;" | OUT 2 | |
| − | + | | style="text-align: left; background: #F6F6FB;" | Digital output, channel 2. Open collector output. Max. 3,3 A DC. | |
| − | |||
| − | | style=" | ||
| − | |||
| − | | style=" | ||
|- | |- | ||
| − | | style=" | + | | style="text-align: left; background: #F6F6FB;" | 10 |
| − | | style=" | + | | style="text-align: left; background: #F6F6FB;" | 1WIRE POWER |
| − | | style=" | + | | style="text-align: left; background: #F6F6FB;" | +3,8 V output for 1–Wire devices. |
|- | |- | ||
| − | | style=" | + | | style="text-align: left; background: #F6F6FB;" | 11 |
| − | | style=" | + | | style="text-align: left; background: #F6F6FB;" | 1WIRE DATA |
| − | | style=" | + | | style="text-align: left; background: #F6F6FB;" | Data for 1–Wire devices. |
|- | |- | ||
| − | | style=" | + | | style="text-align: left; background: #F6F6FB;" | 12 |
| − | | style=" | + | | style="text-align: left; background: #F6F6FB;" | INPUT 5 |
| − | | style=" | + | | style="text-align: left; background: #F6F6FB;" | RX EXT (LVCAN - RX). |
|- | |- | ||
|} | |} | ||
| − | |||
| − | |||
| − | + | <font size="+3"><span style=color:#104996>'''How to install FMB120 drivers'''</span></font> | |
| − | |||
| − | |||
| − | |||
| − | |||
| − | |||
| − | < | ||
| − | |||
| − | |||
| − | FMB120 | ||
| − | < | ||
| − | |||
| − | < | ||
| − | |||
| − | + | <font size="+2"><span style=color:#F49E21> 1. </span> Obtain prerequisite .NET software. </font> | |
| − | |||
| − | |||
| − | |||
| − | |||
| − | |||
| − | |||
| − | |||
| − | |||
| − | |||
| − | https://teltonika- | + | <font size="+2"><span style=color:#104996>.NET requirements</span></font> |
| + | |||
| + | {| class="wikitable" | ||
| + | |+ | ||
| + | ! style="background: white; color: #F6A83E;" | Operating system | ||
| + | | style="background: white; color: #F6A83E;" | MS .NET Framework version | ||
| + | | style="background: white; color: #F6A83E;" | Version | ||
| + | | style="background: white; color: #F6A83E;" | Links | ||
| + | |- | ||
| + | | style="text-align: left; background: #F6F6FB;" rowspan="2" | Windows XP with SP3 or later | ||
| + | | style="text-align: left; background: #F6F6FB;" rowspan="2" | MS .NET Framework 4 with KB2468871-v2 update | ||
| + | | style="text-align: left; background: #F6F6FB;" | 32 and 64 bit | ||
| + | | style="text-align: left; background: #F6F6FB;" | https://www.microsoft.com/en-US/Download/confirmation.aspx?id=17718 | ||
| + | http://avl1.teltonika.lt/downloads/software/Framework/.NET%20Framework%204/dotNetFx40_Full_x86_x64.exe | ||
| + | |- | ||
| + | | style="text-align: left; background: #F6F6FB;" | 32 bit (x86) , 64 bit (x64 or IA64) | ||
| + | | style="text-align: left; background: #F6F6FB;" | https://www.microsoft.com/en-us/download/details.aspx?id=3556 | ||
| + | http://avl1.teltonika.lt/downloads/software/Framework/.NET%20Framework%204%20update%20KB2468871-v2/ | ||
| + | |- | ||
| + | | style="text-align: left; background: #F6F6FB;" | Windows Vista<br/>Windows 7<br/>Windows 8.1<br/>Windows 10 | ||
| + | | style="text-align: left; background: #F6F6FB;" | MS .NET Framework 4.6.2 | ||
| + | | style="text-align: left; background: #F6F6FB;" | 32 and 64 bit | ||
| + | | style="text-align: left; background: #F6F6FB;" | https://www.microsoft.com/en-us/download/confirmation.aspx?id=53344 | ||
| + | http://avl1.teltonika.lt/downloads/software/Framework/.NET%20Framework%204.6.2/NDP462-KB3151800-x86-x64-AllOS-ENU.exe | ||
| + | |- | ||
| + | |} | ||
| + | |||
| + | <font size="+2"><span style=color:#F49E21> 2. </span> Please download COM port drivers from Teltonika website: https://teltonika.lt/?media_dl=5543. </font> | ||
| + | |||
| + | <font size="+2"><span style=color:#F49E21> 3. </span> Extract and run TeltonikaCOMDriver.exe. This driver is used to detect FMB120 device when it is connected to the computer. </font> | ||
| + | |||
| + | <font size="+2"><span style=color:#F49E21> 4. </span> Click 'Next' in driver installation window. </font> | ||
| + | |||
| + | <font size="+2"><span style=color:#F49E21> 5. </span> In the following window click 'Install' button. </font> | ||
| + | |||
| + | <font size="+2"><span style=color:#F49E21> 6. </span> Setup will continue install driver and will display a windows confirming that installation process is complete. Click 'Finish' to complete setup. You are now ready to use the device on your computer. </font> | ||
| + | |||
| + | |||
| + | |||
| + | |||
| + | <font size="+3"><span style=color:#104996>'''Precautions'''</span></font> | ||
| + | <font size="+2"> | ||
| + | {| class="wikitable" style="border-style: solid; border-width: 0px" | ||
| + | |+ | ||
| + | |- | ||
| + | | style="text-align: left; background: #F6F6FB;" | [[Image:Bw_nb.png|50px]] | ||
| + | | style="text-align: left; background: #F6F6FB;" | Do not disassemble the device. If the device is damaged, the power supply cables are not isolated or the isolation is damaged, DO NOT touch the device before unplugging the power supply. | ||
| + | |- | ||
| + | | style="text-align: left; background: #F6F6FB;" | [[Image:Bw_nb.png|50px]] | ||
| + | | style="text-align: left; background: #F6F6FB;" | All wireless data transferring devices produce interference that may affect other devices which are placed nearby. | ||
| + | |- | ||
| + | | style="text-align: left; background: #F6F6FB;" | [[Image:Bw_key.png|50px]] | ||
| + | | style="text-align: left; background: #F6F6FB;" | The device must be connected only by qualified personnel. | ||
| + | |- | ||
| + | | style="text-align: left; background: #F6F6FB;" | [[Image:Bw_tick.png|50px]] | ||
| + | | style="text-align: left; background: #F6F6FB;" | The device must be firmly fastened in the predefined location. | ||
| + | |- | ||
| + | | style="text-align: left; background: #F6F6FB;" | [[Image:Bw_tick.png|50px]] | ||
| + | | style="text-align: left; background: #F6F6FB;" | The programming must be performed using a PC with autonomic power supply. | ||
| + | |- | ||
| + | | style="text-align: left; background: #F6F6FB;" | [[Image:Bw_humidity.png|50px]] | ||
| + | | style="text-align: left; background: #F6F6FB;" | The device is susceptible to water and humidity. | ||
| + | |- | ||
| + | | style="text-align: left; background: #F6F6FB;" | [[Image:Bw_ecute.png|50px]] | ||
| + | | style="text-align: left; background: #F6F6FB;" | Any installation and/or handling during a lightning storm are prohibited. | ||
| + | |} | ||
| + | </font> | ||
| − | + | https://teltonika.lt/product/fmb120-internal-gnss-antenna-battery/ | |
Revision as of 10:12, 10 April 2018
Main Page > Advanced Trackers > FMB120 > FMB120 First Start
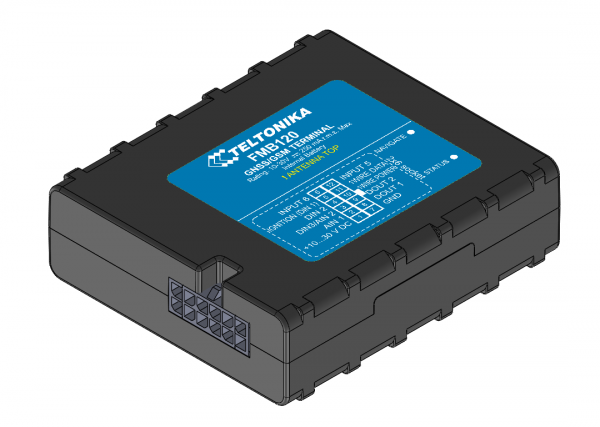
FMB120 GNSS/GSM/Bluetooth tracker with internal GNSS/GSM antennas and internal battery
Quick Start Guide
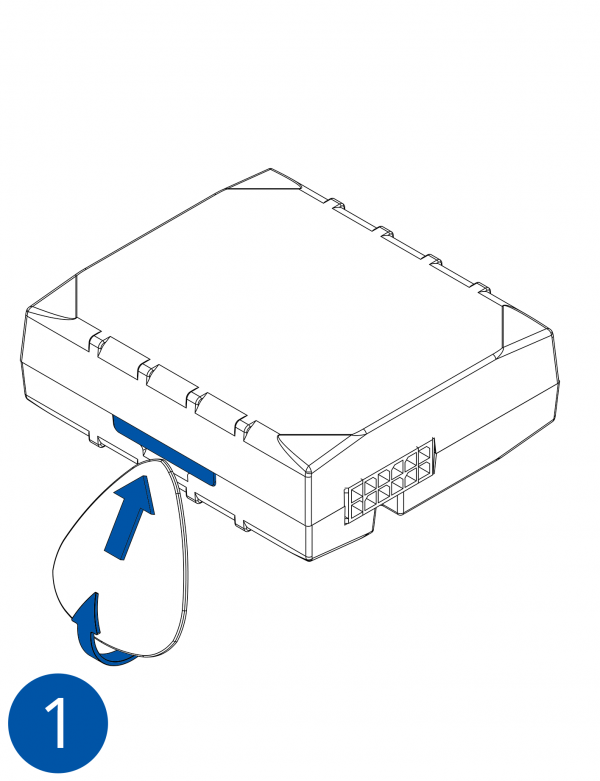
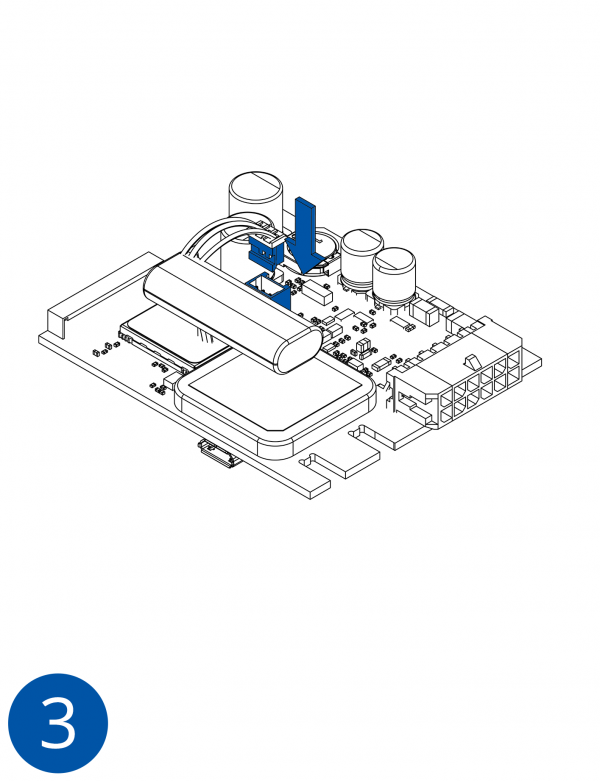
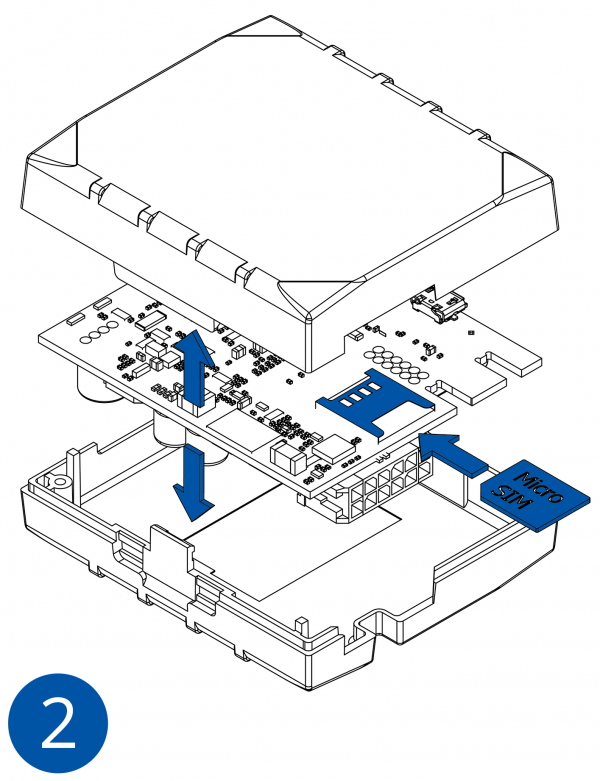
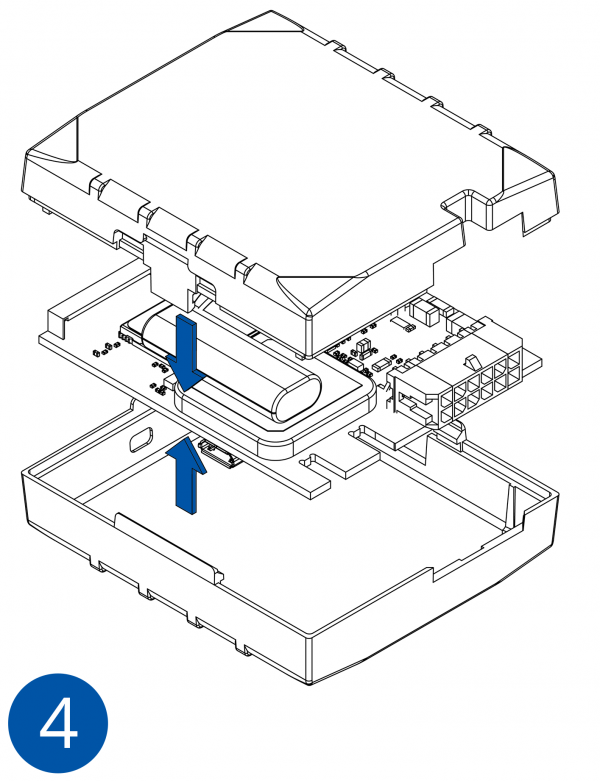
How to insert micro SIM card into FMB120
1. Remove FMB120 cover.
2. Insert SIM card as shown. SIM slot 1 is closer to PCB, SIM slot 2 is the upper one.
3. Attach cover.
4. Device is ready.
2x6 socket pinout
| Pin number | Pin name | Description |
|---|---|---|
| 1 | VCC (10-30)V DC (+) | Power supply (10-30 V DC). |
| 2 | AIN 1 | Analog input, channel 1. Input range: 0-30V DC. |
| 3 | AIN 2 / DIN 3 | Analog input, channel 2. Input range: 0-30V DC / Digital input, channel 3. |
| 4 | DIN 2 | Digital input, channel 2. |
| 5 | DIN 1 | Digital input, channel 1. |
| 6 | INPUT 6 | TX EXT (LVCAN – TX). |
| 7 | GND (-) | Ground. |
| 8 | OUT 1 | Digital output, channel 1. Open collector output. Max. 3,3 A DC. |
| 9 | OUT 2 | Digital output, channel 2. Open collector output. Max. 3,3 A DC. |
| 10 | 1WIRE POWER | +3,8 V output for 1–Wire devices. |
| 11 | 1WIRE DATA | Data for 1–Wire devices. |
| 12 | INPUT 5 | RX EXT (LVCAN - RX). |
How to install FMB120 drivers
1. Obtain prerequisite .NET software.
.NET requirements
| Operating system | MS .NET Framework version | Version | Links |
|---|---|---|---|
| Windows XP with SP3 or later | MS .NET Framework 4 with KB2468871-v2 update | 32 and 64 bit | https://www.microsoft.com/en-US/Download/confirmation.aspx?id=17718 |
| 32 bit (x86) , 64 bit (x64 or IA64) | https://www.microsoft.com/en-us/download/details.aspx?id=3556
http://avl1.teltonika.lt/downloads/software/Framework/.NET%20Framework%204%20update%20KB2468871-v2/ | ||
| Windows Vista Windows 7 Windows 8.1 Windows 10 |
MS .NET Framework 4.6.2 | 32 and 64 bit | https://www.microsoft.com/en-us/download/confirmation.aspx?id=53344 |
2. Please download COM port drivers from Teltonika website: https://teltonika.lt/?media_dl=5543.
3. Extract and run TeltonikaCOMDriver.exe. This driver is used to detect FMB120 device when it is connected to the computer.
4. Click 'Next' in driver installation window.
5. In the following window click 'Install' button.
6. Setup will continue install driver and will display a windows confirming that installation process is complete. Click 'Finish' to complete setup. You are now ready to use the device on your computer.
Precautions
https://teltonika.lt/product/fmb120-internal-gnss-antenna-battery/

