Difference between revisions of "Template:FMP1 First start card"
From Wiki Knowledge Base | Teltonika GPS
| (3 intermediate revisions by 3 users not shown) | |||
| Line 2: | Line 2: | ||
| − | <b>{{{description|Plug and Play tracker with GNSS, GSM and Bluetooth connectivity and cigarette lighter power connector for easy installation.}}}</b>{{{pic|[[Image: | + | <b>{{{description|Plug and Play tracker with GNSS, GSM and Bluetooth connectivity and cigarette lighter power connector for easy installation.}}}</b>{{{pic|[[Image:FMP100_demo.png|400px|right]]}}} |
| Line 25: | Line 25: | ||
# Insert '''Nano-SIM''' card as shown with '''PIN request disabled''' or read our Wiki how to enter it later in Teltonika Configurator. Make sure that Nano-SIM card is fitted properly into the tray. | # Insert '''Nano-SIM''' card as shown with '''PIN request disabled''' or read our Wiki how to enter it later in Teltonika Configurator. Make sure that Nano-SIM card is fitted properly into the tray. | ||
# Insert the SIM card tray back. | # Insert the SIM card tray back. | ||
| − | # After configuration, see | + | # After configuration, see see [[FMP100_First_Start#PC Connection (Windows)|PC Connection (Windows)]]. |
Device is ready to be mounted. | Device is ready to be mounted. | ||
<br /> | <br /> | ||
| − | [[Image:FMP100 | + | [[Image:FMP100 1.png|300px]] |
| + | [[Image:FMP100 2.png|300px]] | ||
| + | [[Image:FMP100 3.png|300px]] | ||
| + | [[Image:FMP100 4.png|300px]] | ||
| + | [[Image:FMP100 5.png|300px]] | ||
| + | [[Image:FMP1000 6.png|300px]] | ||
<br /> | <br /> | ||
<br /> | <br /> | ||
<table><td>[[File:Alert.png|50px|left|link=]]</td><td><b>{{{sim_type|Nano-}}}SIM card insertion/removal must be performed when device is powered off – external voltage and battery are disconnected. Otherwise {{{sim_type|Nano-}}}SIM card might be damaged or device will not detect it.</b></td></table> | <table><td>[[File:Alert.png|50px|left|link=]]</td><td><b>{{{sim_type|Nano-}}}SIM card insertion/removal must be performed when device is powered off – external voltage and battery are disconnected. Otherwise {{{sim_type|Nano-}}}SIM card might be damaged or device will not detect it.</b></td></table> | ||
Latest revision as of 08:41, 15 December 2022
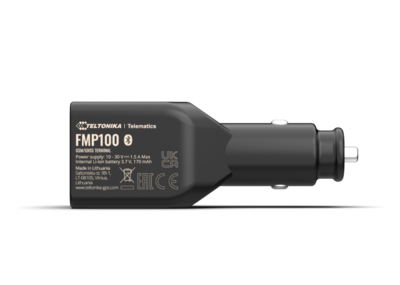
Plug and Play tracker with GNSS, GSM and Bluetooth connectivity and cigarette lighter power connector for easy installation.
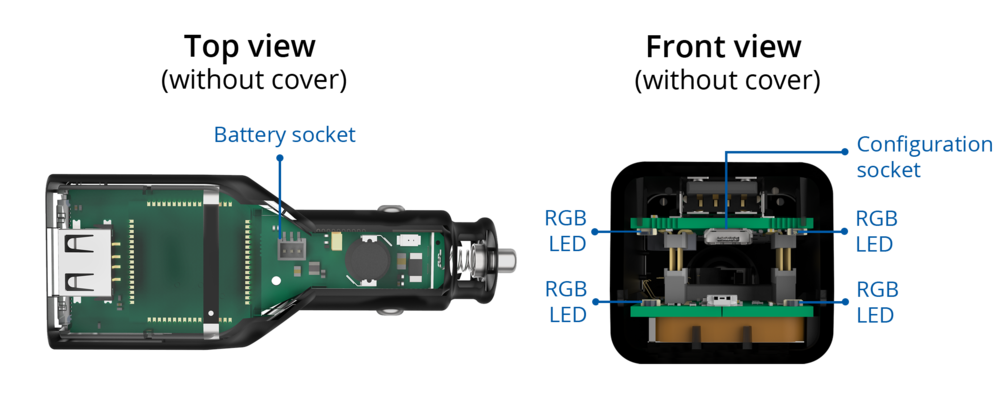
Know your device
Set up your device
How to insert Micro-SIM card and connect the battery
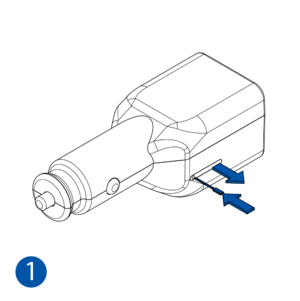
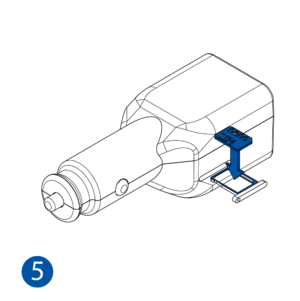
- Insert the SIM tray removal tool into the hole on the SIM card tray and then push until the tray pops out.
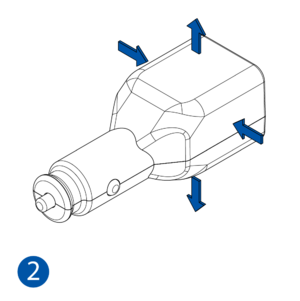
- Split device cover to access battery connector inside.
- Connect the battery as shown to device.
- Gently close device cover back.
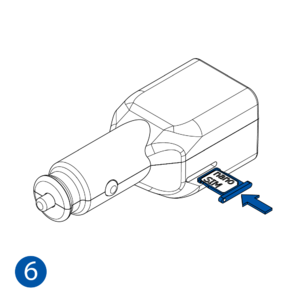
- Insert Nano-SIM card as shown with PIN request disabled or read our Wiki how to enter it later in Teltonika Configurator. Make sure that Nano-SIM card is fitted properly into the tray.
- Insert the SIM card tray back.
- After configuration, see see PC Connection (Windows).
Device is ready to be mounted.


| Nano-SIM card insertion/removal must be performed when device is powered off – external voltage and battery are disconnected. Otherwise Nano-SIM card might be damaged or device will not detect it. |

