TAT100 Bluetooth® settings: Difference between revisions
m Sterbavicius.jo moved page TAT100 Bluetooth settings to TAT100 Bluetooth® settings: Text replacement - "Bluetooth" to "Bluetooth®" |
Replaced content with "{{ Template:TATXYZ Bluetooth® settings |model=TAT100 }} Category:TAT100 Configuration" Tag: Replaced |
||
| Line 1: | Line 1: | ||
{{ | |||
Template:TATXYZ Bluetooth® settings | |||
|model=TAT100 | |||
}} | |||
= | |||
[[Category:TAT100 Configuration]] | [[Category:TAT100 Configuration]] | ||
Latest revision as of 11:20, 3 April 2024
Main Page > Autonomous Trackers > TAT100 > TAT100 Configuration > TAT100 Bluetooth® settingsBLE Feature Sensors
Allows to configure universal or EYE sensors for data reading or BLE beacons for use with Recovery mode.

BLE Feature:
None – Bluetooth functionality will be disabled.
Sensors – Enables Bluetooth functionality for universal sensors, EYE Sensors and beacons.
Backup Tracker - Enables Backup Tracker
Update frequency - Sets BLE update frequency if Backup Tracker or BLE beacon is configured. Scan for universal sensors or EYE Sensors is only performed with periodic or scheduled records. To increase BLE scan frequency when using universal sensors or EYE Sensors, Operand in IO elements needs to be configured.
AAS scenario - When enabled TAT device will only perform BLE scan while it is in "On Move" tracking scenario. While device is stationary BLE scan does not initiate.
Sensor
When Sensors mode is selected a table with configurable parameters will appear:

- The table has 9 types of parameters:
- Type – EIR data type. This parameter will indicate which type to look for and work with.
- Data Offset – start index of data we are interested in.
- Data Size – size of the data we are interested in. Limited to 2 bytes of data.
- Action – two actions are possible: Match and Save. Match means that we want to perform a validation of certain data. Save means that we want to get certain data and later save it to an AVL record.
- IO – tells which IO element's data will be saved to. Used only with Save action.
- Match – hex string to be matched with BLE sensor data. Used only with Match action.
- Endianness – endianness of data: little endian (ex. 0x1122) or big endian (ex. 0x2211). Used only with Save action.
- Multiplier – value to be used to multiply output data. Used only with Save action.
- Offset – value to be added to output data. Used only with Save action.
MAC - MAC address of the universal sensor.

Lost Sensor Alarm - When enabled TAT device will generate a record to notify that sensor has been lost. Required to be enabled for Recovery mode trigger "Lost BLE sensor" to work.
When universal sensor is lost TAT will send a record with event number that is the first configured IO element. In shown example if sensor is lost device will generate a record with event ID 29 (BLE Battery #1:29). If it was configured for second sensor, record will have event ID 20 (BLE Battery #2:20). Depending on the type of IO element this AVL ID will have one of two values:
-4162 - if configured data is integer
BEEF - if configured data is sent as HEX number.
EYE Sensor

When EYE Sensors mode is selected MAC address of the sensor will need to be entered.
MAC - MAC address of the EYE Sensor.
Lost Sensor Alarm - When enabled TAT device will generate a record to notify that EYE Sensor has been lost. Required to be enabled for Recovery mode trigger "Lost BLE sensor" to work.
AVL ID 463, value BEEF - Lost BLE1 EYE Sensor.
AVL ID 467, value BEEF - Lost BLE2 EYE Sensor.
AVL ID 471, value BEEF - Lost BLE3 EYE Sensor.
AVL ID 475, value BEEF - Lost BLE4 EYE Sensor.
| Please note: If Lost Sensor Alarm is disabled and sensor is not found during a scan IO element will contain value:
|
When EYE Sensor is configured, TAT device will automatically map data to below IO elements -
| Sensor Data | IO Element | AVL ID |
|---|---|---|
| EYE Sensor 1 Temperature | BLE Temp #1 | 25 |
| EYE Sensor 1 Battery | BLE Battery #1 | 29 |
| EYE Sensor 1 Humidity | BLE Humidity #1 | 86 |
| EYE Sensor 1 Flags | BLE1 Custom #1 | 331 |
| EYE Sensor 1 Movement Counter | BLE1 Custom #2 | 463 |
| EYE Sensor 1 Angle (pitch) | BLE1 Custom #3 | 464 |
| EYE Sensor 1 Angle (roll) | BLE1 Custom #4 | 465 |
| EYE Sensor 2 Temperature | BLE Temp #2 | 26 |
| EYE Sensor 2 Battery | BLE Battery #2 | 20 |
| EYE Sensor 2 Humidity | BLE Humidity #2 | 104 |
| EYE Sensor 2 Flags | BLE2 Custom #1 | 332 |
| EYE Sensor 2 Movement Counter | BLE2 Custom #2 | 467 |
| EYE Sensor 2 Angle (pitch) | BLE2 Custom #3 | 468 |
| EYE Sensor 2 Angle (roll) | BLE2 Custom #4 | 469 |
| EYE Sensor 3 Temperature | BLE Temp #3 | 27 |
| EYE Sensor 3 Battery | BLE Battery #3 | 22 |
| EYE Sensor 3 Humidity | BLE Humidity #3 | 106 |
| EYE Sensor 3 Flags | BLE3 Custom #1 | 333 |
| EYE Sensor 3 Movement Counter | BLE3 Custom #2 | 471 |
| EYE Sensor 3 Angle (pitch) | BLE3 Custom #3 | 472 |
| EYE Sensor 3 Angle (roll) | BLE3 Custom #4 | 473 |
| EYE Sensor 4 Temperature | BLE Temp #4 | 28 |
| EYE Sensor 4 Battery | BLE Battery #4 | 23 |
| EYE Sensor 4 Humidity | BLE Humidity #4 | 108 |
| EYE Sensor 4 Flags | BLE4 Custom #1 | 334 |
| EYE Sensor 4 Movement Counter | BLE4 Custom #2 | 475 |
| EYE Sensor 4 Angle (pitch) | BLE4 Custom #3 | 476 |
| EYE Sensor 4 Angle (roll) | BLE4 Custom #4 | 477 |
Eddystone

When Eddysone mode is selected Namesspace and Instance IDs will be configurable.
Configuring both parameters is not mandatory. If one of the parameters is is left empty TAT will find beacons matching other provided parameter. It is also possible to configure only part of a parameter (for example only 10 Namespace ID symbols instead of 20). During BLE scan device needs to find at least one beacon (even if 4 different connections are configured.
Scanning for BLE beacons is initiated every Update Frequency. Scan will take up to 60 seconds and will end early if at least one beacon is found.
If no beacons are found during a BLE scan, device will wake up, acquire location based on configuration and send a record to configured server. This record will have event AVL ID 20014 with a value of 3.
This functionality can also trigger Recovery mode. Device will send lost beacon event and then go into Recovery mode.
iBeacon
When iBeacon mode is selected UUID, Major ID and Minor IDs will be configurable.
Configuring all parameters is not mandatory. If one of the parameters is is left empty TAT will find beacons matching other provided parameter. It is also possible to configure only part of a parameter (for example only 20 UUID symbols instead of 32). During BLE scan device needs to find at least one beacon (even if 4 different connections are configured.
Scanning for BLE beacons is initiated every Update Frequency. Scan will take up to 60 seconds and will end early if at least one beacon is found.
If no beacons are found during a BLE scan, device will wake up, acquire location based on configuration and send a record to configured server. This record will have event AVL ID 20014 with a value of 3.
This functionality can also trigger Recovery mode. Device will send lost beacon event and then go into Recovery mode.
BLE Feature Backup Tracker
Introduction to Backup Tracker functionality
TAT devices support a feature which allows them to work as a Backup Tracker.
1. If main tracker (Compatibility table) is turned off, Alarm event from the TAT100 will be received and AVL 236 in the data packet will be sent.
2. Even if Backup tracker is in alarm mode, TAT device will continue to track its position as configured.
Topology scheme
.png)
Backup feature logic

| NOTE: | If TAT does not pick up advertised data packets from main tracker, TAT100 generates and sends a record with AVL ID 236 (Value 1). After sending this record, device will wait for the next Update Frequency and will keep generating records with event ID 236 until main tracker is found again. No record is generated if main tracker can be located during a BLE scan. |
| Parameter Name | Description | Parameter ID | Parameter Value |
|---|---|---|---|
| BLE Feature | Select which BLE feature is enabled. Backup tracker or Sensors can be selected (not both) |
189 | 0 - None 1 - Backup Tracker 2 - Sensors |
| IMEI of Central Device | IMEI of main tracker that TAT is scanning for | 190 | Valid IMEI number |
| Update Frequency | Time in seconds for scanning intervals | 1100 | Min 30 sec. Max 65535 sec. Default 120 sec. |
Instructions
To ENABLE backup feature on TAT device:
Bluetooth→ selectBackup Tracker- Enter main device (FMBxxx/TFT100/TST100/GH5200/TMT250) IMEI
- Set Update frequency – (We recommend to set update frequency to >3600 sec. Frequent BLE scanning will reduce battery life.)
To ENABLE backup feature on main tracker:
Bluetooth→BT Radioset toEnable (visible)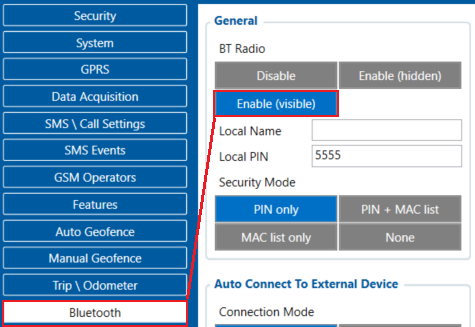
450x - ENABLE backup feature on:
- TFT100 | TST100 | GH5200 | TMT250 devices
Bluetooth 4.0→Backup Trackerset toEnabled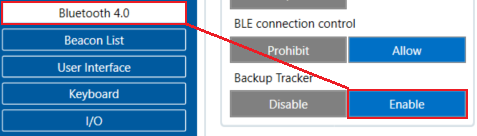
- FMBXXX devices
BLE connection controlneeds to be set to Prohibit forBackup Trackerfeature to become visible.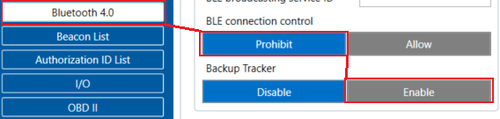
- TFT100 | TST100 | GH5200 | TMT250 devices