TAT100 Bluetooth settings
Disclaimer

If you are not using Bluetooth®, please consider turning it off or change Bluetooth® PIN to remove potential risks.
If you are using Bluetooth® we strongly recommend using AES encryption for enhanced security.
Sensors
TAT100 has a BLE connectionless devices reading feature that can be configured in the Bluetooth® tab. When Sensors mode is selected a table with configurable parameters will appear. Currently to the TAT100 device up to 4 sensors can be connected.

BLE Feature:
None – Bluetooth® functionality will be disabled.
Sensors – Enables Bluetooth® functionality for sensors.
Update frequency – how often BLE scanning will run.
Scan duration – how long scanning will be processed.

Supported BLE sensors are listed below:
- Blue Puck/Coin T (Temperature)
- Blue Puck/Coin MAG (Magnet detection)
- Blue Puck/Coin MOV (Movement detection)
- Blue Puck RHT (Temperature and Humidity)
- EYE Sensor / BTSMP1 (Temperature, Humidity, Movement, Magnet and sensor's battery voltage)
These sensors have been fully tested by Teltonika and are confirmed to work properly.
| Please note: How to configure the device to read data is described HERE. |
Backup Tracker
Introduction to Backup Tracker functionality
TAT100 supports a feature which allows to work as backup tracker.
1. Even if Backup tracker is in alarm mode, device will continue to track its position as configured.
2. If FMBXXX device (Compatibility table) is turned off, Alarm event from the TAT100 will be received and AVL 236 in the data packet will be sent.
Topology scheme
.png)
Backup feature logic

| NOTE: | If TAT100 does not pick up advertised data packets from main tracker, TAT100 enters alarm state, generates and starts sending records with AVL ID 236 (Value 0). |
| Parameter Name | Description | ID | Value |
|---|---|---|---|
| BLE Feature | Select which BLE feature is enabled. For Backup Tracker "Backup Tracker" feature has to be selected |
189 | 0 - None 1 - Backup Tracker 2 -Sensors |
| Central Device IMEI | IMEI of central device that TAT100 is connected | 190 | Valid IMEI number |
| Update Frequency | Time in seconds for scanning intervals | 1100 | Min 5 sec. Max 65535 sec. Default 120 sec. |
| Scan Duration | Time in seconds for how long BLE scan will be running | 1113 | Up to 60 seconds (Not configurable) |
FIRMWARE (MODEM AND BLUENRG) INSTALLATION
Download Firmware and Configurator from STABLE FIRMWARE or SHORT-TERM FIRMWARE pages.
After device connection to Configurator:
1) Select Update firmware;
2) Select to flash Firmware(*.e.XIM) file;
3) Click on file;
4) And select Open.
Wait until the device will upload the firmware.

When parameters successfully loaded:
1) Select Update firmware;
2) Select to flash BlueNRG firmware(*.bin);
3) Click on file;
4) And select Open.

Instructions
To ENABLE backup feature on TAT100 device:
Bluetooth®→ selectBackup Tracker- Enter main device (FMBxxx/TFT100/TST100/GH5200/TMT250) IMEI
- Set Update frequency to 3600 (s) – We do not recommend to set values below 1800 sec. in this field, as it will shorten the battery life.
- Configure your APN and Server settings in GPRS section.

To ENABLE backup feature on FMBXXX/TFT100/TST100/GH5200/TMT250 devices:
Bluetooth®→BT Radioset toEnable(visible)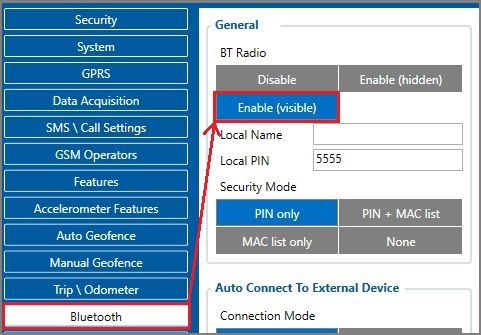
- ENABLE backup feature on:
- TFT100 | TST100 | GH5200 | TMT250 devices
Bluetooth® 4.0→Backup Trackerset toEnabled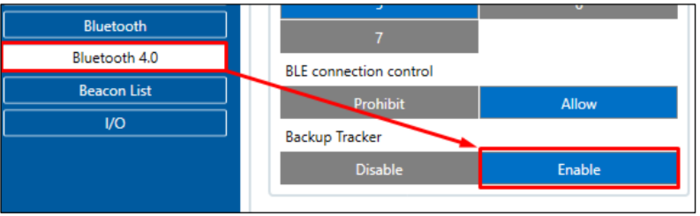
- FMBXXX devices
Instructions on how to configure the FMBXXX device can be found here.
- TFT100 | TST100 | GH5200 | TMT250 devices


DEVICE RECOGNITION CHECK USING TERMINAL
- Debug mode:
Device is able to transmit its current state when connected to PC using USB cable. It is used to detect errors and provide information to possible solutions when operating as unexpected.
- After launching terminal choose baud rate 115200 and hardware control – none.
- Select COM port which is assigned to “Virtual COM Port”.
- Click on ‘Start Log’ button and save a new file.
- Then click ‘Connect’ to start receiving messages from device.

Required Terminal application for log capturing can be downloaded here: Terminal
TAT100 terminal instructions:
1. Connect TAT100 to the computer and open it with Terminal as shown in example above.
2. When TAT100 recognizes the main tracker, a terminal will print a line as shown in example below:
[2021.10.26 06:28:40] – [ASSET.UART] << Device MAC: 785ae3d1f9de IMEI 141fa7497ac1 Command 0 Sequence 24 Packet Cnt 5
3. When TAT100 cannot see the main tracker Terminal will print a line as shown in example below:
[2021.10.26 10:50:03] – [ASSET.UART] << [2021.10.26 10:50:03] – [APP.TBT] ERROR! Amount of valid packets does not detect during this period! Triggering alarm