DashCam Configuration: Difference between revisions
| (One intermediate revision by the same user not shown) | |||
| Line 16: | Line 16: | ||
*'''Do not forget''' to configure ''DashCam'' server information. In '''RS232\RS485''' fill in '''DashCam Server Settings''' with ''Domain'' and ''Port'' entries. | *'''Do not forget''' to configure ''DashCam'' server information. In '''RS232\RS485''' fill in '''DashCam Server Settings''' with ''Domain'' and ''Port'' entries. | ||
[[File:Dashcamserver.png|600px]] | [[File:Dashcamserver.png|600px]] | ||
== Metadata version == | |||
From 03.29.00.Rev.534 metadata version can be configured. Version descriptions and differences are provided in section. [[DashCam Communication Protocol#Communication%20protocol|https://wiki.teltonika-gps.com/view/DashCam_Communication_Protocol#Communication_protocol]] . Default value is version 3. | |||
[[File:Metadata.png|alt=|frameless]]<br /> | |||
==FMC650 DashCam Configuration== | ==FMC650 DashCam Configuration== | ||
Latest revision as of 13:46, 31 July 2024
Main Page > Video Solutions > Teltonika DashCam > DashCam ConfigurationFMX125/225 configuration
- Please make sure to download the latest DashCam FW version. The latest FWs can be downloaded from the following Wiki page — DashCam Firmware errata
- It is necessary to change Data Protocol to Codec 8 Extended
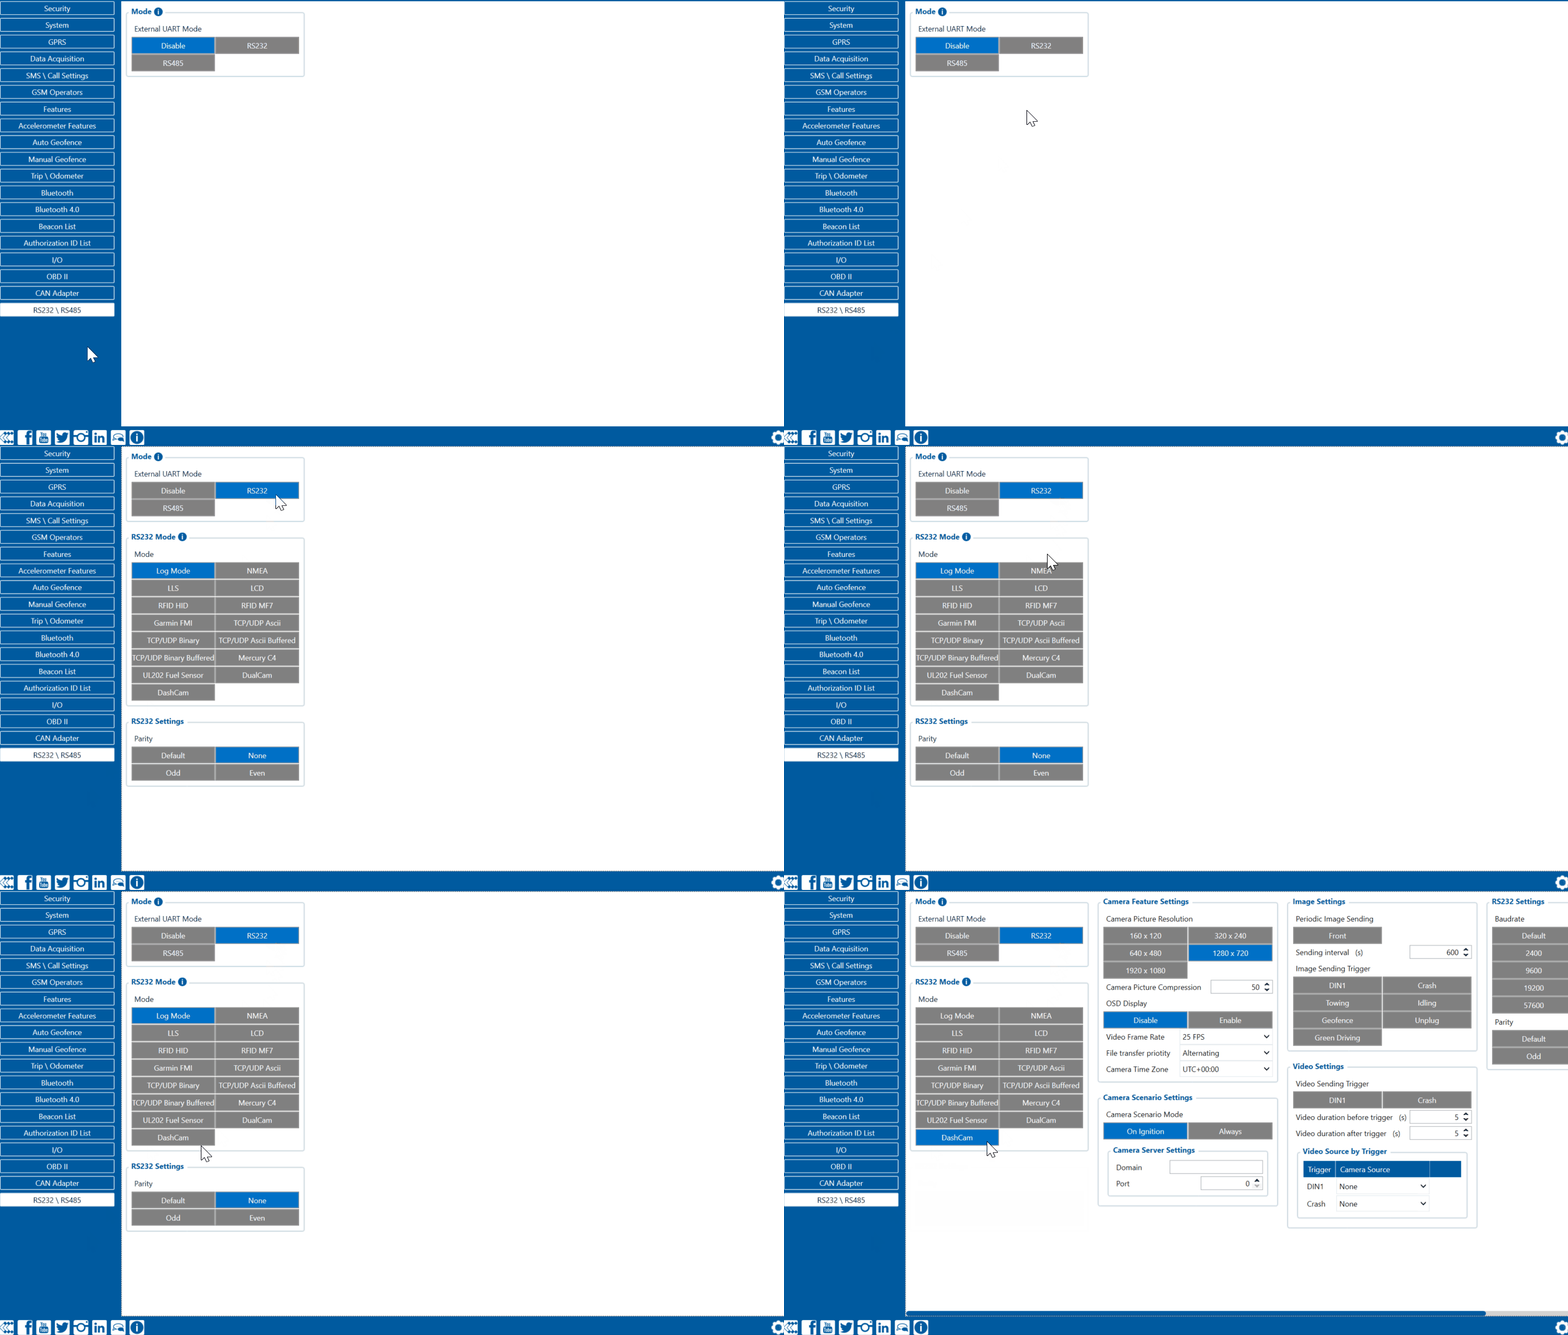
- In RS232\RS485 settings change Mode to RS232 and in RS232 Mode select DashCam
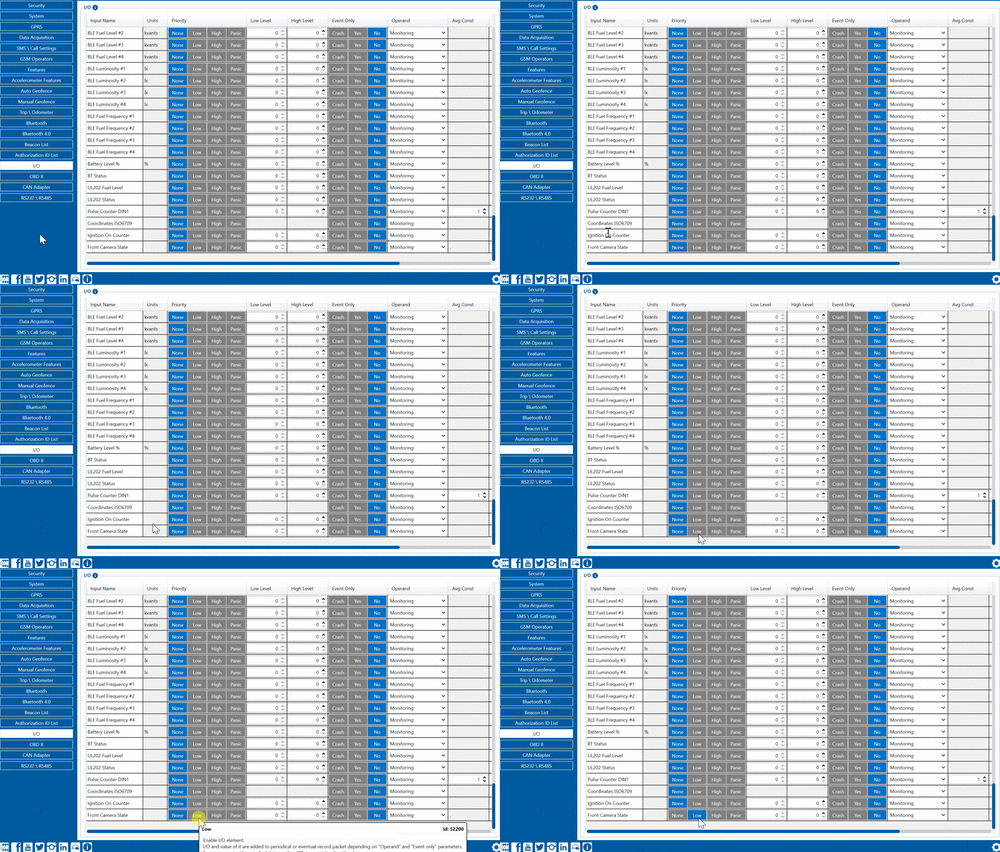
- Make sure to change I/O Camera state Priorities to Low
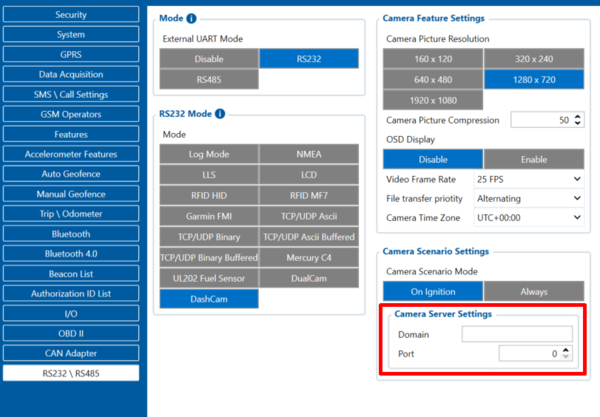
- Do not forget to configure DashCam server information. In RS232\RS485 fill in DashCam Server Settings with Domain and Port entries.
Metadata version
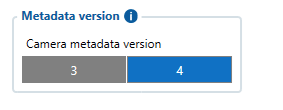
From 03.29.00.Rev.534 metadata version can be configured. Version descriptions and differences are provided in section. https://wiki.teltonika-gps.com/view/DashCam_Communication_Protocol#Communication_protocol . Default value is version 3.
FMC650 DashCam Configuration
(!) Required firmware version - 03.00.14.Rev.114. Firmware errata.
- Make sure Data Protocol is set to Codec 8 Extended
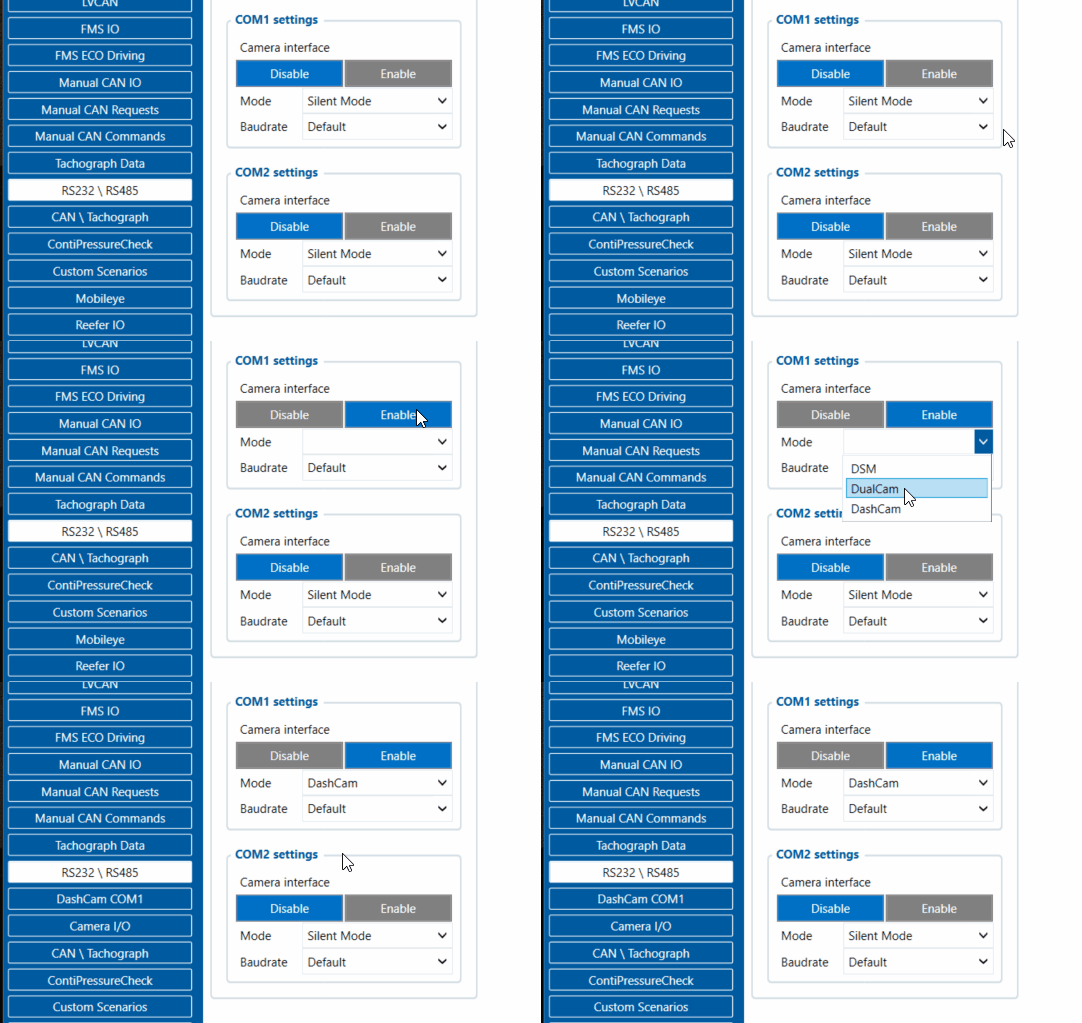
- In RS232 \ RS485 settings tab, make sure to enable Camera interface by "Enable", and select DashCam in the Mode drop-down menu, afterwards DashCam COM1 and Camera I/O should appear in the tab list.
- Make sure to change Camera I/O camera state Priorities to Low
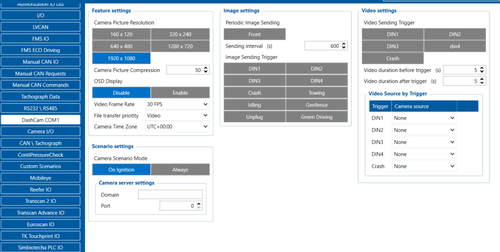
- In appeared DashCam COM1 tab, make sure to configure everything by your needs, and do not forget to complete the "Domain" and "Port" settings in "DashCam" Scenario Settings
- NOTE: This is a base setup for the device to work properly. Other device configuration is made according to your needs.
- NOTE: There are different settings for picture quality and compression, these settings will affect picture/video sizes and upload speeds. For more information about transfer sizes and timings, please visit our DashCam Data Transfer Timing section
Connecting two cameras simultaneously for FMx650
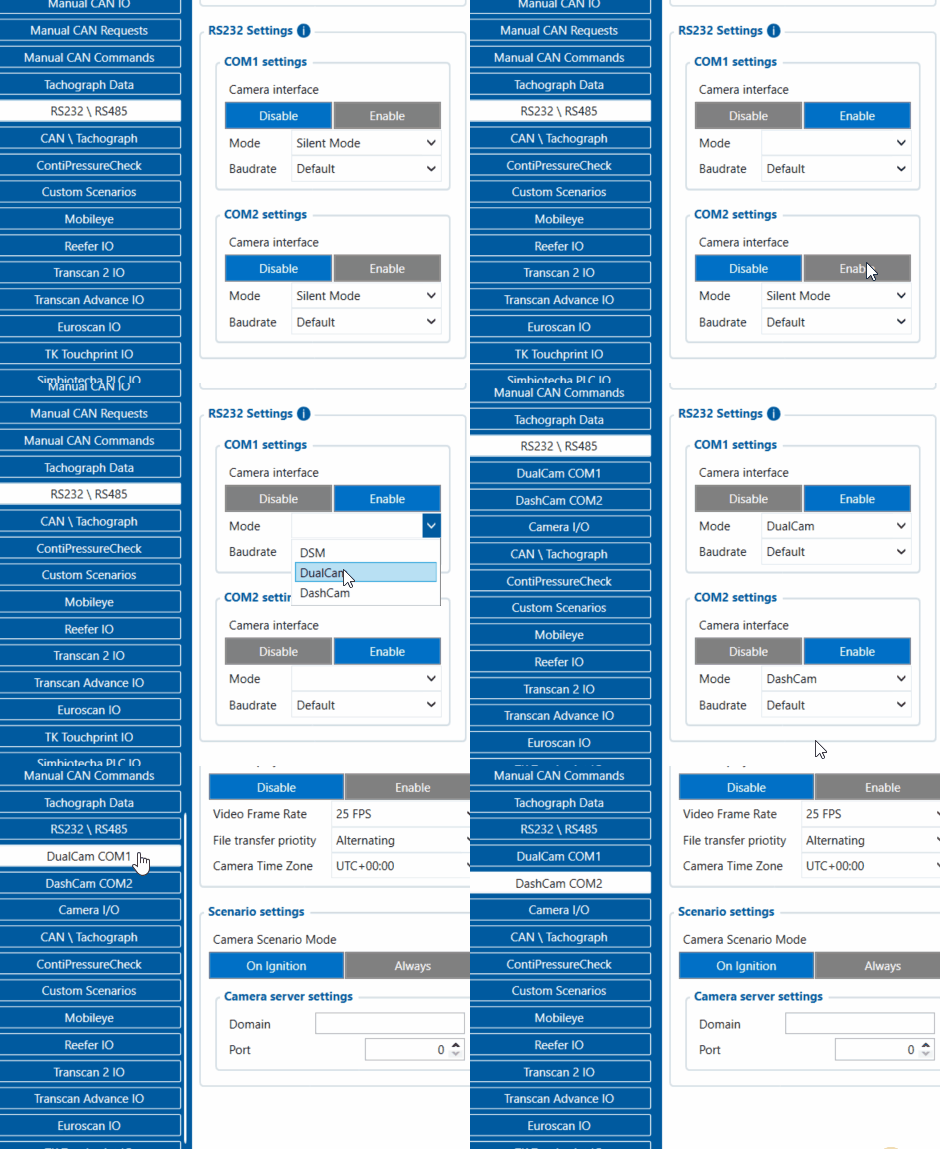
The new feature for FMx650 DashCam configuration, which is available from 03.00.14.Rev.114 iCamera allows you to connect two of your cameras at once. Method for connection and configuration stays the same, for this you are only required to choose two cameras in "RS232 \ RS485" tab from the configurator.
In the new functionality, you are able to connect any combo of the cameras by your wish, as an example: you are able to connect DashCam/Dualcam, DashCam/DSM, DSM/DSM, DualCam/DualCam and etc.
Camera Scenario Mode
The options On Ignition and Always determine the working mode.
On Ignition means the camera scenarios will operate the way it was up to 03.27.13.Rev.662, that is it will work only when the ignition is detected.
Always mode means the camera scenarios will work all the time, including whenever the device is in sleep mode (except Ultra sleep mode during which the scenario is disabled). During sleep footage requests (if the network is available), periodic image sending and triggers work as well.
Warning: using Always mode, depending on the configuration, the device might wake up from sleep very frequently. That has to be taken into consideration when configuring the scenarios.
Periodic image sending scenario
Periodic image sending triggers photo capture from a front camera, whenever the timeout is reached (sending interval parameter).
Update: Since 03.27.13.Rev.662 firmware, Periodic Image Sending Enable/Disable switch was replaced by a camera selection:
- Front cameras deselected – periodic image sending is disabled (value 0)
- Front camera selected – front camera’s pictures will be sent periodically (value 1)
If the camera has not finished uploading pictures to the server, then the photo capture is skipped.
File Transfer priority
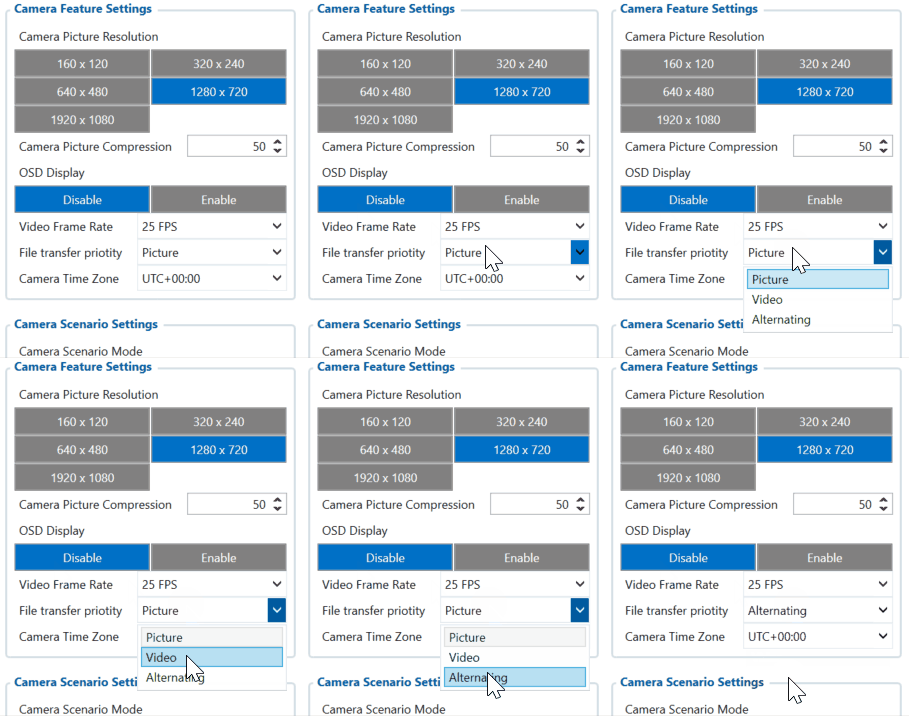
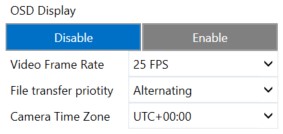
Filet transfer priority allows changing the priority of the specific type (photo or video) when both types are ready at once. The file transfer priority can be the following:
- Picture — the photo type of files will be prioritized.
- Video — the video type of files will be prioritized.
- Alternating — the priority will be changing from picture to video and vice versa after each file transmission.
Camera RTC synchronization
Camera RTC synchronization is done anytime the device itself is synchronized (via NTP, NITZ or GNSS).
After 03.27.13.Rev:662 firmware for FMX125 we added a feature to set camera time, same as device selecting time.
NOTE:
That after changes of the time it can be that you can receive files which the old-time or just do not have any video/photo on this periodical time then you change time, but then it will be back to normal work.
Time zone changes the inside clock of the camera, not only the OSD displayed time but all recordings will be done according to that.
For example, if you request a video from, say, 9:00 AM GMT+0, and the camera time is GMT+0 (matches our device's time), it is all fine. But if you were to configure time zone later to, for instance, GMT+10, the camera time will be set according to that time zone (time forwarded by 10 hours in this case). Which means that time gets forwarded with no real continuation as the camera does not understand the concept of time zones, it just uses time that we set. For continuation reasons in our device, we continue using GMT+0 in the camreq and then compensate with time zone if needed. The result of that, if we send the same request command as before (when requesting 9:00 AM video) with time zone GMT+10 set, the camera will receive video request for 7 PM (19:00) and the videos were not recorded at that time which will result in "file doesn't exist".
Camera control using DOUT1
It is possible to control the camera ON/OFF state using DOUT1 control in the "Features" selections. In order to achieve
this functionality, please see the connection diagram located in the First start page.
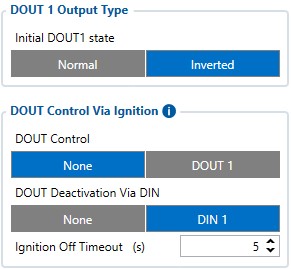
DOUT 1 Output Type has selections of either normal or inverted. Selecting inverted will make the DashCam turn on when the DOUT1 state will be 0 and turn off the the state changes to 1 and vice versa. This is recommended as inverted selection will turn on the camera upon turning on you FMx device. When 'Normal' is selected, you will need to send an SMS message to the device requesting to turn on DOUT1 every time IF DOUT control via ignition is not turned on.
Dout control via ignition stands for controlling DOUT when the ignition turns on, this setting can be chosen instead of Inverted dout. Please make sure ignition settings in the 'System' tab is correctly set and the device will turn on when the ignition of the vehicle is on. Ignition Off Timeout is a specified amount of seconds which the device will wait after ignition turns off before turning the device off. If the ignition comes back within the specified timeframe, timeout will turn off and the camera will not be turned off.
DOUT deactivation via DIN turns of DashCam when the state of DIN1 changes. This can be set with a button which when pressed will disable DOUT1 thus ensuring camera has no power.
DOUT control can also be set using sms command such as setdigout.
"setdigout # Y1 Z1" The complete setdigout command structure, listed below is explanation:
# – 0; 1 or ? (0 - OFF, 1 – ON, ? - Ignore) for DOUT1.
Y1 – timeout value for DOUT1 if needed (in seconds).
Z1 – maximum speed value for DOUT1 if needed.
Crash Detection Functionality using DOUT
The crash detection feature is a crucial capability provided by our device. It enhances evidential documentation through video or photo evidence in the event of a crash. However, activating this functionality necessitates a direct connection of the camera to a power source. Nonetheless, such a direct connection can lead to battery drainage.
To circumvent this issue, we recommend utilizing DOUT and a relay for connection. This setup enables control via SMS or GPRS command, or through predefined scenarios within our device. By activating DOUT post-ignition, the camera receives power, allowing it to function and record evidence even after the ignition is turned off following a crash. For your convenience, the connection scheme can be found here: DashCam First Start
It is important to note that in the event of a fatal crash where fatalities may occur, we cannot guarantee the retrieval of video or photo evidence due to the severity of the accident. Moreover, both the camera and the device itself may sustain irreparable damage in such instances
Camera is configured if all of these conditions are met:
- RS232 mode is selected (DashCam)
- Camera was not configured since startup or one of the related parameters were changed (compression, framerate or OSD)
- Camera file transfer is not active
Active camera reconfiguration is accompanied by two consecutive camera shutter clicks.
If camera is disconnected and later reconnected, a device will detect it by periodic camera ping packet. Once camera is detected, the device will reissue the reconfiguration procedure.


