DashCam Communication Protocol
Server side configuration source code
NOTE: This is a "test server" version, dedicated for initial functionality testing (which could also be done via cloudview platform) with 1-2 cameras. Multithreaded (and multiple device) handling on the server side is up to the client to do additional development and/or necessary optimizations and modifications, to support more than 1-2 cameras at the same server instance.
Optionally - platforms that already support camera integrations could be used.
Together with the communication protocol, this server side source code can be downloaded and implemented upon personal servers for the ease of use and configuration, please see index.js, debug.js and protocol.js which can be copied into the server.
Server files & source code can be downloaded here:
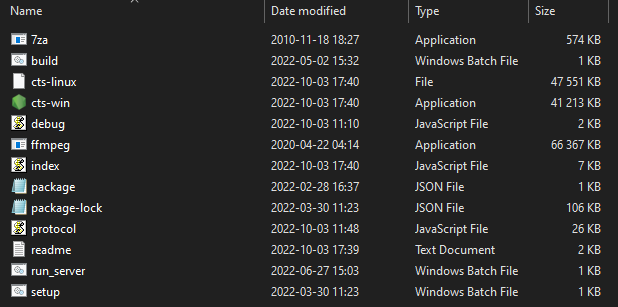
Please see index.js, debug.js and protocol.js files. These files contain required support for camera downloads and they can be inserted straight into server. The folder can also be run as server and will work with file downloads, so if personal server is not available, there is always a possibility to use this default server.

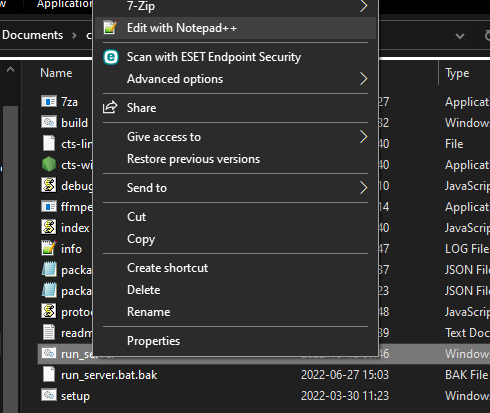
All that is required is an open Port on the computer and that port has to be written in run_server.bat file. Also by clicking on Readme file, you will be able to see the settings which you can enter into that run_server.bat file by right clicking the mouse button on it and choosing edit option. These settings include choices like DashCam download, ADAS file download or Auto mode, Metadata inclusion and etc.

In this case, Notepad++ is chosen but you can choose any text editor in order to update the file.
Camera file transfer reconnection
If FMU1YX device has bad reception, server is not reachable or wrong server details are configured, then the device tries to open a link to a camera server few consecutive times. If no connection was possible to be established, then the connection is postponed for 30 minutes and tried again (or tried every configured sending interval if periodic image sending is enabled).
DashCam camera file transfer support

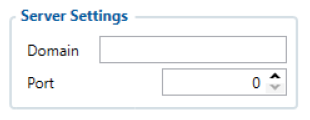
Once camera has at least one file captured, it starts connection to a remote server, which is configured by parameters “Domain” and “Port” found in the “Camera Settings” tab.
Initialization packet
On connection, a device sends an initialization packet.
| Header(0x0000) | Protocol ID | IMEI | Settings |
|---|---|---|---|
| 2 bytes | 2 bytes | 8 bytes | 4 bytes |
Protocol ID – just a reference for the protocol version that is running on a device (for server cross compatibility with older versions). Firmware FMB.Ver.03.27.00.Rev.100 and up have protocol ID 5. Settings flag contains information on what is available for download. Structure is provided below:
| Settings, 4 B | |||||||||||||||||||||||||||||||
|---|---|---|---|---|---|---|---|---|---|---|---|---|---|---|---|---|---|---|---|---|---|---|---|---|---|---|---|---|---|---|---|
| Byte 3 | Byte 2 | Byte 1 | Byte 0 | ||||||||||||||||||||||||||||
| 1 | 2 | 3 | 4 | ||||||||||||||||||||||||||||
- Video, rear (%videor)
- Video, front (%videof)
- Photo, rear (%photor)
- Photo, front (%photof)
If identifier sent to a server is not valid, device disconnects.
General command structure
General communication packet structure is as in the table bellow. It consist of CMD_ID (2 bytes), Data length of a command and a payload.
| Command ID | Data length | Data |
|---|---|---|
| 2 bytes | 2 bytes | [data length] bytes |
Communication protocol
Close a session command (CMD ID 0x0000)
In case when a device connects to a server, but the server does not expect it to connect, the server will respond by sending a CLOSE command after which the connection will be terminated. This command is also used when the device connects to a server for a custom file sending and the server finishes to send all custom files to the device.
| Command ID | Data length |
|---|---|
| 0x0000 | 0x0000 |
Start file transfer command (CMD ID 0x0001)
After device received file request command from the server (0x0008) device sends START command with file data (packet count).
| Command ID | Data length | File Packets (4 bytes) | Blank field (2 bytes) |
|---|---|---|---|
| 0x0001 | 0x0006 | 0x12345678 | 0x0000 (always same value) |
File request command (CMD ID 0x0008)
After the device is connected for a file upload, the server initiates file transfer by sending a FILE REQ command.
| Command ID | Data length | File Identifier |
|---|---|---|
| 0x0008 | 2 bytes | See the table below |
The device should answer with a START command described above indicating the size and CRC of the requested file.
| File source, type | Identifier (ASCII chars) |
|---|---|
| Photo from camera, rear | %photor |
| Photo from camera, front | %photof |
| Video from camera, rear | %videor |
| Video from camera, front | %videof |
Resume file transfer command (CMD ID 0x0002)
In a response to the START command a RESUME command must be sent from server.
| Command ID | Data length | Packet offset (4 bytes) |
|---|---|---|
| 0x0002 | 0x0004 | 0x00000001 |
To begin file transfer from the start, offset should be set to 1 (4 bytes value). In case when the file transfer was interrupted, to resume file transfer, offset can be set to the desired value (1 ≤ [offset] ≤ [file packets]).
Synchronize file transfer command (CMD ID 0x0003)
In a response to the RESUME command a SYNC command is sent from device.
| Command ID | Data length | File offset (4 bytes) |
|---|---|---|
| 0x0003 | 0x0004 | 0x00000001 |
By sending the SYNC command it is ensured that the next data command will contain file data starting from the specified offset.
File data transfer command (CMD ID 0x0004)
After sending a SYNC command, a file data transfer is started by sending DATA commands.
| Command ID | Data length | File data (up to 1024 bytes) | Data CRC (2 bytes) |
|---|---|---|---|
| 0x0004 | 0x0402 | ... | ... |
The file is sent in chunks of 1024 bytes, but the server may receive it in various packet sizes depending on a modem and provider packet forming procedures. .
Note: if a command with a bad CRC is received, RESUME command should be sent with the last valid file offset, after receiving a RESUME command, the server will stop sending DATA commands and continue communication from “Resume file transfer” step.
CRC polynomial expression: 0x8408
The initial value, when calculating CRC, is the previously received packet (CMD ID 0x0004) CRC value.
File transfer status command (CMD ID 0x0005)
After a file transfer is completed and no more files are required from the device, a server should send a COMPLETED command to the device (this command does not work after executing repeat init command0 x0009 – in this case, the server should send a CLOSE SESSION 0x0000 command mentioned before).
| Command ID | Data length | Status (4 bytes) |
|---|---|---|
| 0x0005 | 0x0004 | 0x00000000 |
In case of the server using invalid arguments, commands or not following the file request flow, the device will send this command with a Status field set to one of the few possible error codes. A list of possible ones is provided below.
| Status value (hexadecimal) | Description | Notes |
|---|---|---|
| 0x00000000 | File transfer process completed | Sent from server |
| 0x00000002 | Failed to close GPRS | Sent from device |
| 0x00000003 | Failed to close socket | Sent from device |
| 0x00000005 | Invalid response from server to init packet | Sent from device |
| 0x00000011 | This error code forces the device to disconnect from server | Sent from device. Possible causes:
|
After a COMPLETED command device should disconnect from the server.
Initialization packet repeat command (CMD ID 0x0009)
When sent, the initialization packet is repeated. This is used, when all of the files are downloaded and an additional check is carried out for any additional files, that may have been captured during the download operation.
Query file metadata request (CMD ID 0x000A)
This command is used for retrieving extra information about a selected file. A file identifier is used to determine which file’s information will be received. File identifiers are identical and used in the same way as in the File Request Command (0x0008).
| Command ID (2 bytes) | Data length (2 bytes) | File Identifier (7 bytes) |
|---|---|---|
| 0x000A | 0x0007 | 0xFFFFFFFFFFFFFF |
Can be sent after the initialization packet or after the file transfer is complete. It is not a mandatory command and doesn’t have to be used. The response for this command is 0x000B (more details below).
Note: 0x000A command was added since 03.27.04.Rev.104 firmware version and would not work with older versions.
File metadata response (CMD ID 0x000B) From 03.29.00.Rev.534 metadata version can be configured.
0x000B is a response command to the request command 0x000A.
Response command returns information about a specified file: file type, timestamp, trigger, and video length. Complete command’s structure:
| Command ID (2 bytes) | Data length (2 bytes) | Command version (1 byte) | File type (1 byte) | Timestamp (8 bytes) | Trigger (1 byte) | Video length (2 bytes) | Framerate (1 bytes) | Time Zone (2 bytes) | Latitude (8 bytes) | Longitude (8 bytes) | Trigger Timestamp (8 bytes) |
|---|---|---|---|---|---|---|---|---|---|---|---|
| 0x000B | 0x000D | 0xFF | 0xFF | 0xFFFFFFFFFFFFFFFF | 0xFF | 0xFFFF | 0xFF | 0xFFFF | 0xFFFFFFFFFFFFFFFF | 0xFFFFFFFFFFFFFFFF | 0xFFFFFFFFFFFFFFFF |
Note: 0x000B command was added since 03.27.04.Rev.104 firmware version and would not work with older versions.
Response command meta data:
| Data | Description |
|---|---|
| Command version | Iteration of the command itself to determine to parse of the data |
| File type | Media type for confirming which file’s metadata is received. Byte structure is the same as byte 3 in the initialization packet settings data |
| Timestamp | Timestamp at the time of the video file being finalized. |
| Trigger | Trigger values. Same values as video sending trigger in SOS record. |
| Video length | Duration of the video in seconds. If the file type is a photo, this value is 0x0000. |
| Trigger Timestamp | Timestamp at the time of the trigger. The same value is used in the corresponding event record. |
Metadata command response version changes:
- Version 1 - added metadata response command.
- Version 2 - added frame rate setting.
- Version 3 - added time zone and coordinates.
- Version 4 - added trigger timestamp value in milliseconds (available from 03.29.00.Rev.534 FW version)
Converting Latitude and Longitude values to decimal
Latitude and Longitude values are being sent in HEX format, but to correctly parse them conversation from HEX to Double. Example:
The received value in HEX is 404B59A74E8E028D
- Convert the hexadecimal value to binary. The hex value 404B59A74E8E028D can be converted to binary as 0100000001001011010110011010011101001110100011101110000001010001101.
- Determine the sign bit. The sign bit is the leftmost bit of the binary representation. A value of 0 indicates a positive number, while a value of 1 indicates a negative number.
- Determine the exponent. The exponent is the next 11 bits after the sign bit. Subtract 1023 from the exponent value to obtain the actual exponent. In our example, the exponent bits "10000000100" correspond to the exponent value of 1028 (i.e., 2^10 + 2^3 = 1024 + 8 = 1032, and 1032 - 4 = 1028, since the bias for double precision is 1023).
- Determine the significand. The significand is the remaining 52 bits after the sign bit and exponent. Add an implicit leading 1 to the significand to obtain a value between 1 and 2. In our example, the significand bits 0101101001110100011101010111010011100110000000010 correspond to a significand value of 1.3582693302319776.
- Calculate the final value. The final value is determined by combining the sign bit, exponent, and significand according to the IEEE 754 standard for double-precision floating-point numbers. The formula is: (-1)^signbit x significand x 2^(exponent-1023). In our example, the final value is (-1)^0 x 1.3582693302319776 x 2^(1028-1023) = 54.7004183.
Therefore, the hexadecimal value 404B59A74E8E028D is equivalent to the double-precision floating-point value of approximately 54.7004183.
CRC-16 calculation
CRC is calculated with using 3 input variables:
1. init_value - last packet CRC (or 0 if it's the first packet)
2. poly - binary polynomial expression (0x8408 in our case)
3. data - raw data of the packet (not including the first 4 bytes (cmd ID and packet size) and 2 last bytes (the CRC)
An example of structure can be found below:
function crc16_generic(init_value, poly, data) {
    let RetVal = init_value;
    let offset;

    for (offset = 0; offset < data.length; offset++) {
        let bit;
        RetVal ^= data[offset];
        for (bit = 0; bit < 8; bit++) {
            let carry = RetVal & 0x01;
            RetVal >>= 0x01;
            if (carry) {
                RetVal ^= poly;
            }
        }
    }
    return RetVal;
}
CRC (Cyclic Redundancy Check) is an error - detecting code using for detect accidental changes to RAW data. The algorithm how to calculate CRC - 16 (also known as CRC - 16 / IBM) you will find below.
var crc = {
   extractCRC: function (message) {
       crcData = message.slice(message.length - 2, message.length);
       return crcData[0] * 256 + crcData[1];
   },
   calculateCRC: function(message, previous_crc) {
       let crc_poly = 0x8408;
       let idx = 0;
       let crc = 0x0000;

       /* the payload length is calculated with removing size of header and CRC (4 + 2 bytes) */
       let payload_length = message.length - 6;

       /* the payload is separated from the message header and CRC (4 bytes ofset + length)*/
       let payload = message.slice(4, 4 + payload_length);

       /* Init value for the first message is zero and for the upcoming messages it is the CRC value of the previous message */
       crc = previous_crc;

       for (idx = 0; idx < payload_length; idx++) {
           let bit;
           /* Use XOR operation for initial value and payload */
           crc ^= payload[idx];

           for (bit = 0; bit < 8; bit++) {
               let carry_bit = crc & 0x01;
               crc >>= 0x01;

               if (carry_bit != 0) {
                   crc ^= crc_poly;
               }
           }
       }
       return crc;
   }
};
exports.crc = crc;
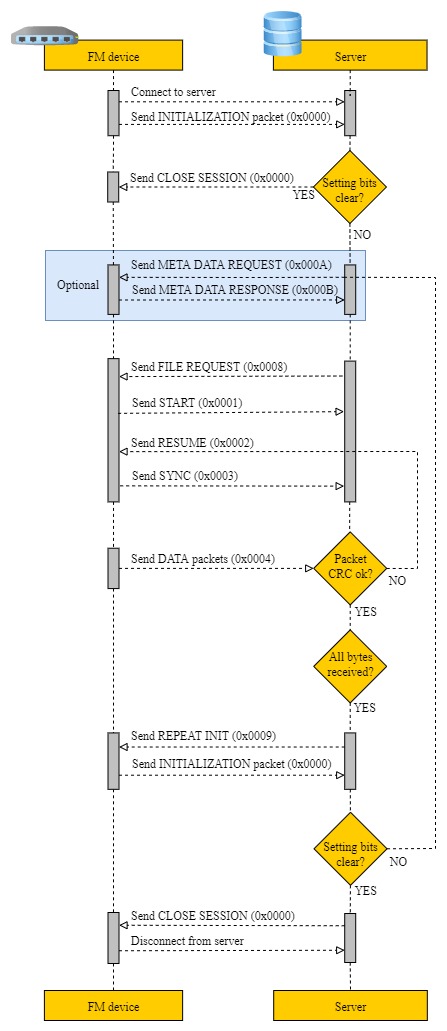
File transfer visual flow

Video conversion example and settings
For converting DashCam h265 videos to a more popular mp4 video format, a free open-source converter FFmpeg is used in the example. Although any other converter from h265 would work as well.
To convert DashCam video properly, the converter has to know the frame rate of the video. The frame rate is configured as Config Id: 66003 and could be either 20, 25, or 30 FPS. That same value could be obtained by using the metadata command (see more details at File metadata response (CMD ID 0x000B)).
Recommended parameters using the FFmpeg for the conversion:
ffmpeg -r <fps> -i <input>.h265 -ss 00:00:0.9 -c:a copy -c:v libx264 <output>.mp4
<fps> - configured frame rate of the video;
<input> - file name of the video file from the camera;
<output> - file name of the video that will be converted to mp4.
Additional audio converting from video file
This information is only for cameras that support sound recording
Please find attached files required for video converting, so there is also audio.
When you receive a *.h265 file, you will need to convert it to *.mp4, by using the “VideoConverter.exe”. There is a *.bat file with an example.
The principle use is very simple. Instead of converting with the FFMPEG library, you just use the “VideoConverter.exe”: ZmConverter\VideoConverter.exe codec "path_to_input_file.h265" "path_to_converted_file.mp4"
Will receive with h265 codec:
To have the h264 codec:
In the end, you will have this:
Video files and conversion
Videos downloaded from the camera are in the raw h265 format. By default, they could be viewed using the ZMVideoPlayer program in the h265 format. If the videos are needed in a more common format, they can be converted.


