FOTA WEB Account Settings: Difference between revisions
| (13 intermediate revisions by the same user not shown) | |||
| Line 34: | Line 34: | ||
=== Two-factor authentication === | === Two-factor authentication === | ||
''' | '''FA will help you to protect your account from intruders''' | ||
To improve user security and protect against unauthorized intrusions, Two-Factor Authentication (2FA) functionality was added to FOTA WEB. | To improve user security and protect against unauthorized intrusions, Two-Factor Authentication (2FA) functionality was added to FOTA WEB. | ||
This feature allows you to add [https://www.microsoft.com/en-us/security/mobile-authenticator-app Microsoft Authenticator] or [https://support.google.com/accounts/answer/1066447?hl=en&co=GENIE.Platform%3DAndroid Google Authenticator] or Email authorization in addition to your existing password. | This feature allows you to add [https://www.microsoft.com/en-us/security/mobile-authenticator-app Microsoft Authenticator] or [https://support.google.com/accounts/answer/1066447?hl=en&co=GENIE.Platform%3DAndroid Google Authenticator] or Email authorization in addition to your existing password. | ||
With 2FA user will not only have to enter the correct email and password, but also a unique code generated by the chosen authentication service or code received via email in order to successfully log in. | |||
<br><br> | |||
'''Authentication via app''' | '''Authentication via app''' | ||
[[File:Select 2FA 2.png|left|thumb|Select Authentication via app method]] | |||
After login with email and password choosing authentication via app method press "Continue" button | |||
<br> | |||
[[File:Auth app 2.png|thumb|Enter 2FA code|alt=|left]] | |||
After that, the user will see a window where links to authorization methods will be provided, by clicking on which the user can get detailed instructions on how to work with them. | |||
<br><br><br><br><br><br><br><br><br> | |||
After pressing the button "Continue" the user should scan the displayed QR code with the help of authentication application on phone and enter the code provided by the authorization service. | After pressing the button "Continue" the user should scan the displayed QR code with the help of authentication application on phone and enter the code provided by the authorization service. | ||
<br><br> | |||
'''NOTE: If you are unable to scan the QR code using the authenticator application, click on "Click here to manually type the code instead" to enter the code manually.''' | '''NOTE: If you are unable to scan the QR code using the authenticator application, click on "Click here to manually type the code instead" to enter the code manually.''' | ||
[[File:Enabled 2FA 2.png|thumb|left|2FA was enabed]] | |||
[[File: | |||
<br><br><br><br><br><br><br><br><br><br><br> | |||
After clicking on the "Verify" button, if the code is correct, 2FA will be activated. If the entered code is incorrect, 2FA won't be activated and you will see an error on your screen. | |||
In addition, the user will receive an email from FOTA stating that two factor authentication has been successfully enabled.<br> | |||
On the next login into your account, in addition to the standard login and password you will be asked to enter a 6-digit code generated by the authentication application you activated in previous steps. | |||
<br><br><br><br><br><br> | |||
'''Authentication via Email''' | '''Authentication via Email''' | ||
[[File:Select email 2FA 2.png|left|thumb|Select Authentication via email method]] | |||
After choosing authentication via app method press " | After choosing authentication via app method press "Continue" button[[File:Auth via email3.png|left|thumb|Send Authentication code via email]] | ||
[[File:Auth via email code4.png|thumb|Enter verification code from the email|alt=|left]] | |||
[[File: | |||
<br><br><br><br><br><br><br><br><br><br><br><br> | |||
Before clicking on a button, the user should verify that their email address is correct. Then, need to click the "Send code" button to receive a verification code via email. | |||
Enter the verification code you received into the verification field. | Enter the verification code you received into the verification field. | ||
After clicking on the "Verify" button, if the code is correct, 2FA will be activated. If the entered code is incorrect, 2FA won't be activated and you will see an error on your screen. | After clicking on the "Verify" button, if the code is correct, 2FA will be activated. If the entered code is incorrect, 2FA won't be activated and you will see an error on your screen. | ||
<br><br><br><br> | |||
In addition, the user will receive an email from FOTA stating that two factor authentication has been successfully enabled. | In addition, the user will receive an email from FOTA stating that two factor authentication has been successfully enabled. | ||
On the next login into your account, in addition to the standard login and password you will be asked to enter a 6-digit code received via email. | On the next login into your account, in addition to the standard login and password you will be asked to enter a 6-digit code received via email. | ||
<br><br><br><br><br><br><br><br><br> | |||
==== How to change 2FA method==== | |||
To change 2FA method, select "Settings" -> "Security" and click "Disable" button in the "Two-factor authentication" field. | |||
After that, the user will have to choose authentication method. | |||
[[File:Disable 2FA 2.png|thumb|How to enable 2FA |alt=|left]] | |||
[[File:Are you sure to disable 2FA .png|thumb|Authentication change warning |alt=|left]] | |||
<br><br><br><br><br><br><br><br><br><br><br><br><br><br> | |||
{|style="width:100%;" | {|style="width:100%;" | ||
Latest revision as of 17:35, 26 August 2025
Settings
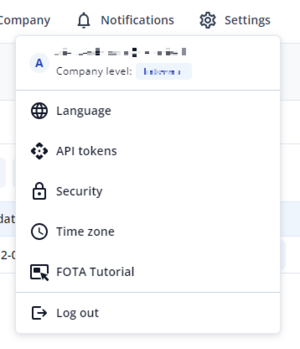
You can find FOTA Web Settings at the top-right of the page, there you are able to change web page language, generate API tokens, change account password and set your own time zone. More details about the functions are explained below.
Language
In the settings tab window you can select your preferred language. Currently there are 6 available languages:
- English
- Lithuanian
- Russian
- Spanish
- Portuguese
- France
API tokens
You can generate Token ID in the API Tokens window by clicking Add token, set a Token name and then click generate. This will generate FOTA Web API Token with which you can use it to integrate FOTA Web functionalities on your existing software system.
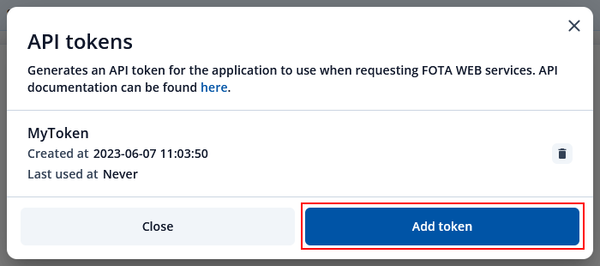
Full FOTA API documentation can be found HERE.
Change password
If your current password is too difficult to remember or not secure enough and you want to change it, you can freely change your password by entering your current password and then the password you want it to be changed to.
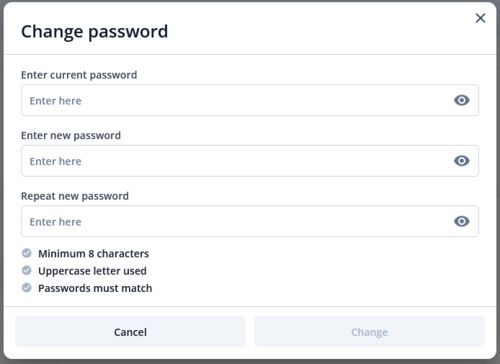
If you do not remember your current password, in FOTA WEB initial window you can click forgot password. It will generate a link for resetting your password and send it to your email address.
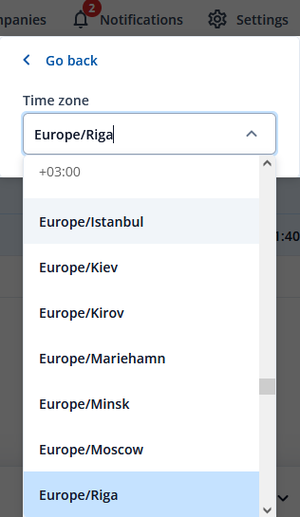
Time zone
Time zone functionality lets you freely change how page will display time in different time zones. Changing it will change time information on when device was Seen at, Created at or Updated at.
Two-factor authentication
FA will help you to protect your account from intruders
To improve user security and protect against unauthorized intrusions, Two-Factor Authentication (2FA) functionality was added to FOTA WEB.
This feature allows you to add Microsoft Authenticator or Google Authenticator or Email authorization in addition to your existing password.
With 2FA user will not only have to enter the correct email and password, but also a unique code generated by the chosen authentication service or code received via email in order to successfully log in.
Authentication via app
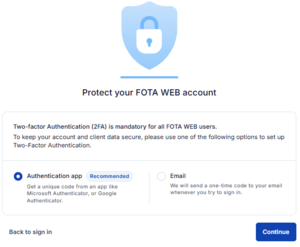
After login with email and password choosing authentication via app method press "Continue" button
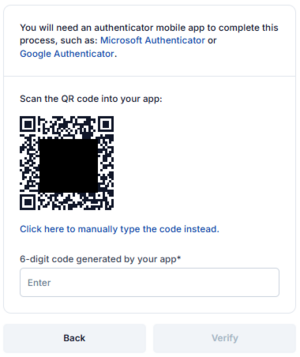
After that, the user will see a window where links to authorization methods will be provided, by clicking on which the user can get detailed instructions on how to work with them.
After pressing the button "Continue" the user should scan the displayed QR code with the help of authentication application on phone and enter the code provided by the authorization service.
NOTE: If you are unable to scan the QR code using the authenticator application, click on "Click here to manually type the code instead" to enter the code manually.
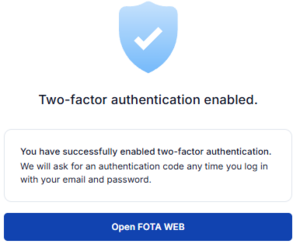
After clicking on the "Verify" button, if the code is correct, 2FA will be activated. If the entered code is incorrect, 2FA won't be activated and you will see an error on your screen.
In addition, the user will receive an email from FOTA stating that two factor authentication has been successfully enabled.
On the next login into your account, in addition to the standard login and password you will be asked to enter a 6-digit code generated by the authentication application you activated in previous steps.
Authentication via Email
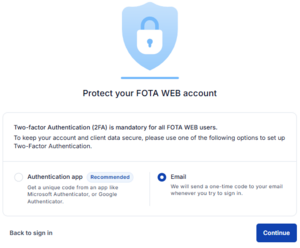
After choosing authentication via app method press "Continue" button
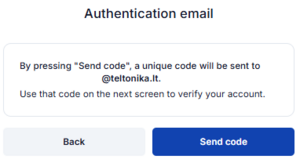

Before clicking on a button, the user should verify that their email address is correct. Then, need to click the "Send code" button to receive a verification code via email.
Enter the verification code you received into the verification field.
After clicking on the "Verify" button, if the code is correct, 2FA will be activated. If the entered code is incorrect, 2FA won't be activated and you will see an error on your screen.
In addition, the user will receive an email from FOTA stating that two factor authentication has been successfully enabled.
On the next login into your account, in addition to the standard login and password you will be asked to enter a 6-digit code received via email.
How to change 2FA method
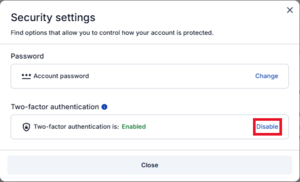
To change 2FA method, select "Settings" -> "Security" and click "Disable" button in the "Two-factor authentication" field.
After that, the user will have to choose authentication method.

| Users - Previous page | Next page - API |

