A new camera request has been added, which allows the server to request files from a camera. It is also possible to to have two identical cameras connected at once. The format is as provided below in the table:
Teltonika OBD devices are able to read data from heavy duty vehicles. With the OBD to FMS adapter, clients are able to connect OBD devices to their heavy duty vehicles which have FMS female connector (usually located under the front panel). Cable is only applicable with the European truck.
*If <b><resolution></b> parameter is included when requesting a photo, the device will send the photo with the selected resolution.
{| class="wikitable"
|+'''Cable pinout scheme:'''
<b>Please note,</b> that if the resolution parameter is not included in the SMS/GPRS command, the device will request a photo with configured resolution.
'''DISCLAIMER:''' ''PLEASE MAKE SURE THE FMS PINOUT OF YOUR HEAVY DUTY VEHICLE IS AS REFERRED ON THE PROVIDED PINOUT SCHEME. IN CASE OF INCORRECT PINOUT PLEASE CONTACT YOUR HEAVY DUTY VEHICLE DEALERSHIP. THE CLIENT IS RESPONSIBLE FOR ALL THE ISSUES, WHICH MIGHT OCCUR BY INCORRECT INSTALLATION.''
For example: camreq:0,1,1624960616,5,212.59.13.226,7160
'''NOTE:''' ''Please use OBD devices with the latest firmware which has implemented J1939 protocol support.''
Even though the FMS cable is standardized cable – its placement in the vehicle might differ depending on manufacturer and depending on vehicle trim level.
Upload with domain, port, and resolution provided by a request. Example: camreq:1,1,192.168.1.1,12345,4
These examples identify the most common locations for the FMS plug.
'''''icam_req:'' Structure examples:'''
==== Behind the Fuse panel on passenger side – for Example SCANIA S/R/G/P Euro6 Series [[File:Scania R-series 1.3.png|frameless|1000x1000px]] ====
1. Connect your OBD device to PC via USB or Bluetooth.<br>
2. Open '''Teltonika Configurator''' and find your device in the list.<br>
3. Select your device from the list.<br>
4. Navigate to '''System''' and under '''System Settings''' Enable '''Codec 8 Extended''' protocol.<br>
5. Open '''OBD II''' section on the left.<br>
6. In '''General''' -> '''OBD II Settings''' -> '''OBD Feature''' select '''ELD'''.<br>
7. In '''OBD VIN settings'''-> '''VIN Source''' select prefered source. Some heavy duty vehicles may not automaticly provide VIN number, in that case we recommend to setup VIN manually.<br>
[[File:OBD II Settings.png|500x500px]]<br>
8. Save the configuration by pressing '''Save to device''' on the top.<br>
9. New section with J1939 parameters can be found in '''ELD''' section on the right bottom.<br>
The full supported parameter list for OBD devices can be found in the following pages:
*[[FMB001 Teltonika Data Sending Parameters ID]]
*[[FMB003 Teltonika Data Sending Parameters ID]]
*[[FMC003 Teltonika Data Sending Parameters ID]]
*[[FMM003 Teltonika Data Sending Parameters ID]]
*[[FMM00A Teltonika Data Sending Parameters ID]]
==Downloads==
This functionality requires the latest OBD [[Teltonika Configurator versions|configurator]] and [[Firmware versions#OBD trackers|firmware]] for optimal performance.
Video request from source <1-3> for <1-30> seconds since YYYY-MM-DD HH:MM:SS.
==Ordering and Specifications==
For more information about '''OBD-II to FMS adapter''' specifications and ordering, please visit [https://www.teltonika-gps.com/products/accessories/data-cables/obd-ii-to-fms-adapter OBD-II TO FMS ADAPTER] web page.
'''(If video request)'''
| colspan="2" |Preparing to send file from timestamp <timestamp of the file>
|-
| rowspan="1" style="text-align: center; style=" width: 150px; background: white; color: black;" |Request successful but the device was already connected to the server. Device is ready to send selected file
| colspan="2" |Already connected. Preparing to send file from timestamp <timestamp of the file>
|-
| rowspan="1" style="text-align: center; style=" width: 150px; background: white; color: black;" |Request received but the capture failed
| colspan="2" |Error: capture failed
|-
|Request received but the device cannot proceed with the capture and sending because ignition is off
| colspan="2" |Error: Cannot capture because ignition is off
|-
|Request received but the previously captured and prepared photo/video was not sent. New media is not captured. The device is ready to send the previous capture
| colspan="2" |Warning: Photo / Video already captured previously, trying to send it
|-
|Request received but the device was already connected to the server. New media is not captured. The device is ready to send previous capture
| colspan="2" |Already connected. Warning: Photo / Video already captured previously, trying to send it
|-
|Request received but the camera doesn’t acknowledge sent command. Nothing will be sent
| colspan="2" |Error: DualCam NAK
|-
|Request received but the camera is not connected or not working
| colspan="2" |Error: DualCam not present
|-
|Request received but the camera is not connected or not working
| colspan="2" |Error: requested file does not exist
|-
|Request received but the device cannot connect to the server
| colspan="2" |Error: connect to server
|-
|Request received but the modem is not ready for operation (network or modem issue)
| colspan="2" |Error: modem not ready to start send
|-
|Request received but the device cannot proceed with the capture and sending because the camera is being reconfigured
| colspan="2" |Cannot send, DualCam configuration is in progress
|-
|Request received but file capture time was exceeded.
| colspan="2" |Error: Media request timeout
|-
|Request received but capture completed incorrectly
| colspan="2" |Error: Media request problem
|-
|File type parameter incorrect in the request command
| rowspan="4" |Error: Invalid
|File Type
| rowspan="4" |argument in camera request cmd!
|-
|File Source parameter incorrect in the request command
|File Source
|-
|Timestamp parameter incorrect in the request command
|Timestamp
|-
|Duration parameter incorrect in the request command
|Duration
|-
|Cannot proceed with the request, ignition is off
| colspan="3" |Error: Ignition not detected!
|-
|Request command structure incorrect
| colspan="3" |Error: Invalid camera request command!
|-
|RS232 and DualCam mode is not enabled
| colspan="3" |Error: DualCam is not configured!
|-
|Front or rear camera not found
| colspan="3" |Error: Front / Rear Camera not present
|}
<br>
Latest revision as of 09:34, 8 May 2026
Introduction
Teltonika OBD devices are able to read data from heavy duty vehicles. With the OBD to FMS adapter, clients are able to connect OBD devices to their heavy duty vehicles which have FMS female connector (usually located under the front panel). Cable is only applicable with the European truck.
Cable pinout scheme
Cable pinout scheme:
OBD 16PF
FMS 12PM
4/5
=>
1
6
=>
6
14
=>
9
16
=>
12
DISCLAIMER:PLEASE MAKE SURE THE FMS PINOUT OF YOUR HEAVY DUTY VEHICLE IS AS REFERRED ON THE PROVIDED PINOUT SCHEME. IN CASE OF INCORRECT PINOUT PLEASE CONTACT YOUR HEAVY DUTY VEHICLE DEALERSHIP. THE CLIENT IS RESPONSIBLE FOR ALL THE ISSUES, WHICH MIGHT OCCUR BY INCORRECT INSTALLATION.
NOTE:Please use OBD devices with the latest firmware which has implemented J1939 protocol support.
FMS Plug Location
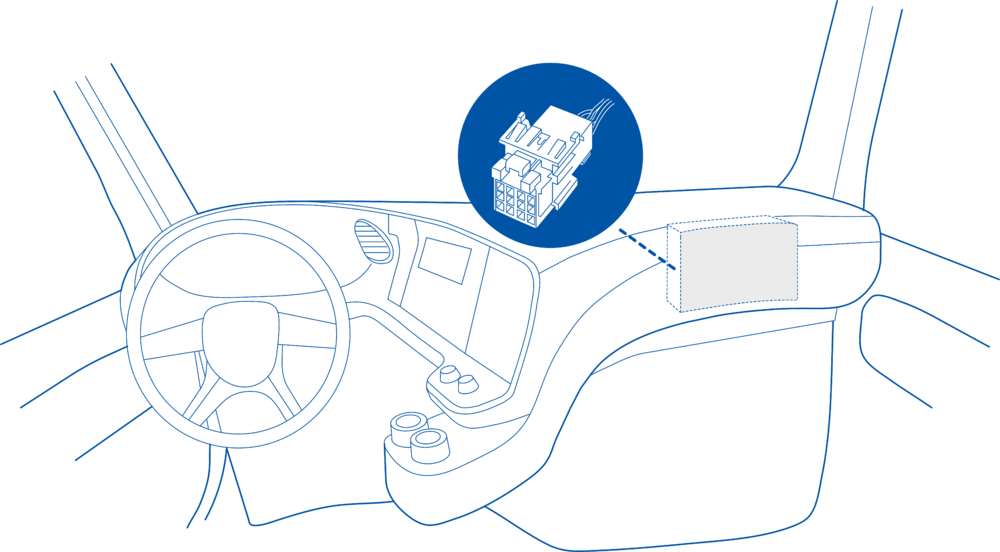
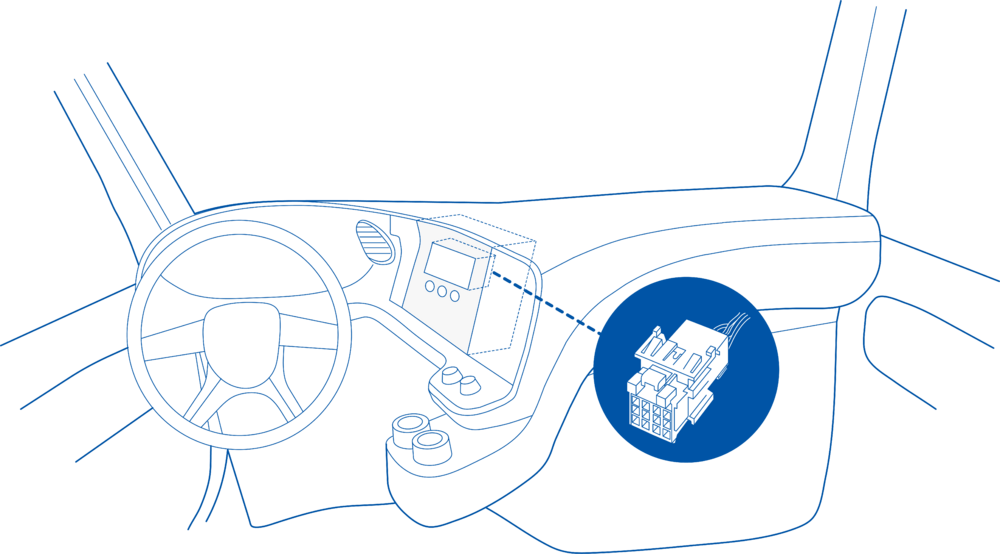
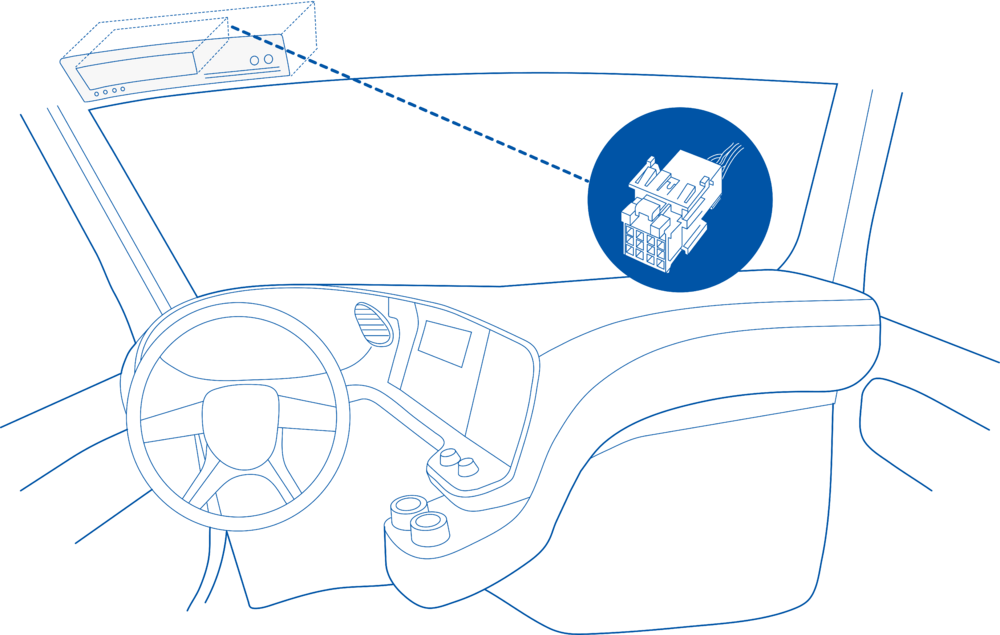
Even though the FMS cable is standardized cable – its placement in the vehicle might differ depending on manufacturer and depending on vehicle trim level.
These examples identify the most common locations for the FMS plug.
Behind the Fuse panel on passenger side – for Example SCANIA S/R/G/P Euro6 Series
Near the Fuse panel on passenger side – for example DAF XF Euro6
Behind the Radio on lower deck – for example Volvo FH Euro5 and Renault T Euro6
Behind the Tachograph on upper deck – for example Mercedes Actros MP5 Euro6
Device Configuration
1. Connect your OBD device to PC via USB or Bluetooth.
2. Open Teltonika Configurator and find your device in the list.
3. Select your device from the list.
4. Navigate to System and under System Settings Enable Codec 8 Extended protocol.
5. Open OBD II section on the left.
6. In General -> OBD II Settings -> OBD Feature select ELD.
7. In OBD VIN settings-> VIN Source select prefered source. Some heavy duty vehicles may not automaticly provide VIN number, in that case we recommend to setup VIN manually.
8. Save the configuration by pressing Save to device on the top.
9. New section with J1939 parameters can be found in ELD section on the right bottom.
Supported Parameter List
The full supported parameter list for OBD devices can be found in the following pages: