Difference between revisions of "FOTA WEB Devices"
(→Move) |
|||
| (54 intermediate revisions by 9 users not shown) | |||
| Line 1: | Line 1: | ||
__TOC__ | __TOC__ | ||
| + | The Device Area is the main area where we can see the devices and all information about them including pending,completed and canceled tasks. | ||
| + | |||
| + | =='''Device Area'''== | ||
There are the following columns in the general Device area. | There are the following columns in the general Device area. | ||
| − | [[Image: | + | [[Image:FOTANEWDEVICE1.png|1100px|center]] |
| − | {| | + | {| style="width: 100%;" |
| − | |||
! style="width: 20%; border: 1px solid white; border-bottom: 2px solid #0054A6; background: white; color: #0054A6; text-align: left;" | '''FIELD NAME''' | ! style="width: 20%; border: 1px solid white; border-bottom: 2px solid #0054A6; background: white; color: #0054A6; text-align: left;" | '''FIELD NAME''' | ||
! style="width: 40%; border: 1px solid white; border-bottom: 2px solid #0054A6; background: white; color: #0054A6; text-align: left;" | '''VALUE''' | ! style="width: 40%; border: 1px solid white; border-bottom: 2px solid #0054A6; background: white; color: #0054A6; text-align: left;" | '''VALUE''' | ||
! style="width: 40%; border: 1px solid white; border-bottom: 2px solid #0054A6; background: white; color: #0054A6; text-align: left;" | '''DESCRIPTION''' | ! style="width: 40%; border: 1px solid white; border-bottom: 2px solid #0054A6; background: white; color: #0054A6; text-align: left;" | '''DESCRIPTION''' | ||
|- | |- | ||
| − | | rowspan="2" style="border: 1px solid white; border-bottom: 2px solid #E8E8E8; text-align: left; vertical-align: center; background: white;" | '''DESCRIPTION''' | + | | rowspan="2" style="border: 1px solid white; border-bottom: 2px solid #E8E8E8; text-align: left; vertical-align: center; background: white;" | '''DESCRIPTION''' |
| − | | style="border: 1px solid white; border-bottom: 2px solid #E8E8E8; text-align: left; vertical-align: center; background: white;" | <nowiki>Device description |default: -</nowiki> | + | | style="border: 1px solid white; border-bottom: 2px solid #E8E8E8; text-align: left; vertical-align: center; background: white;" |<nowiki>Device description |default: -</nowiki> |
| − | | style="border: 1px solid white; border-bottom: 2px solid #E8E8E8; text-align: left; vertical-align: center; background: white;" | Will display device description added by the user.<br /> | + | | style="border: 1px solid white; border-bottom: 2px solid #E8E8E8; text-align: left; vertical-align: center; background: white;" |Will display device description added by the user.<br /> |
|- | |- | ||
|+ | |+ | ||
| − | | style="border: 1px solid white; border-bottom: 2px solid #E8E8E8; text-align: left; vertical-align: center; background: white;" | '''MODEL''' | + | | style="border: 1px solid white; border-bottom: 2px solid #E8E8E8; text-align: left; vertical-align: center; background: white;" |'''MODEL''' |
| − | | style="border: 1px solid white; border-bottom: 2px solid #E8E8E8; text-align: left; vertical-align: center; background: white;" | Device model<br /> | + | | style="border: 1px solid white; border-bottom: 2px solid #E8E8E8; text-align: left; vertical-align: center; background: white;" |Device model<br /> |
| − | | style="border: 1px solid white; border-bottom: 2px solid #E8E8E8; text-align: left; vertical-align: center; background: white;" | Displays device’s model, e.g. FMB001, FMC130 etc. This field cannot be changed. | + | | style="border: 1px solid white; border-bottom: 2px solid #E8E8E8; text-align: left; vertical-align: center; background: white;" |Displays device’s model, e.g. FMB001, FMC130 etc. This field cannot be changed. |
|- | |- | ||
| − | | style="border: 1px solid white; border-bottom: 2px solid #E8E8E8; text-align: left; vertical-align: center; background: white;" | '''FIRMWARE''' | + | | style="border: 1px solid white; border-bottom: 2px solid #E8E8E8; text-align: left; vertical-align: center; background: white;" |'''FIRMWARE''' |
| − | | style="border: 1px solid white; border-bottom: 2px solid #E8E8E8; text-align: left; vertical-align: center; background: white;" | <nowiki>Device firmware version |default: -</nowiki> | + | | style="border: 1px solid white; border-bottom: 2px solid #E8E8E8; text-align: left; vertical-align: center; background: white;" |<nowiki>Device firmware version |default: -</nowiki> |
| − | | style="border: 1px solid white; border-bottom: 2px solid #E8E8E8; text-align: left; vertical-align: center; background: white;" | Once device is seen – field shall display current firmware version. This field is changed only when firmware has been updated and FM device reconnected to FOTA WEB with the new firmware. | + | | style="border: 1px solid white; border-bottom: 2px solid #E8E8E8; text-align: left; vertical-align: center; background: white;" |Once device is seen – field shall display current firmware version. This field is changed only when firmware has been updated and FM device reconnected to FOTA WEB with the new firmware. |
|- | |- | ||
| − | | style="border: 1px solid white; border-bottom: 2px solid #E8E8E8; text-align: left; vertical-align: center; background: white;" | '''CONFIGURATION''' <br /> | + | | style="border: 1px solid white; border-bottom: 2px solid #E8E8E8; text-align: left; vertical-align: center; background: white;" |'''CONFIGURATION''' <br /> |
| style="border: 1px solid white; border-bottom: 2px solid #E8E8E8; text-align: left; vertical-align: center; background: white;" |<nowiki>Current configuration name | default: - </nowiki><br /> | | style="border: 1px solid white; border-bottom: 2px solid #E8E8E8; text-align: left; vertical-align: center; background: white;" |<nowiki>Current configuration name | default: - </nowiki><br /> | ||
| − | | style="border: 1px solid white; border-bottom: 2px solid #E8E8E8; text-align: left; vertical-align: center; background: white;" | Field displays configuration file name that has been uploaded via FOTA WEB from '''FILES''' tab. If FM configuration was changed via other means than FOTA WEB – this field shall not be updated.<br /> | + | | style="border: 1px solid white; border-bottom: 2px solid #E8E8E8; text-align: left; vertical-align: center; background: white;" |Field displays configuration file name that has been uploaded via FOTA WEB from '''FILES''' tab. If FM configuration was changed via other means than FOTA WEB – this field shall not be updated.<br /> |
| − | '''Note:''' if configuration was downloaded from device – it’s name shall be displayed. | + | '''Note:''' if a configuration was downloaded from the device – it’s name shall be displayed. |
| + | |||
| + | '''Note:''' From 2022-02-01, if the device was sent from manufacturing with custom client configuration, the name of the configuration will have the following structure '''''GCFXXX_YYYYMMDDHHMM''''' where: | ||
| + | |||
| + | * '''''XXX''''' - shows the internal manufacturing identification number | ||
| + | * '''''YYYYMMDDHHMM''''' - date and time configuration file was uploaded to manufacturing. | ||
|- | |- | ||
| − | | style="border: 1px solid white; border-bottom: 2px solid #E8E8E8; text-align: left; vertical-align: center; background: white;" | '''IMEI''' <br /> | + | | style="border: 1px solid white; border-bottom: 2px solid #E8E8E8; text-align: left; vertical-align: center; background: white;" |'''IMEI''' <br /> |
| − | | style="border: 1px solid white; border-bottom: 2px solid #E8E8E8; text-align: left; vertical-align: center; background: white;" | Device’s IMEI<br /> | + | | style="border: 1px solid white; border-bottom: 2px solid #E8E8E8; text-align: left; vertical-align: center; background: white;" |Device’s IMEI<br /> |
| − | | style="border: 1px solid white; border-bottom: 2px solid #E8E8E8; text-align: left; vertical-align: center; background: white;" | Field displays device’s IMEI. <br /> | + | | style="border: 1px solid white; border-bottom: 2px solid #E8E8E8; text-align: left; vertical-align: center; background: white;" |Field displays device’s IMEI. <br /> |
|- | |- | ||
| − | | style="border: 1px solid white; border-bottom: 2px solid #E8E8E8; text-align: left; vertical-align: center; background: white;" | ''' | + | | style="border: 1px solid white; border-bottom: 2px solid #E8E8E8; text-align: left; vertical-align: center; background: white;" |'''Status''' <br /> |
| − | | style="border: 1px solid white; border-bottom: 2px solid #E8E8E8; text-align: left; vertical-align: center; background: white;" | | + | | style="border: 1px solid white; border-bottom: 2px solid #E8E8E8; text-align: left; vertical-align: center; background: white;" |<span style="color:grey">'''Inactive'''</span> <br /> <span style="color:orange">'''Offline'''</span> <br /> <span style="color:green">'''Online'''</span><br /> |
| − | | style="border: 1px solid white; border-bottom: 2px solid #E8E8E8; text-align: left; vertical-align: center; background: white;" | | + | | style="border: 1px solid white; border-bottom: 2px solid #E8E8E8; text-align: left; vertical-align: center; background: white;" |<span style="color:grey">'''Inactive'''</span> - not activated or already decomissioned <br /> <span style="color:orange">'''Offline'''</span> - seen at is more than 24h ago <br /> <span style="color:green">'''Online'''</span> - seen at is less than 24h ago <br /> |
|- | |- | ||
| − | | style="border: 1px solid white; border-bottom: 2px solid #E8E8E8; text-align: left; vertical-align: center; background: white;" | ''' | + | | style="border: 1px solid white; border-bottom: 2px solid #E8E8E8; text-align: left; vertical-align: center; background: white;" |'''Task queue''' <br /> |
| − | | style="border: 1px solid white; border-bottom: 2px solid #E8E8E8; text-align: left; vertical-align: center; background: white;" | | + | | style="border: 1px solid white; border-bottom: 2px solid #E8E8E8; text-align: left; vertical-align: center; background: white;" |<span style="color:grey">'''Empty'''</span> <br /> <span style="color:indigo">'''Pending'''</span> <br /> <span style="color:#0066CC">'''Executing'''</span> |
| − | | style="border: 1px solid white; border-bottom: 2px solid #E8E8E8; text-align: left; vertical-align: center; background: white;" | | + | | style="border: 1px solid white; border-bottom: 2px solid #E8E8E8; text-align: left; vertical-align: center; background: white;" |<span style="color:grey">'''Empty'''</span> - no task in a queue <br /> <span style="color:indigo">'''Pending'''</span> - created task is awaiting execution<br /><span style="color:#0066CC">'''Executing'''</span> - created task is being executed <br /> |
|- | |- | ||
| − | | style="border: 1px solid white; border-bottom: 2px solid #E8E8E8; text-align: left; vertical-align: center; background: white;" | '''GROUP'''<br /> | + | | style="border: 1px solid white; border-bottom: 2px solid #E8E8E8; text-align: left; vertical-align: center; background: white;" |'''SERIAL NO.''' <br /> |
| + | | style="border: 1px solid white; border-bottom: 2px solid #E8E8E8; text-align: left; vertical-align: center; background: white;" |Device’s S/N<br /> | ||
| + | | style="border: 1px solid white; border-bottom: 2px solid #E8E8E8; text-align: left; vertical-align: center; background: white;" |Field displays device’s Serial number.<br /> | ||
| + | |- | ||
| + | | style="border: 1px solid white; border-bottom: 2px solid #E8E8E8; text-align: left; vertical-align: center; background: white;" |'''GSM NUMBER''' | ||
| + | | style="border: 1px solid white; border-bottom: 2px solid #E8E8E8; text-align: left; vertical-align: center; background: white;" |GSM number (MSISDN) of the SIM card installed in the device | ||
| + | | style="border: 1px solid white; border-bottom: 2px solid #E8E8E8; text-align: left; vertical-align: center; background: white;" |'''Note:''' The GSM number is shown in FOTA WEB for all devices that had the SIM card is installed during the device manufacturing process (eSIM or regular SIM) after May 3rd, 2022. | ||
| + | Previously manufactured devices might not have the GSM number available in FOTA WEB. | ||
| + | |- | ||
| + | | style="border: 1px solid white; border-bottom: 2px solid #E8E8E8; text-align: left; vertical-align: center; background: white;" |'''ICCID''' | ||
| + | | style="border: 1px solid white; border-bottom: 2px solid #E8E8E8; text-align: left; vertical-align: center; background: white;" |ICCID of the SIM card that is installed in the device | ||
| + | | style="border: 1px solid white; border-bottom: 2px solid #E8E8E8; text-align: left; vertical-align: center; background: white;" |'''Note:''' The SIM card IMSI is shown in FOTA WEB for all devices that had the SIM card is installed during the device manufacturing process (eSIM or regular SIM) after May 3rd, 2022. | ||
| + | Previously manufactured devices might not have the ICCID number available in FOTA WEB. | ||
| + | |- | ||
| + | | style="border: 1px solid white; border-bottom: 2px solid #E8E8E8; text-align: left; vertical-align: center; background: white;" |'''IMSI''' | ||
| + | | style="border: 1px solid white; border-bottom: 2px solid #E8E8E8; text-align: left; vertical-align: center; background: white;" |IMSI number of the SIM card that is installed in the device | ||
| + | | style="border: 1px solid white; border-bottom: 2px solid #E8E8E8; text-align: left; vertical-align: center; background: white;" |'''Note:''' The SIM card IMSI is shown in FOTA WEB for all devices that had the SIM card is installed during the device manufacturing process (eSIM or regular SIM) after May 3rd, 2022. | ||
| + | Previously manufactured devices might not have the IMSI number available in FOTA WEB. | ||
| + | |- | ||
| + | | style="border: 1px solid white; border-bottom: 2px solid #E8E8E8; text-align: left; vertical-align: center; background: white;" |'''PRODUCT CODE''' | ||
| + | | style="border: 1px solid white; border-bottom: 2px solid #E8E8E8; text-align: left; vertical-align: center; background: white;" |Manufacturing code of the device | ||
| + | | style="border: 1px solid white; border-bottom: 2px solid #E8E8E8; text-align: left; vertical-align: center; background: white;" |Internal manufacturing code, that shows the device hardware/firmware configuration. | ||
| + | |||
| + | '''Note:''' All devices manufactured '''after''' 2022, May 3rd will have the product code displayed in FOTA WEB - devices manufactured before this date, might not have the product code in FOTA WEB. | ||
| + | |- | ||
| + | | style="border: 1px solid white; border-bottom: 2px solid #E8E8E8; text-align: left; vertical-align: center; background: white;" |'''COMPANY''' <br /> | ||
| + | | style="border: 1px solid white; border-bottom: 2px solid #E8E8E8; text-align: left; vertical-align: center; background: white;" |Device’s Company <br /> | ||
| + | | style="border: 1px solid white; border-bottom: 2px solid #E8E8E8; text-align: left; vertical-align: center; background: white;" |This field shall always show which company device belongs to directly. Higher level companies shall not be displayed in this field. <br /> | ||
| + | |- | ||
| + | | style="border: 1px solid white; border-bottom: 2px solid #E8E8E8; text-align: left; vertical-align: center; background: white;" |'''GROUP'''<br /> | ||
| style="border: 1px solid white; border-bottom: 2px solid #E8E8E8; text-align: left; vertical-align: center; background: white;" |Device’s Group<br /> | | style="border: 1px solid white; border-bottom: 2px solid #E8E8E8; text-align: left; vertical-align: center; background: white;" |Device’s Group<br /> | ||
| style="border: 1px solid white; border-bottom: 2px solid #E8E8E8; text-align: left; vertical-align: center; background: white;" |If device is assigned to a group, this field displays group name device is assigned to.<br /> | | style="border: 1px solid white; border-bottom: 2px solid #E8E8E8; text-align: left; vertical-align: center; background: white;" |If device is assigned to a group, this field displays group name device is assigned to.<br /> | ||
| − | |||
| − | |||
| − | |||
| − | |||
| − | |||
| − | |||
| − | |||
| − | |||
| − | |||
| − | |||
| − | |||
| − | |||
| − | |||
|- | |- | ||
| style="border: 1px solid white; border-bottom: 2px solid #E8E8E8; text-align: left; vertical-align: center; background: white;" |'''UPDATED AT'''<br /> | | style="border: 1px solid white; border-bottom: 2px solid #E8E8E8; text-align: left; vertical-align: center; background: white;" |'''UPDATED AT'''<br /> | ||
| Line 69: | Line 92: | ||
| style="border: 1px solid white; border-bottom: 2px solid #E8E8E8; text-align: left; vertical-align: center; background: white;" |This field shows the time device was added to the FOTA WEB web system. | | style="border: 1px solid white; border-bottom: 2px solid #E8E8E8; text-align: left; vertical-align: center; background: white;" |This field shows the time device was added to the FOTA WEB web system. | ||
|} | |} | ||
| − | <br | + | |
| + | ===Device Information=== | ||
| + | |||
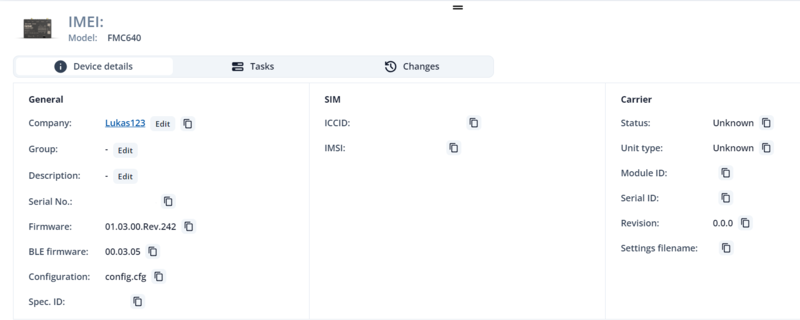
| + | By clicking on a device we can see the displayed information about the selected device. | ||
| + | |||
| + | [[Image:Device_Information.png|800px|left]]<br> | ||
| + | <br> | ||
| + | <br> | ||
| + | <br> | ||
| + | <br> | ||
| + | <br> | ||
| + | <br> | ||
| + | <br> | ||
| + | <br> | ||
| + | <br> | ||
| + | <br> | ||
| + | <br> | ||
| + | <br> | ||
| + | <br> | ||
=='''Create Task'''== | =='''Create Task'''== | ||
| Line 75: | Line 116: | ||
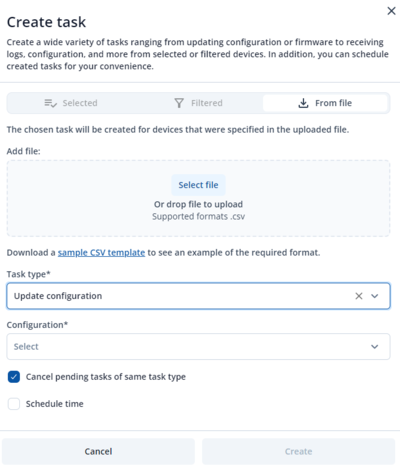
The '''Create Task''' pop up menu button is the main tool for all possible actions (tasks) with devices. Successful action results in a [[FOTA WEB Devices#View Tasks|'''queued job''']]. | The '''Create Task''' pop up menu button is the main tool for all possible actions (tasks) with devices. Successful action results in a [[FOTA WEB Devices#View Tasks|'''queued job''']]. | ||
| − | [[Image: | + | [[Image:FOTATaskCreate.png|500px|left]]<br> |
| − | + | <br> | |
| − | This chapter provides an explanation of what | + | <br>This chapter provides an explanation of what each dropdown menu item does and how to use it. There is 4 possible filtering from the beginning to assign your tasks.<br /> |
1. For the manually '''selected devices'''.<br /> | 1. For the manually '''selected devices'''.<br /> | ||
2. For the '''filtered devices'''.<br /> | 2. For the '''filtered devices'''.<br /> | ||
| Line 83: | Line 124: | ||
4. For '''all devices'''.<br /> | 4. For '''all devices'''.<br /> | ||
| − | [[Image: | + | [[Image:FOTACreateTask.png|400px|alt=|left]] |
| + | <br> | ||
| + | <br> | ||
| + | <br> | ||
| + | <br> | ||
| + | <br> | ||
| + | <br> | ||
| + | <br> | ||
| + | <br> | ||
| + | <br> | ||
| + | <br> | ||
| + | <br> | ||
| + | <br> | ||
| + | <br> | ||
| + | <br> | ||
| + | <br> | ||
| + | <br> | ||
| + | <br> | ||
| + | <br> | ||
| + | <br> | ||
| + | <br> | ||
| + | <br> | ||
| + | <br> | ||
| + | |||
| + | === Cancel task === | ||
| + | |||
| + | By selecting the required device and opening the detailed information you can also cancel the task. Only tasks in the statuses "Pending" and "Running" can be cancelled | ||
| + | |||
| + | [[Image:Cancel task.png|400px|alt=|left]] | ||
| + | <br> | ||
| + | <br> | ||
| + | <br> | ||
| + | <br> | ||
| + | <br> | ||
| + | <br> | ||
| + | <br> | ||
| + | <br> | ||
| + | <br> | ||
| + | |||
| + | |||
| + | === Task Types === | ||
| + | |||
| + | General information about tasks and task types. | ||
{| class="sortable" style="width: 100%;" | {| class="sortable" style="width: 100%;" | ||
| − | ! style="width: 20%; border: 1px solid white; border-bottom: 2px solid #0054A6; background: white; color: #0054A6; text-align: left;" | '''FIELD NAME''' | + | ! style="width: 20%; border: 1px solid white; border-bottom: 2px solid #0054A6; background: white; color: #0054A6; text-align: left;" |'''FIELD NAME''' |
! style="width: 40%; border: 1px solid white; border-bottom: 2px solid #0054A6; background: white; color: #0054A6; text-align: left;" |'''ACTION''' | ! style="width: 40%; border: 1px solid white; border-bottom: 2px solid #0054A6; background: white; color: #0054A6; text-align: left;" |'''ACTION''' | ||
! style="width: 40%; border: 1px solid white; border-bottom: 2px solid #0054A6; background: white; color: #0054A6; text-align: left;" |'''DESCRIPTION''' | ! style="width: 40%; border: 1px solid white; border-bottom: 2px solid #0054A6; background: white; color: #0054A6; text-align: left;" |'''DESCRIPTION''' | ||
| Line 101: | Line 184: | ||
|- | |- | ||
| style="border: 1px solid white; border-bottom: 2px solid #E8E8E8; text-align: left; vertical-align: center; background: white;" |'''Receive configuration''' <br /> | | style="border: 1px solid white; border-bottom: 2px solid #E8E8E8; text-align: left; vertical-align: center; background: white;" |'''Receive configuration''' <br /> | ||
| − | | style="border: 1px solid white; border-bottom: 2px solid #E8E8E8; text-align: left; vertical-align: center; background: white;" | <nowiki>Receive configuration | Create </nowiki><br /> | + | | style="border: 1px solid white; border-bottom: 2px solid #E8E8E8; text-align: left; vertical-align: center; background: white;" |<nowiki>Receive configuration | Create </nowiki><br /> |
| style="border: 1px solid white; border-bottom: 2px solid #E8E8E8; text-align: left; vertical-align: center; background: white;" |This function assigns a Download configuration job to device. Next time it connects to FOTA WEB – selected files shall be downloaded.<br /> | | style="border: 1px solid white; border-bottom: 2px solid #E8E8E8; text-align: left; vertical-align: center; background: white;" |This function assigns a Download configuration job to device. Next time it connects to FOTA WEB – selected files shall be downloaded.<br /> | ||
|- | |- | ||
| Line 109: | Line 192: | ||
'''NOTE:''' Continuous log lets you select number of files to be downloaded. Newest log files, that are stored in device’s memory, are taken first. <br /> | '''NOTE:''' Continuous log lets you select number of files to be downloaded. Newest log files, that are stored in device’s memory, are taken first. <br /> | ||
|- | |- | ||
| − | |'''Send TLS file''' | + | |'''Send TLS file''' |
|<nowiki>Transfer user TLS certificate | Select File | Create </nowiki> | |<nowiki>Transfer user TLS certificate | Select File | Create </nowiki> | ||
| − | |You can Upload the required TLS certificate over the '''Files menu''' or over the same pop up | + | |You can Upload the required TLS certificate over the '''Files menu''' or over the same pop up window while selecting the task, if you have the TLS certificate uploaded already, task can be created by selecting required TLS certificate.<br />If there is no available TLS certificates, please press on '''Upload new file''' button to add the certificate on the same pop up window. |
| + | [[File:Alert.png|left|link=]] | ||
| + | <br> | ||
| + | Task type is only supported by devices with '''Firmware version newer than 03.28.01''', otherwise FOTA WEB will not allow to upload certificate to device and error that feature is not supported will be shown. | ||
|} | |} | ||
| − | == | + | === Scheduled tasks === |
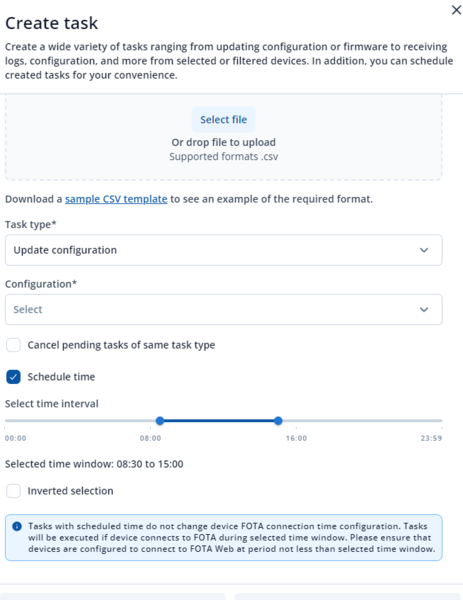
| + | The "Schedule time" feature allows users to select the time, when the created task can be executed. | ||
| − | + | [[File:FOTASchedule1.png|alt=|frameless|600x600px]] | |
| − | + | Time range can be selected in 30 minute periods, but it cannot be less than 2 hours - for example, user can select a task time from 8:30 to 15:00. | |
| − | |||
| − | |||
| − | + | With the time range set for the task, the device will only execute the task, if it connects to FOTA WEB during set hours. | |
| − | + | '''NOTE:''' The time is selected in the user's time zone. | |
| − | + | '''NOTE:''' The scheduling feature does '''not''' adjust the time of the device connection to FOTA WEB - the user has to ensure, that the device has the correct connection frequency configured, so the device would connect to FOTA WEB during the set time range. Otherwise, the device will not execute the task. | |
| − | + | FOTA WEB connection frequency configuration is described here: [[FMB920 GPRS settings#FOTA%20WEB%20Settings|FOTA WEB Settings]] | |
| − | |||
| − | |||
| − | |||
=='''Move'''== | =='''Move'''== | ||
| − | This function assigns devices from Device list. | + | This function assigns devices from the Device list. |
There are 4 possible filtering options for this function..<br />1. For the manually '''selected devices'''.<br />2. For the '''filtered devices'''.<br />3. For the devices '''from .csv file''' (IMEI or Serial No. can be used as identifier).<br />4. For '''all devices'''.<br /> | There are 4 possible filtering options for this function..<br />1. For the manually '''selected devices'''.<br />2. For the '''filtered devices'''.<br />3. For the devices '''from .csv file''' (IMEI or Serial No. can be used as identifier).<br />4. For '''all devices'''.<br /> | ||
Select '''Company''' or '''Group''' name that these devices should be assigned to.<br /> | Select '''Company''' or '''Group''' name that these devices should be assigned to.<br /> | ||
| − | '''NOTE:''' a '''Group''' must be created first in '''Groups''' menu. | + | '''NOTE:''' a '''Group''' must be created first in '''Groups''' menu.<br /> |
| − | [[File: | + | |
| + | [[Image:FOTAMove.png|600px|left]]<br> | ||
| + | <br> | ||
| + | <br> | ||
| + | <br /> | ||
| + | =='''Import'''== | ||
| + | |||
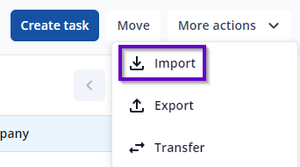
| + | This function is used to '''Import''' device attributes from the supported '''.csv''' file. | ||
| + | There are 4 possible attributes that can be imported using this function.<br /> | ||
| + | 1. Description<br /> | ||
| + | 2. GSM Number<br /> | ||
| + | 3. ICCID<br /> | ||
| + | 4. IMSI<br /> | ||
| + | <br /> | ||
| + | '''NOTE:''' File syntax is as follows: IMEI, Attribute value. | ||
| + | |||
| + | [[File:Import new.png|frameless]] | ||
=='''Export'''== | =='''Export'''== | ||
This function is used to '''Export''' devices to the required '''.csv''' or '''.xlsx''' files. | This function is used to '''Export''' devices to the required '''.csv''' or '''.xlsx''' files. | ||
| − | There | + | There are 4 possible filtering options for this function.<br /> |
1. For the manually '''selected devices'''.<br /> | 1. For the manually '''selected devices'''.<br /> | ||
2. For the '''filtered devices'''.<br /> | 2. For the '''filtered devices'''.<br /> | ||
3. For the devices '''from .csv file''' (IMEI or Serial No. can be used as identifier).<br /> | 3. For the devices '''from .csv file''' (IMEI or Serial No. can be used as identifier).<br /> | ||
| − | 4. For '''all devices'''. | + | 4. For '''all devices'''.<br /> |
| − | [[File: | + | [[File:Export new.png|frameless]] |
| + | |||
| + | =='''Device transfer'''== | ||
| + | |||
| + | This function is used to '''transfer devices''' between unrelated companies. | ||
| + | |||
| + | [[File:Transfer new.png|frameless]] | ||
| + | |||
| + | <br> | ||
| + | "Device transfer" function operation principle: <br /> | ||
| + | 1. Company A (Device receiving company) generates a transfer token by selecting "Receive devices" tab and clicking on the "Create button". Generated token will be visible in the following window.<div style="width: 1000px; height: 250px;"> | ||
| + | {{{insert1|[[Image:FotaDeviceTransfer.png|550x270px|left|frameless]]}}}{{{insert2|[[Image:FotaDeviceToken.png|550x270px|right|frameless]]}}} | ||
| + | </div> | ||
| + | |||
| + | <br /> | ||
| + | |||
| + | '''NOTE:''' The token is single-use and expires in 21 days. Send this token to the person responsible for transferring devices from their company to yours. | ||
| + | |||
| + | 2. Company A provides token to Company B (Device sending company) <br /> | ||
| + | 3. Company B opens the Device transfer window, Transfer devices tab, and selects the preferred device source (Selected, Filtered or From file). <br /> | ||
| + | 4. Company B enters the transfer token and clicks on the "Transfer" button to transfer selected devices to the "Receiving company"<br /> | ||
| + | |||
| + | <div style="width: 1000px; height: 380px;"> | ||
| + | [[Image:FotaDeviceTransfer2.png|500px|left]]<br> | ||
| + | <br> | ||
| + | <br> | ||
| + | <br> | ||
| + | <br> | ||
| + | <br> | ||
| + | <br> | ||
| + | <br> | ||
| + | <br> | ||
| + | <br> | ||
| + | <br> | ||
| + | <br> | ||
| + | <br> | ||
| + | <br> | ||
| + | <br>If all steps were correctly done, device/devices will be transferred to the receiving company, and both companies will receive an e-mail regarding the successful device transfer. | ||
| + | </div> | ||
| + | =='''Search'''== | ||
| + | |||
| + | This function is used to search for a device.<br> | ||
| + | |||
| + | You can search for devices by using the:<br> | ||
| + | 1. IMEI.<br> | ||
| + | 2. Description.<br> | ||
| + | 3. Serial Number.<br> | ||
| + | |||
| + | ==='''Status'''=== | ||
| + | |||
| + | This function is used to search for devices with the specific chosen status.<br /> | ||
| + | |||
| + | You can choose the devices that have this status:<br /> | ||
| + | 1. Inactive.<br /> | ||
| + | 2. Offline.<br /> | ||
| + | 3. Online. <br /> | ||
| + | |||
| + | ==='''Filter'''=== | ||
| + | |||
| + | Filter is designed to both: (1) filter out a list of devices based on combinations of parameters, (2) and to make bulk ACTIONS.<br /> | ||
| + | |||
| + | You can select/filter devices by:<br /> | ||
| + | |||
| + | *Group<br /> | ||
| + | *Device Model<br /> | ||
| + | *Firmware version<br /> | ||
| + | *Configuration version<br /> | ||
| + | *Job status<br /> | ||
| + | *Spec ID | ||
| + | [[File:Spec ID filter.png|left|thumb]] | ||
| + | |||
| + | <br> | ||
| + | <br> | ||
| + | <br> | ||
| + | <br> | ||
| + | <br> | ||
| + | <br> | ||
| + | <br> | ||
| + | <br> | ||
| + | <br> | ||
| + | <br> | ||
| + | <br> | ||
| + | <br> | ||
| + | <br> | ||
| + | <br> | ||
| + | <br> | ||
| + | <br> | ||
| + | <br> | ||
| + | <br> | ||
| + | <br> | ||
| + | |||
| + | Under '''Active Filters''' section you shall see current filters that have been selected.<br /> | ||
| + | Each of the '''Active Filters''' can be removed individually by clicking on a particular filter, or they all can be removed together by clicking '''Reset all'''.<br /> | ||
| + | '''Active Filters''' shall maintain current configuration until manually Reset, meaning that navigating through various FOTA WEB menu’s '''Active Filters''' shall remain as last configured.<br /> | ||
| + | |||
| + | ===='''Bulk assignment'''==== | ||
| + | |||
| + | Once '''Active Filters''' section has any number of parameters, the '''ACTIONS''' dropdown button automatically displays how many devices have been filtered. It allows to assign jobs to all selected devices.<br /> | ||
| + | |||
| + | Example for the device filtering window is showed below, where FMB120 model selected. | ||
| + | [[Image:FotaFilter.png|1100px|center]]<br /> | ||
| + | |||
| + | Clicking on '''Create task''' and then selecting a task from filtering, say Firmware upgrade, would assign a Firmware upgrade job to selected devices.<br /> | ||
| + | |||
| + | ==='''Table View'''=== | ||
| + | This function allows you to manage the amount and what kind of information will be displayed in the table.<br /> | ||
| + | |||
| + | Table view has two options:<br /> | ||
| + | 1. Select columns to show.<br /> | ||
| + | 2. Rows count per page.<br /> | ||
| + | |||
| + | ===='''Columns view'''==== | ||
| + | |||
| + | This function allows you to filter out what kind of information to be shown about the device.<br /> | ||
| + | |||
| + | ===='''Rows per page'''==== | ||
| + | |||
| + | This function defines the amount of rows that will be shown.<br /> | ||
=='''View Tasks'''== | =='''View Tasks'''== | ||
| Line 178: | Line 393: | ||
! style="width: 40%; border: 1px solid white; border-bottom: 2px solid #0054A6; background: white; color: #0054A6; text-align: left;" |'''DESCRIPTION''' | ! style="width: 40%; border: 1px solid white; border-bottom: 2px solid #0054A6; background: white; color: #0054A6; text-align: left;" |'''DESCRIPTION''' | ||
|- | |- | ||
| − | | style="border: 1px solid white; border-bottom: 2px solid #E8E8E8; text-align: left; vertical-align: center; background: white;" | '''Config assignment''' <br /> | + | | style="border: 1px solid white; border-bottom: 2px solid #E8E8E8; text-align: left; vertical-align: center; background: white;" |'''Config assignment''' <br /> |
| style="border: 1px solid white; border-bottom: 2px solid #E8E8E8; text-align: left; vertical-align: center; background: white;" |Configuration file mismatch device's platform. <br /> | | style="border: 1px solid white; border-bottom: 2px solid #E8E8E8; text-align: left; vertical-align: center; background: white;" |Configuration file mismatch device's platform. <br /> | ||
| style="border: 1px solid white; border-bottom: 2px solid #E8E8E8; text-align: left; vertical-align: center; background: white;" |Configuration file is not applicable to this type of device model. Select config file that works on this particular device, e.g. FMB64 config for FMB64 device model. <br /> | | style="border: 1px solid white; border-bottom: 2px solid #E8E8E8; text-align: left; vertical-align: center; background: white;" |Configuration file is not applicable to this type of device model. Select config file that works on this particular device, e.g. FMB64 config for FMB64 device model. <br /> | ||
| Line 189: | Line 404: | ||
In an unlikely event, any other type of error would appear – it should be reported back to us.<br /> | In an unlikely event, any other type of error would appear – it should be reported back to us.<br /> | ||
| − | |||
| − | + | {|style="width:100%;" | |
| − | + | |- | |
| − | + | |[https://wiki.teltonika-gps.com/view/Dashboard '''Dashboard'''] - Previous page | |
| − | + | |style="text-align:right;| Next page - [https://wiki.teltonika-gps.com/view/Task_Groups '''Task Groups'''] | |
| − | + | |} | |
| − | |||
| − | |||
| − | |||
| − | |||
| − | |||
| − | |||
| − | |||
| − | |||
| − | |||
| − | |||
| − | |||
| − | |||
| − | |||
| − | |||
| − | |||
| − | |||
| − | |||
| − | |||
| − | |||
[[Category:FOTA WEB]] | [[Category:FOTA WEB]] | ||
Latest revision as of 16:17, 14 October 2024
Main Page > Software & Applications > FOTA WEB > FOTA WEB DevicesThe Device Area is the main area where we can see the devices and all information about them including pending,completed and canceled tasks.
Device Area
There are the following columns in the general Device area.
| FIELD NAME | VALUE | DESCRIPTION |
|---|---|---|
| DESCRIPTION | Device description |default: - | Will display device description added by the user. |
| MODEL | Device model |
Displays device’s model, e.g. FMB001, FMC130 etc. This field cannot be changed. |
| FIRMWARE | Device firmware version |default: - | Once device is seen – field shall display current firmware version. This field is changed only when firmware has been updated and FM device reconnected to FOTA WEB with the new firmware. |
| CONFIGURATION |
Current configuration name | default: - |
Field displays configuration file name that has been uploaded via FOTA WEB from FILES tab. If FM configuration was changed via other means than FOTA WEB – this field shall not be updated. Note: if a configuration was downloaded from the device – it’s name shall be displayed. Note: From 2022-02-01, if the device was sent from manufacturing with custom client configuration, the name of the configuration will have the following structure GCFXXX_YYYYMMDDHHMM where:
|
| IMEI |
Device’s IMEI |
Field displays device’s IMEI. |
| Status |
Inactive Offline Online |
Inactive - not activated or already decomissioned Offline - seen at is more than 24h ago Online - seen at is less than 24h ago |
| Task queue |
Empty Pending Executing |
Empty - no task in a queue Pending - created task is awaiting execution Executing - created task is being executed |
| SERIAL NO. |
Device’s S/N |
Field displays device’s Serial number. |
| GSM NUMBER | GSM number (MSISDN) of the SIM card installed in the device | Note: The GSM number is shown in FOTA WEB for all devices that had the SIM card is installed during the device manufacturing process (eSIM or regular SIM) after May 3rd, 2022.
Previously manufactured devices might not have the GSM number available in FOTA WEB. |
| ICCID | ICCID of the SIM card that is installed in the device | Note: The SIM card IMSI is shown in FOTA WEB for all devices that had the SIM card is installed during the device manufacturing process (eSIM or regular SIM) after May 3rd, 2022.
Previously manufactured devices might not have the ICCID number available in FOTA WEB. |
| IMSI | IMSI number of the SIM card that is installed in the device | Note: The SIM card IMSI is shown in FOTA WEB for all devices that had the SIM card is installed during the device manufacturing process (eSIM or regular SIM) after May 3rd, 2022.
Previously manufactured devices might not have the IMSI number available in FOTA WEB. |
| PRODUCT CODE | Manufacturing code of the device | Internal manufacturing code, that shows the device hardware/firmware configuration.
Note: All devices manufactured after 2022, May 3rd will have the product code displayed in FOTA WEB - devices manufactured before this date, might not have the product code in FOTA WEB. |
| COMPANY |
Device’s Company |
This field shall always show which company device belongs to directly. Higher level companies shall not be displayed in this field. |
| GROUP |
Device’s Group |
If device is assigned to a group, this field displays group name device is assigned to. |
| UPDATED AT |
String; default: N/A |
This field shows the last time device information has changed. |
| SEEN AT |
String; default: N/A |
This field shows the last time device connected to FOTA WEB web. |
| CREATED AT |
String; default: N/A |
This field shows the time device was added to the FOTA WEB web system. |
Device Information
By clicking on a device we can see the displayed information about the selected device.
Create Task
The Create Task pop up menu button is the main tool for all possible actions (tasks) with devices. Successful action results in a queued job.
This chapter provides an explanation of what each dropdown menu item does and how to use it. There is 4 possible filtering from the beginning to assign your tasks.
1. For the manually selected devices.
2. For the filtered devices.
3. For the devices from .csv file.
4. For all devices.
Cancel task
By selecting the required device and opening the detailed information you can also cancel the task. Only tasks in the statuses "Pending" and "Running" can be cancelled
Task Types
General information about tasks and task types.
| FIELD NAME | ACTION | DESCRIPTION |
|---|---|---|
| Update firmware |
Update selected firmware version | Select File | Create |
You can Upload the required firmware version over the Files menu or over the same pop up windown while selecting the task, if you have the firmware uploaded already, task can be assigned by selecting required firmware version. If there is no available firmware versions for the update, please press on Upload new file button to add the file on the same pop up window. |
| Update configuration |
Update selected configuration | Select File | Create |
You can Upload the required configuration over the Files menu or over the same pop up windown while selecting the task, if you have the firmware uploaded already, task can be created by selecting required configuration file. If there is no available configuration versions for the update, please press on Upload new file button to add the file on the same pop up window. |
| Receive configuration |
Receive configuration | Create |
This function assigns a Download configuration job to device. Next time it connects to FOTA WEB – selected files shall be downloaded. |
| Receive internal log |
Receive internal log | Create |
This function assigns a Download logs job to device. Next time it connects to FOTA WEB – selected files shall be downloaded. NOTE: Continuous log lets you select number of files to be downloaded. Newest log files, that are stored in device’s memory, are taken first. |
| Send TLS file | Transfer user TLS certificate | Select File | Create | You can Upload the required TLS certificate over the Files menu or over the same pop up window while selecting the task, if you have the TLS certificate uploaded already, task can be created by selecting required TLS certificate. If there is no available TLS certificates, please press on Upload new file button to add the certificate on the same pop up window. 
|
Scheduled tasks
The "Schedule time" feature allows users to select the time, when the created task can be executed.
Time range can be selected in 30 minute periods, but it cannot be less than 2 hours - for example, user can select a task time from 8:30 to 15:00.
With the time range set for the task, the device will only execute the task, if it connects to FOTA WEB during set hours.
NOTE: The time is selected in the user's time zone.
NOTE: The scheduling feature does not adjust the time of the device connection to FOTA WEB - the user has to ensure, that the device has the correct connection frequency configured, so the device would connect to FOTA WEB during the set time range. Otherwise, the device will not execute the task.
FOTA WEB connection frequency configuration is described here: FOTA WEB Settings
Move
This function assigns devices from the Device list.
There are 4 possible filtering options for this function..
1. For the manually selected devices.
2. For the filtered devices.
3. For the devices from .csv file (IMEI or Serial No. can be used as identifier).
4. For all devices.
Select Company or Group name that these devices should be assigned to.
NOTE: a Group must be created first in Groups menu.
Import
This function is used to Import device attributes from the supported .csv file.
There are 4 possible attributes that can be imported using this function.
1. Description
2. GSM Number
3. ICCID
4. IMSI
NOTE: File syntax is as follows: IMEI, Attribute value.
Export
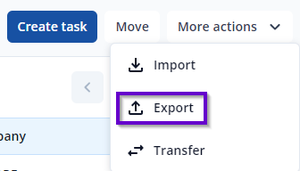
This function is used to Export devices to the required .csv or .xlsx files.
There are 4 possible filtering options for this function.
1. For the manually selected devices.
2. For the filtered devices.
3. For the devices from .csv file (IMEI or Serial No. can be used as identifier).
4. For all devices.
Device transfer
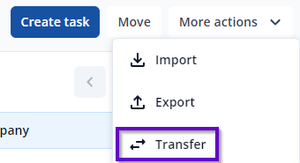
This function is used to transfer devices between unrelated companies.
"Device transfer" function operation principle:
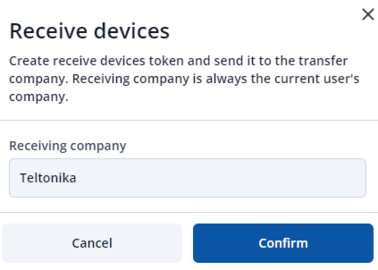
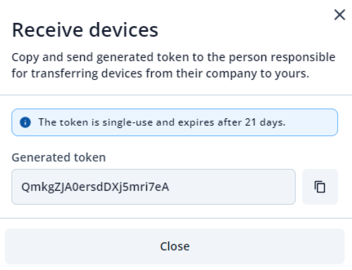
1. Company A (Device receiving company) generates a transfer token by selecting "Receive devices" tab and clicking on the "Create button". Generated token will be visible in the following window.
NOTE: The token is single-use and expires in 21 days. Send this token to the person responsible for transferring devices from their company to yours.
2. Company A provides token to Company B (Device sending company)
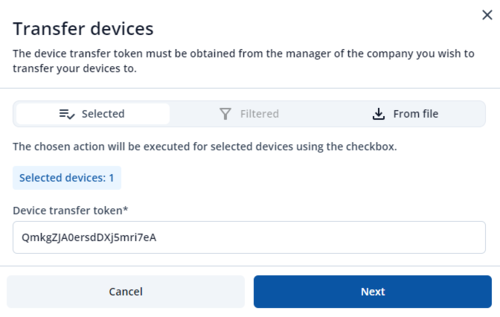
3. Company B opens the Device transfer window, Transfer devices tab, and selects the preferred device source (Selected, Filtered or From file).
4. Company B enters the transfer token and clicks on the "Transfer" button to transfer selected devices to the "Receiving company"
If all steps were correctly done, device/devices will be transferred to the receiving company, and both companies will receive an e-mail regarding the successful device transfer.
Search
This function is used to search for a device.
You can search for devices by using the:
1. IMEI.
2. Description.
3. Serial Number.
Status
This function is used to search for devices with the specific chosen status.
You can choose the devices that have this status:
1. Inactive.
2. Offline.
3. Online.
Filter
Filter is designed to both: (1) filter out a list of devices based on combinations of parameters, (2) and to make bulk ACTIONS.
You can select/filter devices by:
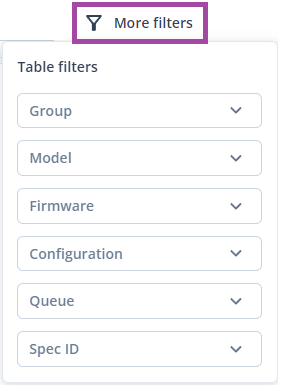
- Group
- Device Model
- Firmware version
- Configuration version
- Job status
- Spec ID
Under Active Filters section you shall see current filters that have been selected.
Each of the Active Filters can be removed individually by clicking on a particular filter, or they all can be removed together by clicking Reset all.
Active Filters shall maintain current configuration until manually Reset, meaning that navigating through various FOTA WEB menu’s Active Filters shall remain as last configured.
Bulk assignment
Once Active Filters section has any number of parameters, the ACTIONS dropdown button automatically displays how many devices have been filtered. It allows to assign jobs to all selected devices.
Example for the device filtering window is showed below, where FMB120 model selected.
Clicking on Create task and then selecting a task from filtering, say Firmware upgrade, would assign a Firmware upgrade job to selected devices.
Table View
This function allows you to manage the amount and what kind of information will be displayed in the table.
Table view has two options:
1. Select columns to show.
2. Rows count per page.
Columns view
This function allows you to filter out what kind of information to be shown about the device.
Rows per page
This function defines the amount of rows that will be shown.
View Tasks
This menu provides an opportunity to observe the status of a TASK.
Tasks are successfully queued job, meaning that there was no error parsing user’s request to make an Create Task.
If there are multiple jobs assigned for a single device – FOTA WEB shall execute them one by one. Each time a job is completed FM shall reconnect to FOTA WEB immediately and if another job is awaiting – attempt to complete it.
The order of job execution is as follows:
1. Upload FW to the device
2. Upload CFG to the device
3. Download LOGS from the device
4. Download CFG from the device
Meaning, that if you set all 4 jobs – the device will first upload firmware file, then configuration file and only on 3rd reconnect to FOTA WEB the logs shall be taken.
Relevant possible error’s that you may encounter after creating a task
| TASK | ERROR | DESCRIPTION |
|---|---|---|
| Config assignment |
Configuration file mismatch device's platform. |
Configuration file is not applicable to this type of device model. Select config file that works on this particular device, e.g. FMB64 config for FMB64 device model. |
| Firmware |
Firmware file does not exist or information about firmware is missing. Please re-upload firmware file. |
Re-upload the firmware and try again. Should error remain – contact us (your Sales representative) for assistance. |
In an unlikely event, any other type of error would appear – it should be reported back to us.
| Dashboard - Previous page | Next page - Task Groups |

