Inateck BCST-70 Configuration: Difference between revisions
m Protected "Inateck BCST-70 Configuration" ([Edit=Allow only administrators] (indefinite) [Move=Allow only administrators] (indefinite)) |
m Text replacement - "Bluetooth(?!®)" to "Bluetooth®" Tags: Mobile edit Mobile web edit |
||
| Line 6: | Line 6: | ||
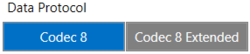
#In System settings, enable Codec8 Extended</br></br>[[File:Data_Protocol.png|border|250px]]</br></br> | #In System settings, enable Codec8 Extended</br></br>[[File:Data_Protocol.png|border|250px]]</br></br> | ||
#In GPRS settings, configure GPRS Settings and Server Settings.</br></br> | #In GPRS settings, configure GPRS Settings and Server Settings.</br></br> | ||
#In | #In Bluetooth® settings, | ||
::*Enable | ::*Enable Bluetooth®, set this setting as either "Enable (hidden)" or "Enable (visible)", otherwise Bluetooth® will be disabled | ||
::*Under | ::*Under Bluetooth® Control, click Discover so it would detect devices within vicinity. </br></br>[[File:Bluetooth®_Control.png|border|200px]]</br></br> | ||
::*Once devices are discovered, select BCST-70-XXXX-SPP then proceed to tick Pair | ::*Once devices are discovered, select BCST-70-XXXX-SPP then proceed to tick Pair | ||
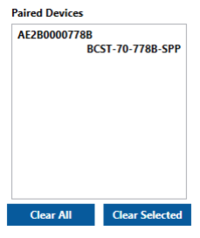
::*After successful pairing, scanner should show under Paired Devices. </br></br>[[File:Paired_Devices.png|border|200px]]</br></br> | ::*After successful pairing, scanner should show under Paired Devices. </br></br>[[File:Paired_Devices.png|border|200px]]</br></br> | ||
<span style="color:#FF0000">'''NOTE:'''</span> : '' If in case the Scanner is not discovered, do the following steps on | <span style="color:#FF0000">'''NOTE:'''</span> : '' If in case the Scanner is not discovered, do the following steps on Bluetooth® Pairing.'' | ||
==Enable | ==Enable Bluetooth® Pairing== | ||
<ol style="list-style-type:lower-alpha"> | <ol style="list-style-type:lower-alpha"> | ||
<li>Scan “Enter Setup” </br></br>[[File:Enter_Setup.png|325px]]</br></br></li> | <li>Scan “Enter Setup” </br></br>[[File:Enter_Setup.png|325px]]</br></br></li> | ||
<li>Scan “ | <li>Scan “ Bluetooth® Pairing” </br></br>[[File:Bluetooth®_Pairing.png|325px]]</br></br></li> | ||
<li>Scan the "Exit with Save" barcode </br></br>[[File:Exit_Save.png|325px]]</br></br></li> | <li>Scan the "Exit with Save" barcode </br></br>[[File:Exit_Save.png|325px]]</br></br></li> | ||
</ol> | </ol> | ||
Latest revision as of 16:27, 28 December 2023
Main Page > Accessories > Inateck BCST-70 Barcode Scanner > Inateck BCST-70 ConfigurationConfigure FM device using Teltonika configurator
- In System settings, enable Codec8 Extended
- In GPRS settings, configure GPRS Settings and Server Settings.
- In Bluetooth® settings,

- Enable Bluetooth®, set this setting as either "Enable (hidden)" or "Enable (visible)", otherwise Bluetooth® will be disabled
- Under Bluetooth® Control, click Discover so it would detect devices within vicinity.
File:Bluetooth® Control.png - Once devices are discovered, select BCST-70-XXXX-SPP then proceed to tick Pair
- After successful pairing, scanner should show under Paired Devices.

NOTE: : If in case the Scanner is not discovered, do the following steps on Bluetooth® Pairing.
Enable Bluetooth® Pairing
- Scan “Enter Setup”

- Scan “ Bluetooth® Pairing”
File:Bluetooth® Pairing.png - Scan the "Exit with Save" barcode


Scanner Auto Connect Configuration
- Fill up the “Auto Connect To External Device“ with as follows:
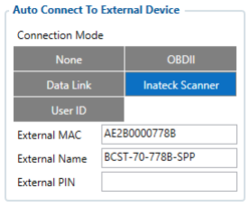

- Select Connection Mode as, Inateck Scanner.
- Enter the External MAC, can be seen on Paired Devices at the upper left corner.
- Enter the External Name, can be seen on Paired Devices at the lower right corner.
- Enter the External Pin, if the scanner has pin code set otherwise leave as blank.
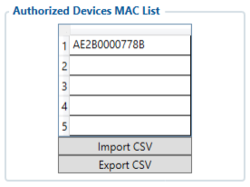
- Fill up the “Authorized Devices MAC List“ same with the External MAC.

NOTE: : It is important to fill out the auto connect so you won‘t need to Pair the device again on the Configurator.
- To receive the data to server enable corresponding BT Status IO element to Low.

NOTE: : If Scanner is connected BT Status value would be read as 2