WEB Tacho User management: Difference between revisions
Appearance
Created page with "==Creating user==" |
|||
| Line 1: | Line 1: | ||
==Creating user== | ==Creating User== | ||
Users can be created and assigned to companies by clicking '''"Add"''' button shown in the picture below and filling the necessary information. | |||
[[image:WEBTACHO User management.png]] | |||
[[image:Login user creation.png]] | |||
{| class="wikitable" | |||
|+ | |||
! style="width: 200px; background: grey; color: white;" | Row | |||
! style="width: 500px; background: grey; color: white;" | Description | |||
|- | |||
! style="text-align: left; vertical-align: top;" | Company group | |||
| style="text-align: left; vertical-align: top;" | Select to which ''company group'' the user will belong | |||
|- | |||
! style="text-align: left; vertical-align: top;" | Company | |||
| style="text-align: left; vertical-align: top;" | Select to which ''company'' the user will belong | |||
|- | |||
! style="text-align: left; vertical-align: top;" | Role | |||
| style="text-align: left; vertical-align: top;" | Select the role of the user: Administrator, Integrator, Manager, User, Disabled | |||
|- | |||
! style="text-align: left; vertical-align: top;" | User | |||
| style="text-align: left; vertical-align: top;" | Enter the user name (Mandatory) | |||
|- | |||
! style="text-align: left; vertical-align: top;" | Comment | |||
| style="text-align: left; vertical-align: top;" | Write a comment (Optional) | |||
|- | |||
! style="text-align: left; vertical-align: top;" | Email | |||
| style="text-align: left; vertical-align: top;" | Enter user email address (Mandatory) | |||
|- | |||
! style="text-align: left; vertical-align: top;" | Password | |||
| style="text-align: left; vertical-align: top;" | Create password for the user (Mandatory) | |||
|- | |||
|} | |||
==External links== | |||
https://teltonika.lt/product/tachograph-web/ | |||
Revision as of 11:27, 13 November 2018
Main Page > Software & Applications > WEB Tacho > WEB Tacho User managementCreating User
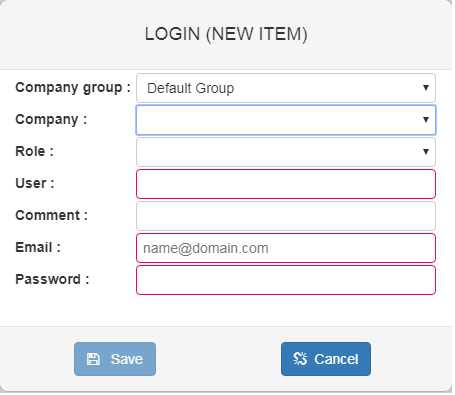
Users can be created and assigned to companies by clicking "Add" button shown in the picture below and filling the necessary information.
| Row | Description |
|---|---|
| Company group | Select to which company group the user will belong |
| Company | Select to which company the user will belong |
| Role | Select the role of the user: Administrator, Integrator, Manager, User, Disabled |
| User | Enter the user name (Mandatory) |
| Comment | Write a comment (Optional) |
| Enter user email address (Mandatory) | |
| Password | Create password for the user (Mandatory) |


