NBL-3: Difference between revisions
No edit summary |
No edit summary |
||
| Line 9: | Line 9: | ||
*Authorized driving - track who is driving your vehicle. You will receive a card ID every time a driver applies a card to NBL-3 reader. | *Authorized driving - track who is driving your vehicle. You will receive a card ID every time a driver applies a card to NBL-3 reader. | ||
*Private mode – this solution will allow your company car to be used by employees for personal purposes without violating the EU General Data Protection Regulations by masking all the personal data while vehicle is used in Private mode. Moreover, self-employed people can easily convert their own car into a business asset and ensure that the data provided (Example - distance traveled) is correct and shown only working hours' driven distance. Private/business mode can be easily switched by any of the NBL-3 buttons. | *Private mode – this solution will allow your company car to be used by employees for personal purposes without violating the EU General Data Protection Regulations by masking all the personal data while vehicle is used in Private mode. Moreover, self-employed people can easily convert their own car into a business asset and ensure that the data provided (Example - distance traveled) is correct and shown only working hours' driven distance. Private/business mode can be easily switched by any of the NBL-3 buttons. | ||
*ID read notification functionality works when | *ID read notification functionality works when it's necessary to provide the output to the driver then the card is read. | ||
* | |||
Revision as of 08:06, 4 August 2023
Main Page > Accessories > NBL-3Introduction to the product
Description:
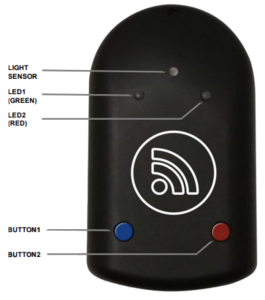
Netronix NBL-3 - wireless Bluetooth RFID reader with additional buttons.
NBL-3 is great in these use cases:
- Authorized driving - track who is driving your vehicle. You will receive a card ID every time a driver applies a card to NBL-3 reader.
- Private mode – this solution will allow your company car to be used by employees for personal purposes without violating the EU General Data Protection Regulations by masking all the personal data while vehicle is used in Private mode. Moreover, self-employed people can easily convert their own car into a business asset and ensure that the data provided (Example - distance traveled) is correct and shown only working hours' driven distance. Private/business mode can be easily switched by any of the NBL-3 buttons.
- ID read notification functionality works when it's necessary to provide the output to the driver then the card is read.
Features:
- Mifare® Classic, Desfire card supports
- Bluetooth low energy module
- Operating frequency - 13,56MHz
- Built in two LED indicators
- Built in two buttons
- Built in light sensor
- UID and card DATA available
- Configure via BL link
- Firmware update via Bluetooth
Product Specification
| Supply voltage | two AAA batteries |
| Sensor | Humidity
Light Magnetic field Low battery voltage |
| Operating temperature | -20ºC to +70ºC |
| Size (mm) | 100 x 58 x 18 |
| Type | RFID reader |
NBL-3 Configuration
For the NBL Tools application, contact the Netronix NBL manufacturer.
Updating NBL-3
How to update the NBL-3 device is shown in the link below.
https://netronix.pl/en/nbl-readers/nbl-3
Device configuration
This functionality is available from firmware version FMB.Ver.03.29.00.Rev.230 or newer
Setting up NBL-3 device to connect with FMB device.
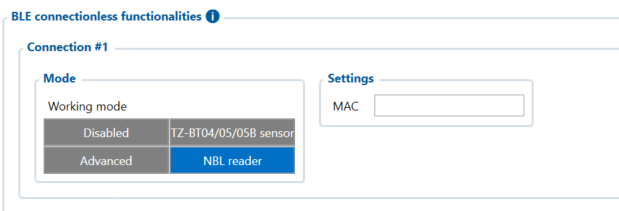
Go to Teltonika configurator -> Bluetooth 4.0 and set it up like it shown in this screenshot (MAC address will depend on your particular NBL sensor):
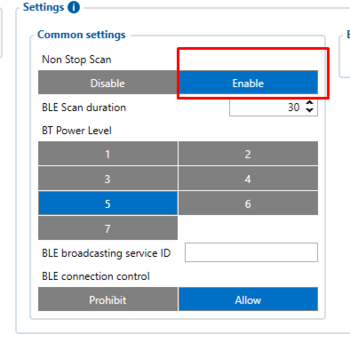
Mandatory setting condition: Non Stop Scan
Then go to I/O settings:
Make sure to enable the BLE RFID #1 parameter (ID: 51740). We would recommend to set the operand to „On Change“.
Setting up Private/Business mode
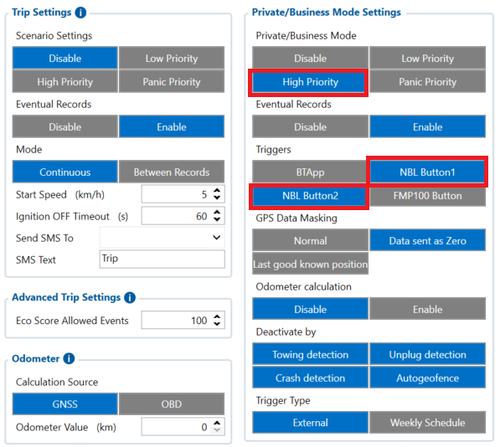
Make sure to enable Private/Business mode in Trip/Odometer settings. It can be done using SMS commands or a configurator. Not every device has these parameters visible in the configurator, therefore they should be configured via SMS commands. It can be done by sending setparam SMS (how to send SMS commands: https://wiki.teltonika-gps.com/view/FMB120_SMS/GPRS_Commands). Set it to High or Low priority (parameter ID: 11850). Enable triggers as NBL Button1 or NBL Button2 (parameter ID: 11811).
Don't forget to set up data masking in Private mode if necessary.
Don‘t forget to save all these changes to the device and you are ready to test the NBL-3 sensor.
More information about Private/Business Driving Mode Functionality.
NBL-3 broadcasting behavior
When NBL-3 device captures RFID value it keeps broadcasting it for roughly a minute (it varies). As of 2023.07.20 NBL-3 manufacturer Netronix states that it is currently impossible to detect when the same RFID is attached to NBL-3 device again (when RFID value is still present after first read). New RFID read can only indicated after NBL-3 value retention timeout is finished.
When attaching different cards each time to reader, all will be read without issues.
Testing NBL-3 RFID card reading and Buttons
1. Using the Configurator
Power up the FMB device, connect it to PC and open Configurator application. Configure devices as shown above.
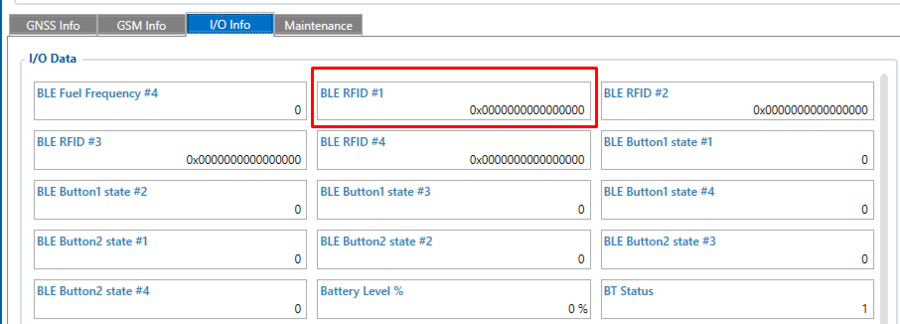
When the RFID card is not enabled, the BLE RFID #1 parameter (AVL ID: 451) will show a specific value.
Example (Status tab => I/O Info):
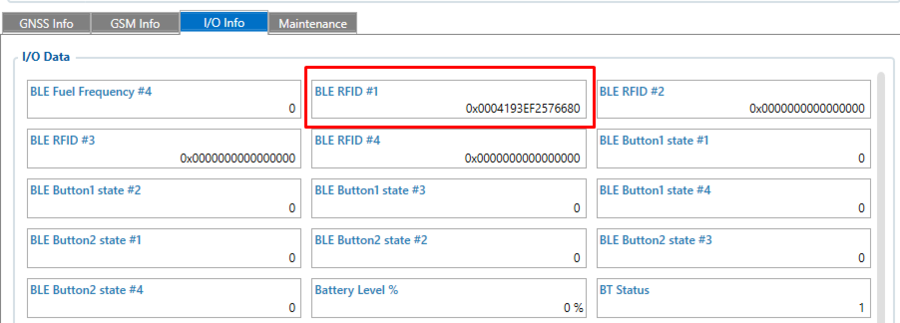
When the RFID card is activated (card touched to NBL-2 and followed by two beeps) BLE RFID #1 parameter should look like this:
2. Using the Terminal application
Power up the FMB device, connect it to PC and start logging it into the Terminal application.
When the RFID card is not enabled, the BLE RFID #1 parameter (AVL ID: 451) will show a specific value.
Example:
IO ID[451]: 0x0000000000000000
When the RFID card is activated (card touched to NBL-2 and followed by two beeps) BLE RFID #1 parameter should look like this:
IO ID[451]: 0x0004193EF2576680
When Private/Business mode is enabled (Button1 or Button2 is pressed):
IO ID[451]: 0x0000000000000000
and
IO ID[391]: 1
NBL-3 packet
NBL-T data is being read via broadcast packets only. The packet structure is described below:
| EIR Type | Description / Value | LEN | ||||||||||||||||||||||||||||||||||||||||||||||||||||
|---|---|---|---|---|---|---|---|---|---|---|---|---|---|---|---|---|---|---|---|---|---|---|---|---|---|---|---|---|---|---|---|---|---|---|---|---|---|---|---|---|---|---|---|---|---|---|---|---|---|---|---|---|---|---|
| Flags – 0x01 | 0x06
GeneralDiscoverable, BrEdrNotSupported |
3B | ||||||||||||||||||||||||||||||||||||||||||||||||||||
| Complete name – 0x09 | ‘NBL-3’ | 7B | ||||||||||||||||||||||||||||||||||||||||||||||||||||
| Service data – 0x16 | Data format
|
21B |
Total packet length: 31B.

