How to capture OBDII data log?
Description
Here are steps how to capture OBDII log from Teltonika devices with Bluetooth® OBDII dongle or directly supporting OBDII data reading
This functionality is available after 03.08.00 firmware version.
- Make sure that the CAN adapter is connected properly to the vehicle and to the FMB1YX series device.
- Start vehicle engine (skip if vehicle is deployed)
- Send following SMS commands to Teltonika tracker:
- If you have set SMS login and password:
login pass sdformat
Note: This will delete all previous DUMP logs without and records that have not been sent yet.
If SMS login and password are not set, then leave two spaces before command:aasdformat - If you have set SMS login and password:
login pass log2sdfilterset 0;2;4;1
If SMS login and password are not set, then leave two spaces before command:aalog2sdfilterset 0;2;4;1
Filter description:- Filter 0 - default filters (No additional data)
- Filter 2 - turns on AVL record creation filter
- Filter 4 - turns on incoming CAN/OBDII data filter
- Filter 7 - turns on BT3 connection filter (only needed when troubleshooting OBDII devices connected via BT
- Filter 1 - saves installed filters to memory after restart
Note: If you are using bluetooth OBDII dongle uselog2sdfilterset 0;2;4;7;1instead oflog2sdfilterset 0;2;4;1
If commandlog2sdfiltersetwas sent correctly:
SMS Response will be:Enabled Trace Filters:5orEnabled Trace Filters:4depending on the sent command. You can restart the device after correct response is received
- If you have set SMS login and password:
login pass cpureset - If SMS login and password are not set, then leave two spaces before command:
aacpureset
- If you have set SMS login and password:
- After the SMS response message CAN adapter log capturing has been started.
- Wait at least 5 minutes to get enough OBDII data and turn off vehicle engine (skip if vehicle is deployed)
- Download captured log (dump) files.
Using Teltonika Configurator

Please check Status info→Maintenance→Log/Dump and download dump YYYY_MM_DD_HH_MM_SS_FMB1YX_IMEI_Dump.zip.
Using FOTA WEB

Enter FOTA WEB → Press on Devices tab → Select your device and press ![]() → Task type → Receive internal log (5) (5 files. Each log size up to 1 MB)→
→ Task type → Receive internal log (5) (5 files. Each log size up to 1 MB)→![]() .
.
To start download process at once send following SMS command:
- If you have set SMS login and password:
login pass web_connect - If SMS login and password are not set leave two spaces before command:
aaweb_connectIf command was sent correctly you should receive SMS Response:
web_connect resp:OKTo find downloaded log press on Tasks tab→Find your device by IMEI and Task type Received internal log→Download
IMEI_logs_TIMESTAMP.zipas showed below: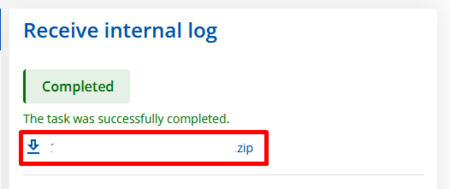
- If you have set SMS login and password:
- After you have downloaded log files send following SMS command to Teltonika device:
- If you have set SMS login and password:
login pass log2sdfilterset 0 - If SMS login and password are not set leave two spaces before command:
aalog2sdfilterset 0If command was sent correctly you should receive SMS Response:
Enabled Trace Filters:1
- If you have set SMS login and password:
- These log (dump) files can be read only with special software. Provide these files to your Teltonika Telematics Sales manager or Teltonika Telematics Support team for further investigation.