How to generate TLS certificates (Windows)?
Introduction
Transport Layer Security (TLS) is a cryptographic protocol that provides communications security over a computer network and is also the successor to SSL.
The TLS protocol aims primarily to provide privacy and data integrity between two communicating computer applications. When secured by TLS, connections between a client and a server have one or more of the following properties:
- The connection is private (or secure) because symmetric cryptography is used to encrypt the data transmitted. The keys for this symmetric encryption are generated uniquely for each connection and are based on a shared secret negotiated at the start of the session. The server and client negotiate the details of which encryption algorithm and cryptographic keys to use before the first byte of data is transmitted. The negotiation of a shared secret is both secure (the negotiated secret is unavailable to eavesdroppers and cannot be obtained, even by an attacker who places themselves in the middle of the connection) and reliable (no attacker can modify the communications during the negotiation without being detected).
- The identity of the communicating parties can be authenticated using public-key cryptography. This authentication can be made optional, but is generally required for at least one of the parties (typically the server).
- The connection ensures integrity because each message transmitted includes a message integrity check using a message authentication code to prevent undetected loss or alteration of the data during transmission.
This article provides a guide on how to generate your own TLS certificates and keys for OpenVPN connection that uses TLS authentication. This guide is aimed at Windows users.
Step 1: installing OpenVPN software
- Download an OpenVPN installer file from here.
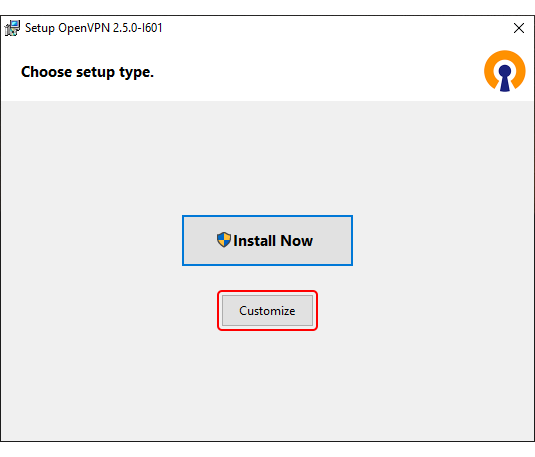
Run the downloaded file. - Before starting the installation process, click 'Customize':
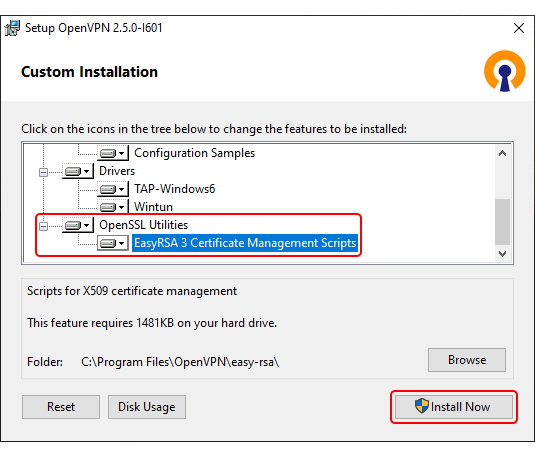
- While in the 'Custom Installation' window, scroll down to find OpenSSL Utilities → EasyRSA 3 Certificate Management Scripts; make sure it is installed along with OpenVPN and click 'Install Now':


Step 2: preparing EasyRSA
- Now we can start preparing to generate certificates and keys. For this we'll be using the EasyRSA 3 application that was installed along with OpenVPN.
EasyRSA commands have to be executed via the Windows Command Prompt. It can be opened by typing cmd in the Windows search bar (Windows button + S). When you launch it, make sure you run it as administrator: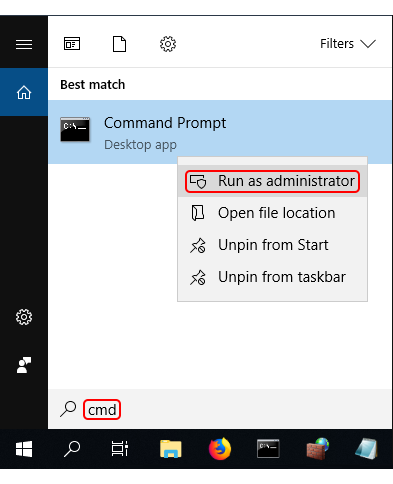
- Change the current directory to the EasyRSA folder. To do so, execute this command:
cd "C:\Program Files\OpenVPN\easy-rsa"
- Launch EasyRSA:
EasyRSA-Start.bat
- Before you can generate files with EasyRSA, you must first initialize a directory for the Public Key Infrastructure (PKI). This can be done with the following command:
./easyrsa init-pki

Step 3: generating certificates and keys
- Now we can start generating the certificates and keys. Begin with the certificate authority (CA) - the root certificate file that will be used to sign other certificates and keys:
./easyrsa build-ca nopass
./easyrsa --subject-alt-name="DNS:*.flespi.gw" build-server-full platform nopass
Step 4: setting up TLS encryption on flespi channel
- Enable TLS in Teltonika channel configuration and upload the pki/issued/platform.crt as a server certificates chain and pki/private/platform.key as a server private key:
- Get the file pki/ca.crt
- Go to Security tab → Certificates section → Upload and select the recently created root.pem file:
- Go to the GPRS section, switch the device to the new channel with TLS configured, enable TLS, save new settings to the device, and reboot it.
- In the channel’s Toolbox is the log records about successful connection and parsed data!

Step 5: loading certificate to the device
Hint: change extension from ca.crt to root.pem to make it visible for the tool. This can be done with any text editing tool.


