Immobilizer configuration explained
![]()
Functionality description is based on latest firmware - 55.01.02.Rev.01.
Immobilizer's functional purpose
Immobilizer prevents anyone from starting the transport without scanning an iButton key/RFID card with a reader or until device detects BLE Beacon first.

|
Functionality examples
Example No. 1
 Configuration:
|
If Depend On Ignition is Enabled and wiring is done following this scheme, then you enable Immobilizer feature, DOUT stay at low level (0) and waits for ignition to be detected with DIN1. After ignition is detected (Ignition=1), DOUT switches to high level (1) preventing the starting of the engine and waits for authorization.
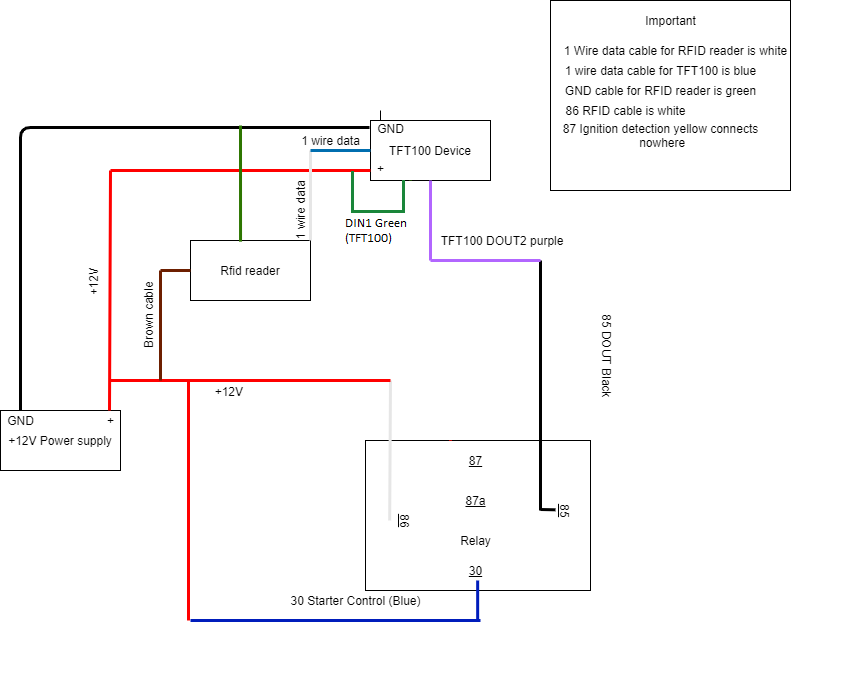
After attaching iButton/RFID or detecting BLE beacon, DOUT switches back to low level (0) allowing the engine to be started fully. When ignition is switched OFF (Ignition=0), Ignition Off timeout starts countdown. After this countdown passes, functionality resets, meaning that after Ignition will be detected again (Ignition=1), DOUT will switch to high level (1) and ask for authorization again.
Example No. 2
 Configuration:
|
If Depend On Ignition is Disabled and wiring is done following this scheme, then when you enable Immobilizer feature, DOUT immediately switches to high level (1) without waiting for Ignition.
After attaching iButton/RFID or detecting BLE beacon, DOUT switches back to low level (0) and Ignition switches to high level (1) allowing the engine to be started fully.
When iButton/RFID is removed from the reader and Ignition is switched OFF, Ignition Off timeout parameter is considered to be RFID Off timeout and after configured time passes, DOUT switches back to high level (1) and ignition switches to low level (0).
Example No. 3
 Configuration:
|
If Depend On Ignition is Disabled and wiring is done following scheme below (without using DIN wire for Ignition), then when you enable Immobilizer feature, DOUT immediately switches to high level (1).
After attaching iButton/RFID or detecting BLE beacon, DOUT switches back to low level (0).
When iButton/RFID is removed from the reader, Ignition Off timeout parameter is considered to be RFID Off timeout and after configured time passes, DOUT switches back to high level (1).
