Difference between revisions of "WEB Tacho Download Schedules"
m |
|||
| (One intermediate revision by the same user not shown) | |||
| Line 1: | Line 1: | ||
__TOC__ | __TOC__ | ||
| − | *Schedule download begins from the | + | *Schedule download begins from the "Due date". If schedule is downloaded every week - then it will download data collected by tachograph week before the "Due date". After |
| − | *If the device is unable to upload DDD files (for example Ignition is turned off during download) it will try to upload the files again after it | + | successful download, due date is updated for the next week. |
| + | *If the device is unable to upload DDD files (for example Ignition is turned off during download) it will try to upload the files again after it '''reconnects<ref>The device connects to TACHO WEB after the ignition is turned on and "Start delay" timeout has passed, later if ignition is still on the device automatically connects every one hour. Each time when the device connects to TACHO WEB it checks if any schedules are assigned for it. This way you can be sure that the files will be successfully uploaded.</ref>''' to TACHO WEB. | ||
==Creating schedules== | ==Creating schedules== | ||
| − | Go to | + | Go to “Download Schedules” from menu visible in <b>Figure below</b> <b>A</b>, select necessary object <b>C</b> (which you created before) and press “Add New Schedule” shown in <b>B</b>. |
[[image:WEBTachoAddingVehicle.png|1100px]] | [[image:WEBTachoAddingVehicle.png|1100px]] | ||
| − | In an opened window <b>Figure below</b> you can also choose | + | In an opened window <b>Figure below</b> you can also choose vehicle (leave selected before or change to another), for which the schedule will be created, data types, download period and due date will be set. |
[[image:WEBTachoNewSchedule.png|WEBTachoNewSchedule.png]] | [[image:WEBTachoNewSchedule.png|WEBTachoNewSchedule.png]] | ||
| Line 20: | Line 21: | ||
* '''Driver Cards Data''' - Driver information with detailed work report | * '''Driver Cards Data''' - Driver information with detailed work report | ||
| − | The last 365 days of | + | The last 365 days of ‘Events and Faults’, ‘Detailed Speed’ ‘Technical Data‘ data is saved in Tachograph memory. <br/> |
| − | The last 28 days of | + | The last 28 days of ‘Driver Cards Data’ data is saved in Drivers' card. <br/> |
[[image:WEB_Tacho_Download_Schedules_Once.png|WEBTachoOnce.png]] | [[image:WEB_Tacho_Download_Schedules_Once.png|WEBTachoOnce.png]] | ||
| − | If every | + | If every "Tachograph Data" type available is selected and "Download Data Periods" is set -> "Once": <br/> |
You will receive: <br/> | You will receive: <br/> | ||
Tachograph Data for the last 365 days:<br/> | Tachograph Data for the last 365 days:<br/> | ||
| Line 34: | Line 35: | ||
Tachograph Data for the selected activity interval.:<br/> | Tachograph Data for the selected activity interval.:<br/> | ||
* '''Activities''' - Driver work day report for selected interval | * '''Activities''' - Driver work day report for selected interval | ||
| − | If | + | If "Driver Card data" type selected:<br/> |
* You will get information from the driver card for the last 28 days. | * You will get information from the driver card for the last 28 days. | ||
| Line 40: | Line 41: | ||
| − | If | + | If Download Data Periods" is set to "Once" ,all information will be downloaded once once, If you set "Download Data Periods" to other setting i.e. once a week, all selected information will be downloaded once a week, but after one week the schedule will be renewed and you will again get the data - this way you do not need to manually set the schedules to "Once", just set the "Download Data Periods" to your preferred period and the data will be downloaded automatically every defined "Download Data Period". |
==Editing schedules== | ==Editing schedules== | ||
| − | If | + | If schedule was created for several vehicles or just one, it will be displayed as a group schedule with vehicles count as shown in <b>Figure below</b>. To see what vehicles are assigned to schedule group, schedule group can be expanded by clicking arrows near cursor. |
[[image:WEBTachoEditSchedule.png|1100px]] | [[image:WEBTachoEditSchedule.png|1100px]] | ||
| − | You can edit a group schedule or add more vehicles to it. While editing group schedules vehicle | + | You can edit a group schedule or add more vehicles to it. While editing group schedules vehicle filter should be set to “<all vehicles>”. Change schedule |
| − | Change schedule options by pressing | + | options by pressing edit button. Assign new vehicles to existing schedule group. |
==Deleting schedules== | ==Deleting schedules== | ||
| − | Select unnecessary | + | Select unnecessary schedules or schedule group and press “Delete Selected Items” button shown in <b>Figure below</b>. After accepting confirmation message – schedule or schedule group will be deleted. |
[[image:WEBTachoDeleteV.png|1100px]] | [[image:WEBTachoDeleteV.png|1100px]] | ||
| − | |||
| − | |||
Revision as of 10:04, 23 January 2020
Main Page > Software & Applications > WEB Tacho > WEB Tacho Download Schedules- Schedule download begins from the "Due date". If schedule is downloaded every week - then it will download data collected by tachograph week before the "Due date". After
successful download, due date is updated for the next week.
- If the device is unable to upload DDD files (for example Ignition is turned off during download) it will try to upload the files again after it reconnects<ref>The device connects to TACHO WEB after the ignition is turned on and "Start delay" timeout has passed, later if ignition is still on the device automatically connects every one hour. Each time when the device connects to TACHO WEB it checks if any schedules are assigned for it. This way you can be sure that the files will be successfully uploaded.</ref> to TACHO WEB.
Creating schedules
Go to “Download Schedules” from menu visible in Figure below A, select necessary object C (which you created before) and press “Add New Schedule” shown in B.
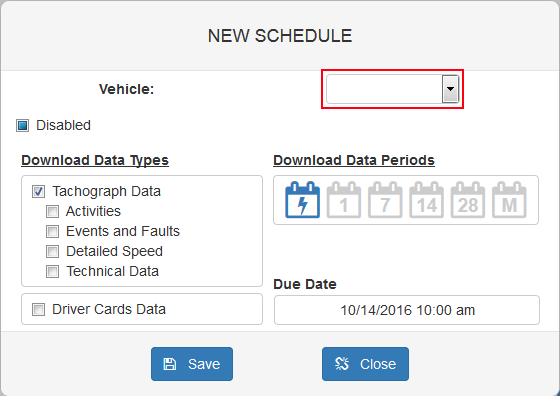
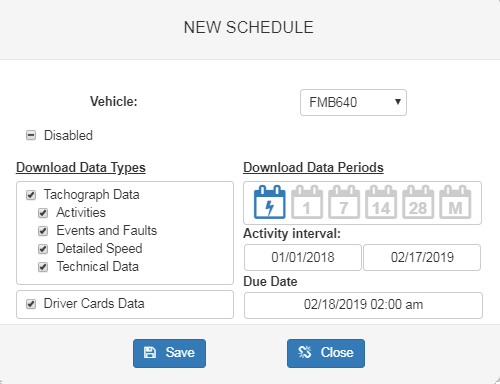
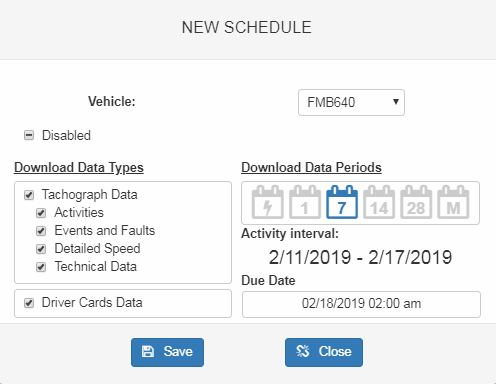
In an opened window Figure below you can also choose vehicle (leave selected before or change to another), for which the schedule will be created, data types, download period and due date will be set.
- Tachograph data - General tachograph information
- Activities - Driver work day report
- Events and Faults - Detailed Events and Faults information
- Detailed Speed - Speed sorted by date and time (in hours)
- Technical Data - Tachograph technical information
- Driver Cards Data - Driver information with detailed work report
The last 365 days of ‘Events and Faults’, ‘Detailed Speed’ ‘Technical Data‘ data is saved in Tachograph memory.
The last 28 days of ‘Driver Cards Data’ data is saved in Drivers' card.
If every "Tachograph Data" type available is selected and "Download Data Periods" is set -> "Once":
You will receive:
Tachograph Data for the last 365 days:
- Events and Faults - Detailed Events and Faults information
- Detailed Speed - Speed sorted by date and time (in hours)
- Technical Data - Tachograph technical information
Tachograph Data for the selected activity interval.:
- Activities - Driver work day report for selected interval
If "Driver Card data" type selected:
- You will get information from the driver card for the last 28 days.
If Download Data Periods" is set to "Once" ,all information will be downloaded once once, If you set "Download Data Periods" to other setting i.e. once a week, all selected information will be downloaded once a week, but after one week the schedule will be renewed and you will again get the data - this way you do not need to manually set the schedules to "Once", just set the "Download Data Periods" to your preferred period and the data will be downloaded automatically every defined "Download Data Period".
Editing schedules
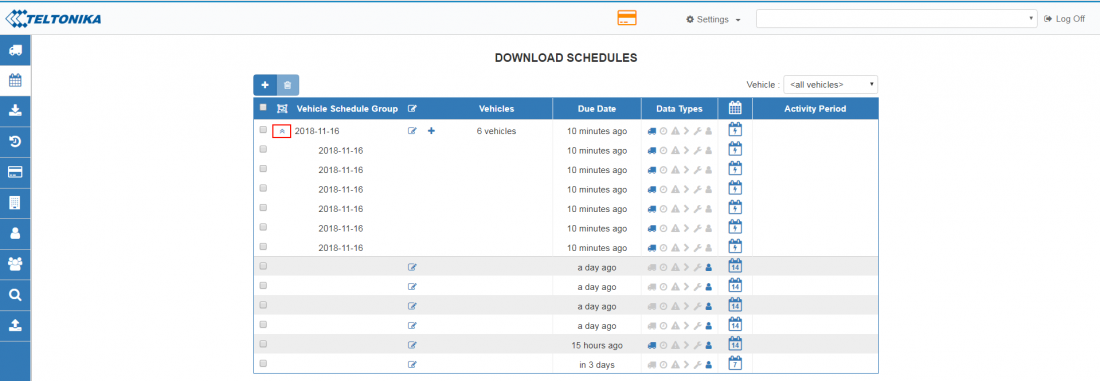
If schedule was created for several vehicles or just one, it will be displayed as a group schedule with vehicles count as shown in Figure below. To see what vehicles are assigned to schedule group, schedule group can be expanded by clicking arrows near cursor.
You can edit a group schedule or add more vehicles to it. While editing group schedules vehicle filter should be set to “<all vehicles>”. Change schedule options by pressing edit button. Assign new vehicles to existing schedule group.
Deleting schedules
Select unnecessary schedules or schedule group and press “Delete Selected Items” button shown in Figure below. After accepting confirmation message – schedule or schedule group will be deleted.


