Difference between revisions of "Data image/video review"
| (4 intermediate revisions by the same user not shown) | |||
| Line 5: | Line 5: | ||
# Double-click “VideoPlayer.exe” to open the player | # Double-click “VideoPlayer.exe” to open the player | ||
| − | # When the software starts, first select the directory where the | + | # When the software starts, first select the directory where the SD card files are located. Once located, click "OK". The software starts analyzing the pictures and videos existing in the SD card files. |
| − | # Software will automatically detect the video and picture in the | + | # Software will automatically detect the video and picture in the SD card files, which will last for a few seconds and then enter the software, as shown., |
The upper part of the software is a calendar. You can choose to view whether there is a | The upper part of the software is a calendar. You can choose to view whether there is a | ||
video in the current month according to the year and month. The number of the year/month can be entered by keyboard after selecting it, and then press the “Enter” key to jump to the entered year/month. You can press [[File:Button1.png|frameless|21x21px]] to view the previous year/month and [[File:Button2.png|frameless|21x21px]] to view the next year/month. The date of the recorded video in the current month will be marked in blue. The lower part of the software is the preview interface, divided into two parts: "'''Video''' '''View'''" and "'''Image View'''". | video in the current month according to the year and month. The number of the year/month can be entered by keyboard after selecting it, and then press the “Enter” key to jump to the entered year/month. You can press [[File:Button1.png|frameless|21x21px]] to view the previous year/month and [[File:Button2.png|frameless|21x21px]] to view the next year/month. The date of the recorded video in the current month will be marked in blue. The lower part of the software is the preview interface, divided into two parts: "'''Video''' '''View'''" and "'''Image View'''". | ||
| Line 54: | Line 54: | ||
'''Note''': ''Closing the current playback interface does not exit the player software.'' | '''Note''': ''Closing the current playback interface does not exit the player software.'' | ||
| + | |||
| + | == Image view == | ||
| + | "Image View" displays the image information (the camera saves the image in the SD card after the person takes the initiative to take the photo, here you can see the photo taken by the camera). We first click on "Image View" to switch the software to the image page. | ||
| + | |||
| + | After switching to the picture interface, you can view when the photo is taken according to the directory. As shown below, after expanding the index, we can see how many pictures in total were taken. | ||
| + | [[File:Imageview1.png|left|frameless|564x564px]] | ||
| + | [[File:Imageview2.png|right|frameless|566x566px]] | ||
| + | |||
| + | |||
| + | |||
| + | |||
| + | |||
| + | After the expansion, click the time of the image generation to see the preview on the left side. Clicking on the preview image will pop up the image viewing window. The size of the window is the size of the image itself. The scroll wheel zooms in and out of the picture. You can right click on the preview to save the original image to your hard disk. | ||
| + | [[File:Imageviwe.png|frameless|436x436px]] | ||
== Export MP4 == | == Export MP4 == | ||
| − | Click the "Convert" button [[File:Convert.png|frameless|27x27px]] to convert the video in the | + | Click the "Convert" button [[File:Convert.png|frameless|27x27px]] to convert the video in the SD card to MP4 and export it. |
Then first select the folder you want to export to, enter the MP4 start time and end time to be exported, and then click Export, if you need, cancel the export. | Then first select the folder you want to export to, enter the MP4 start time and end time to be exported, and then click Export, if you need, cancel the export. | ||
Latest revision as of 07:11, 27 February 2023
Main Page > Video Solutions > Teltonika DualCam > Data image/video reviewHow to read camera data from SD card
The software for reading camera data can be downloaded here
Data reading steps:
- Double-click “VideoPlayer.exe” to open the player
- When the software starts, first select the directory where the SD card files are located. Once located, click "OK". The software starts analyzing the pictures and videos existing in the SD card files.
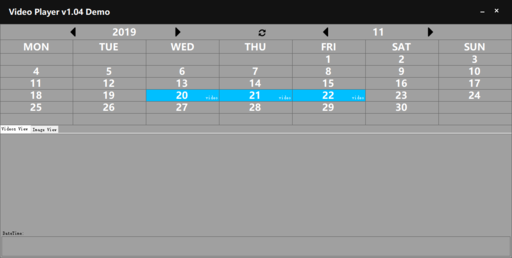
- Software will automatically detect the video and picture in the SD card files, which will last for a few seconds and then enter the software, as shown.,
The upper part of the software is a calendar. You can choose to view whether there is a
video in the current month according to the year and month. The number of the year/month can be entered by keyboard after selecting it, and then press the “Enter” key to jump to the entered year/month. You can press ![]() to view the previous year/month and
to view the previous year/month and ![]() to view the next year/month. The date of the recorded video in the current month will be marked in blue. The lower part of the software is the preview interface, divided into two parts: "Video View" and "Image View".
to view the next year/month. The date of the recorded video in the current month will be marked in blue. The lower part of the software is the preview interface, divided into two parts: "Video View" and "Image View".
Video View
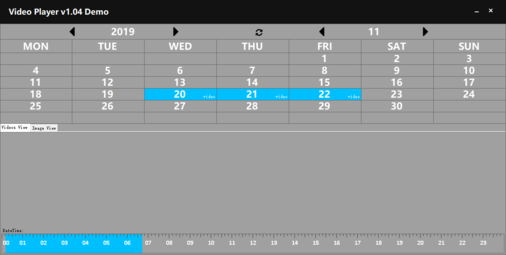
Video view shows the video information. Left click on the date of the video in the calendar, then the following "Video View" section will show which time period there is a video, as shown. For video recording, the time period during which the video is recorded will be marked in blue.
Click on the blue part of the timeline to get the time you clicked, and the video thumbnail of the current time will be displayed in the middle of the screen. The timeline length is 24 hours and it is difficult to locate the exact number of seconds. Hold down the timeline with the left mouse button and then swipe to the right to zoom in on the timeline. For example, we need to carefully view the video at 05:00-07:00. Then, the left mouse button is pressed at the 05:00 position and slide to the right to the position of 07:00, so that this part of time can be enlarged to the entire timeline.
Note: If you need to restore, then left-click and hold the time axis to slide left.
Video Playback
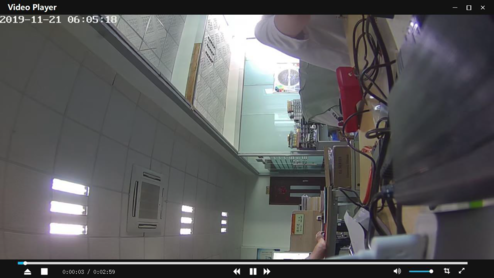
Left click on the timeline will view the video thumbnail of the clicked time point, and double click the left mouse button to start playing the video from the current time. By default, the video will be played for two minutes from the selected time. If you click to find the location you want to play, you don't need to move the mouse, double click again will pop up the play form.
| Video playback interface contains | |||
|---|---|---|---|
| Stop button | Speed up
play button | ||
| Pause button | Screenshot
button | ||
| Slow down
play button |
Full screen
button | ||
Note: Closing the current playback interface does not exit the player software.
Image view
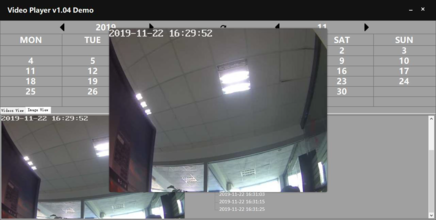
"Image View" displays the image information (the camera saves the image in the SD card after the person takes the initiative to take the photo, here you can see the photo taken by the camera). We first click on "Image View" to switch the software to the image page.
After switching to the picture interface, you can view when the photo is taken according to the directory. As shown below, after expanding the index, we can see how many pictures in total were taken.
After the expansion, click the time of the image generation to see the preview on the left side. Clicking on the preview image will pop up the image viewing window. The size of the window is the size of the image itself. The scroll wheel zooms in and out of the picture. You can right click on the preview to save the original image to your hard disk.
Export MP4
Click the "Convert" button ![]() to convert the video in the SD card to MP4 and export it.
to convert the video in the SD card to MP4 and export it.
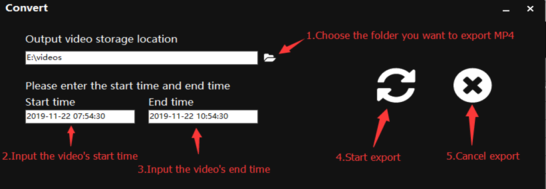
Then first select the folder you want to export to, enter the MP4 start time and end time to be exported, and then click Export, if you need, cancel the export.
Then wait for the export to complete. The time of export is not certain. Depending on the performance of the computer, it takes about 1 to 5 minutes for each 1-hour duration video.
