Difference between revisions of "1-Wire Temperature Sensors"
(Created page with "==Introduction to the product== '''Description:''' One of the implemented features for fleet management devices is 1-Wire data protocol, which enables connection of tempera...") |
|||
| (7 intermediate revisions by 5 users not shown) | |||
| Line 1: | Line 1: | ||
| − | |||
| − | |||
==Introduction to the product== | ==Introduction to the product== | ||
| Line 6: | Line 4: | ||
'''Description:''' | '''Description:''' | ||
| − | One of the implemented features for fleet management devices is | + | One of the implemented features for fleet management devices is 1-Wire data protocol, which enables connection of temperature sensors. It is a perfect accessory for temperature monitoring. |
'''1-Wire temperature sensors is a great addition for your fleet management trackers in the following use cases:''' | '''1-Wire temperature sensors is a great addition for your fleet management trackers in the following use cases:''' | ||
| Line 12: | Line 10: | ||
*Thermostatic controls – maintain temperature near a desired set point. | *Thermostatic controls – maintain temperature near a desired set point. | ||
*Thermally sensitive system – receive alerts when temperature enters or leaves pre-defined value. | *Thermally sensitive system – receive alerts when temperature enters or leaves pre-defined value. | ||
| − | *Consumer products – be assured that | + | *Consumer products – be assured that goods which you are delivering will maintain high quality. |
<br> | <br> | ||
| Line 22: | Line 20: | ||
| − | + | '''Technical characteristics:''' | |
| − | + | *Stainless Steel Tube | |
| − | + | *1-Wire Interface | |
| − | + | *Unique 64-Bit Serial Code | |
| − | + | *±0.5°C Accuracy from -10°C to +85°C | |
| − | + | *No External Components Required | |
| − | + | *Stripped & Tinned Terminal | |
| − | + | *Can be Powered from Data Line (parasitic connection) | |
| − | + | *Power Supply Range: 3.0V to 5.5V | |
| − | + | *Temperature Range: -55°C to 125°C (-67°F to +257°F) | |
| − | + | *Waterproof | |
| − | + | *8 meters cable length | |
| − | |||
| − | |||
| − | |||
| − | |||
| − | |||
| − | |||
| − | |||
| − | |||
| − | |||
| − | |||
| − | |||
| − | |||
| − | |||
| − | |||
| − | |||
| − | |||
| − | |||
| − | |||
| − | |||
| − | |||
| − | |||
| − | |||
| − | |||
| − | |||
| − | |||
| − | |||
==Installation== | ==Installation== | ||
| Line 81: | Line 53: | ||
| style="border: 1px solid white; border-bottom: 2px solid #E8E8E8; text-align: left; vertical-align: center; background: white;" |2 | | style="border: 1px solid white; border-bottom: 2px solid #E8E8E8; text-align: left; vertical-align: center; background: white;" |2 | ||
| style="border: 1px solid white; border-bottom: 2px solid #E8E8E8; text-align: left; vertical-align: center; background: white;" |<span style="color:#FF0000">'''1-wire Power'''</span> | | style="border: 1px solid white; border-bottom: 2px solid #E8E8E8; text-align: left; vertical-align: center; background: white;" |<span style="color:#FF0000">'''1-wire Power'''</span> | ||
| − | | style="border: 1px solid white; border-bottom: 2px solid #E8E8E8; text-align: left; vertical-align: center; background: white;" |Power supply for the sensor (can be left disconnected in parasitic connection | + | | style="border: 1px solid white; border-bottom: 2px solid #E8E8E8; text-align: left; vertical-align: center; background: white;" |Power supply for the sensor (can be left disconnected in parasitic connection) |
|- | |- | ||
|- | |- | ||
| Line 90: | Line 62: | ||
<br /> | <br /> | ||
| − | |||
==Device configuration== | ==Device configuration== | ||
| − | The device reads the sensor data automatically after the sensors are | + | The device reads the sensor data automatically after the sensors are connect, however the I/O elements are disabled by default to save data. To receive data to server, make sure that the appropriate I/O elements(Dallas Temperature # / Dallas Temperature ID #) are enabled.[[File:Io_1wire_temp.png|border|frameless|682x682px]] |
| − | + | First ID is the sensor that is connected first, that can be changed from software side without disconnecting the sensors. It can be done by navigating to 1-Wire section and assigning the IDs of the sensors in your desired order. | |
[[File:Io_1wire_temp2.png|frameless|682x682px]] | [[File:Io_1wire_temp2.png|frameless|682x682px]] | ||
<br> | <br> | ||
| − | |||
Revision as of 14:33, 17 April 2020
Main Page > Accessories > 1-Wire Temperature SensorsIntroduction to the product
Description:
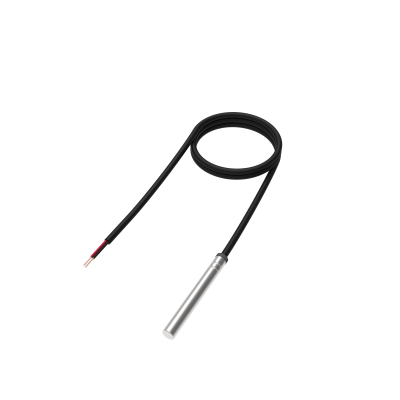
One of the implemented features for fleet management devices is 1-Wire data protocol, which enables connection of temperature sensors. It is a perfect accessory for temperature monitoring.
1-Wire temperature sensors is a great addition for your fleet management trackers in the following use cases:
- Thermostatic controls – maintain temperature near a desired set point.
- Thermally sensitive system – receive alerts when temperature enters or leaves pre-defined value.
- Consumer products – be assured that goods which you are delivering will maintain high quality.
Technical characteristics:
- Stainless Steel Tube
- 1-Wire Interface
- Unique 64-Bit Serial Code
- ±0.5°C Accuracy from -10°C to +85°C
- No External Components Required
- Stripped & Tinned Terminal
- Can be Powered from Data Line (parasitic connection)
- Power Supply Range: 3.0V to 5.5V
- Temperature Range: -55°C to 125°C (-67°F to +257°F)
- Waterproof
- 8 meters cable length
Installation
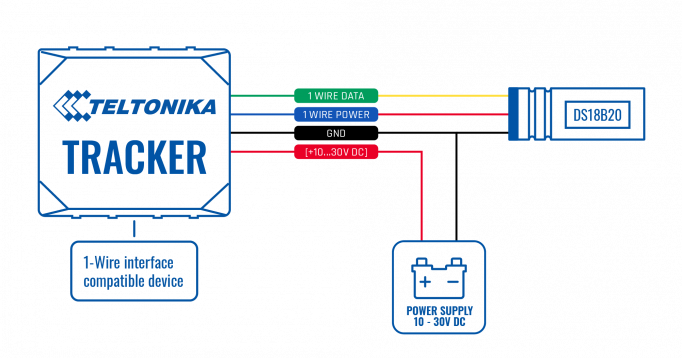
To connect the 1-wire temperature sensor you have to make sure to connect 3 PINs of the sensor to the PINs of your device correctly.
Up to 4 sensors can be connected to our devices simultaneously.
| PIN NUMBER | PIN NAME |
DESCRIPTION |
|---|---|---|
| 1 | 1-wire Data | Outputs temperature data via 1-Wire interface |
| 2 | 1-wire Power | Power supply for the sensor (can be left disconnected in parasitic connection) |
| 3 | GND (-) | Ground. |
Device configuration
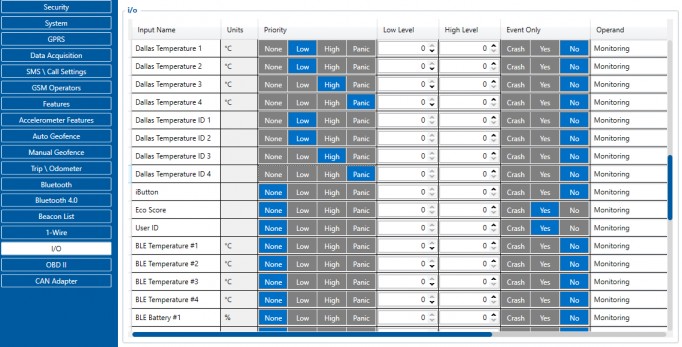
The device reads the sensor data automatically after the sensors are connect, however the I/O elements are disabled by default to save data. To receive data to server, make sure that the appropriate I/O elements(Dallas Temperature # / Dallas Temperature ID #) are enabled.
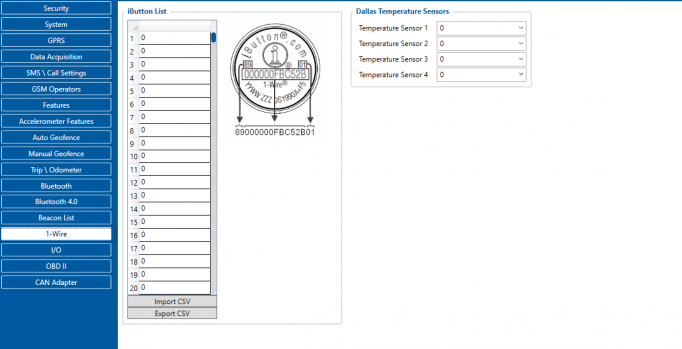
First ID is the sensor that is connected first, that can be changed from software side without disconnecting the sensors. It can be done by navigating to 1-Wire section and assigning the IDs of the sensors in your desired order.


