Difference between revisions of "Automotive Relay"
From Wiki Knowledge Base | Teltonika GPS
| (36 intermediate revisions by 2 users not shown) | |||
| Line 1: | Line 1: | ||
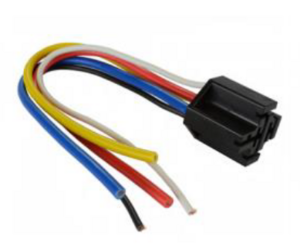
| + | [[File:Relay Photo.png|Frame|Relay|300px|right]] | ||
__TOC__ | __TOC__ | ||
| − | =Introduction to the product= | + | ==Introduction to the product== |
| − | Automotive | + | Automotive relay can be used for immobilizer scenario, when the driver will have to be identificated in order to start the engine. Тhe advantages of a relay are that even if the thieves managed to bypass the cars alarm system by using modern jammers, they won't be able to start the engine. |
| + | <br> | ||
| − | + | ==Product Specification== | |
| − | |||
| − | |||
| − | |||
| − | |||
| − | =Product Specification= | ||
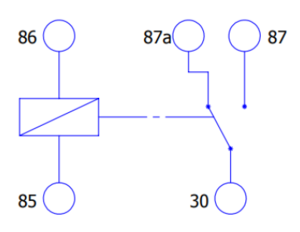
[[Image:Relay scheme.png|thumb|Relay schematic diagram|300px|right]] | [[Image:Relay scheme.png|thumb|Relay schematic diagram|300px|right]] | ||
| Line 52: | Line 49: | ||
| style="border: 1px solid white; border-bottom: 2px solid #E8E8E8; text-align: left; vertical-align: center; background: white;" |Weight | | style="border: 1px solid white; border-bottom: 2px solid #E8E8E8; text-align: left; vertical-align: center; background: white;" |Weight | ||
| style="border: 1px solid white; border-bottom: 2px solid #E8E8E8; text-align: left; vertical-align: center; background: white;" |40g | | style="border: 1px solid white; border-bottom: 2px solid #E8E8E8; text-align: left; vertical-align: center; background: white;" |40g | ||
| − | |||
| − | |||
| − | |||
|- | |- | ||
|} | |} | ||
| − | =Installation= | + | ==Installation== |
| + | [[Image:Relay wiring.png|thumb|Relay Wiring|300px|right]] | ||
| + | |||
| + | In order to control vehicle starter via relay you will need a FM device that has a DOUT (Digital Output). | ||
| + | <br> | ||
| + | First of all you need to cut off the starter control cable and connect relay between starter cable and the engine. | ||
| + | <br> | ||
| + | Also connect FM device DOUT to the relay. | ||
{| class="wikitable" | {| class="wikitable" | ||
|+ | |+ | ||
| − | ! style="width: | + | ! style="width:40%; border: 1px solid white; border-bottom: 2px solid #0054A6; background: white; color: #0054A6; text-align: left;" |Relay PIN |
| − | ! style="width: | + | ! style="width:40%; border: 1px solid white; border-bottom: 2px solid #0054A6; background: white; color: #0054A6; text-align: left;" |Relay cable color |
| − | ! style="width:40%; border: 1px solid white; border-bottom: 2px solid #0054A6; background: white; color: #0054A6; text-align: left;" | | + | ! style="width:40%; border: 1px solid white; border-bottom: 2px solid #0054A6; background: white; color: #0054A6; text-align: left;" |Connects to |
|- | |- | ||
| style="border: 1px solid white; border-bottom: 2px solid #E8E8E8; text-align: left; vertical-align: center; background: white;" |30 | | style="border: 1px solid white; border-bottom: 2px solid #E8E8E8; text-align: left; vertical-align: center; background: white;" |30 | ||
| style="border: 1px solid white; border-bottom: 2px solid #E8E8E8; text-align: left; vertical-align: center; background: white;" |<span style="color:blue"><b>Blue</b></span> | | style="border: 1px solid white; border-bottom: 2px solid #E8E8E8; text-align: left; vertical-align: center; background: white;" |<span style="color:blue"><b>Blue</b></span> | ||
| − | | style="border: 1px solid white; border-bottom: 2px solid #E8E8E8; text-align: left; vertical-align: center; background: white;" | | + | | style="border: 1px solid white; border-bottom: 2px solid #E8E8E8; text-align: left; vertical-align: center; background: white;" |To Engine |
|- | |- | ||
| style="border: 1px solid white; border-bottom: 2px solid #E8E8E8; text-align: left; vertical-align: center; background: white;" |85 | | style="border: 1px solid white; border-bottom: 2px solid #E8E8E8; text-align: left; vertical-align: center; background: white;" |85 | ||
| style="border: 1px solid white; border-bottom: 2px solid #E8E8E8; text-align: left; vertical-align: center; background: white;" |<span style="color:black"><b>Black</b></span> | | style="border: 1px solid white; border-bottom: 2px solid #E8E8E8; text-align: left; vertical-align: center; background: white;" |<span style="color:black"><b>Black</b></span> | ||
| − | | style="border: 1px solid white; border-bottom: 2px solid #E8E8E8; text-align: left; vertical-align: center; background: white;" | | + | | style="border: 1px solid white; border-bottom: 2px solid #E8E8E8; text-align: left; vertical-align: center; background: white;" |DOUT |
|- | |- | ||
| style="border: 1px solid white; border-bottom: 2px solid #E8E8E8; text-align: left; vertical-align: center; background: white;" |86 | | style="border: 1px solid white; border-bottom: 2px solid #E8E8E8; text-align: left; vertical-align: center; background: white;" |86 | ||
| style="border: 1px solid white; border-bottom: 2px solid #E8E8E8; text-align: left; vertical-align: center; background: white;" |<span style="color:#eaecf0 "><b>White</b></span> | | style="border: 1px solid white; border-bottom: 2px solid #E8E8E8; text-align: left; vertical-align: center; background: white;" |<span style="color:#eaecf0 "><b>White</b></span> | ||
| − | | style="border: 1px solid white; border-bottom: 2px solid #E8E8E8; text-align: left; vertical-align: center; background: white;" | | + | | style="border: 1px solid white; border-bottom: 2px solid #E8E8E8; text-align: left; vertical-align: center; background: white;" |To Car Battery |
|- | |- | ||
| style="border: 1px solid white; border-bottom: 2px solid #E8E8E8; text-align: left; vertical-align: center; background: white;" |87 | | style="border: 1px solid white; border-bottom: 2px solid #E8E8E8; text-align: left; vertical-align: center; background: white;" |87 | ||
| style="border: 1px solid white; border-bottom: 2px solid #E8E8E8; text-align: left; vertical-align: center; background: white;" |<span style="color:yellow"><b>Yellow</b></span> | | style="border: 1px solid white; border-bottom: 2px solid #E8E8E8; text-align: left; vertical-align: center; background: white;" |<span style="color:yellow"><b>Yellow</b></span> | ||
| − | | style="border: 1px solid white; border-bottom: 2px solid #E8E8E8; text-align: left; vertical-align: center; background: white;" | | + | | style="border: 1px solid white; border-bottom: 2px solid #E8E8E8; text-align: left; vertical-align: center; background: white;" |None |
|- | |- | ||
| style="border: 1px solid white; border-bottom: 2px solid #E8E8E8; text-align: left; vertical-align: center; background: white;" |87a | | style="border: 1px solid white; border-bottom: 2px solid #E8E8E8; text-align: left; vertical-align: center; background: white;" |87a | ||
| style="border: 1px solid white; border-bottom: 2px solid #E8E8E8; text-align: left; vertical-align: center; background: white;" |<span style="color:red"><b>Red</b></span> | | style="border: 1px solid white; border-bottom: 2px solid #E8E8E8; text-align: left; vertical-align: center; background: white;" |<span style="color:red"><b>Red</b></span> | ||
| − | | style="border: 1px solid white; border-bottom: 2px solid #E8E8E8; text-align: left; vertical-align: center; background: white;" | | + | | style="border: 1px solid white; border-bottom: 2px solid #E8E8E8; text-align: left; vertical-align: center; background: white;" |Starter |
| − | |||
| − | |||
| − | |||
| − | |||
| − | |||
| − | |||
| − | |||
| − | |||
| − | |||
| − | |||
| − | |||
| − | |||
|- | |- | ||
|} | |} | ||
| − | < | + | <br> |
| − | < | + | <youtube>gjuiJjAejWU</youtube>}}} |
| − | |||
| − | |||
| − | |||
| − | |||
| − | |||
| − | |||
| − | |||
| − | |||
| − | </ | ||
| − | |||
| − | |||
Revision as of 16:26, 5 October 2021
Main Page > Accessories > Automotive RelayIntroduction to the product
Automotive relay can be used for immobilizer scenario, when the driver will have to be identificated in order to start the engine. Тhe advantages of a relay are that even if the thieves managed to bypass the cars alarm system by using modern jammers, they won't be able to start the engine.
Product Specification
| Name | Value |
|---|---|
| Contact Rating | 30A/40A 14VDC |
| Coil Voltage | 12VDC |
| Coil Power | 1.8W |
| Release Voltage | ≥10% |
| Pickup Voltage | ≤70% |
| Insulation Resistance | 100Ω |
| Contact Resistance | 100Ω |
| Between open contact | 500VAC |
| Between coil & contact | 750VAC |
| Temperature Range | -55~+85℃ |
| Dimension | 25.0x27.4x28.4 |
| Weight | 40g |
Installation
In order to control vehicle starter via relay you will need a FM device that has a DOUT (Digital Output).
First of all you need to cut off the starter control cable and connect relay between starter cable and the engine.
Also connect FM device DOUT to the relay.
| Relay PIN | Relay cable color | Connects to |
|---|---|---|
| 30 | Blue | To Engine |
| 85 | Black | DOUT |
| 86 | White | To Car Battery |
| 87 | Yellow | None |
| 87a | Red | Starter |
}}}


