Difference between revisions of "NBL-2"
m (Text replacement - "Bluetooth(?!®)" to "Bluetooth®") |
m |
||
| (38 intermediate revisions by 2 users not shown) | |||
| Line 1: | Line 1: | ||
==Introduction to the product== | ==Introduction to the product== | ||
| − | |||
| − | |||
| − | Netronix NBL-2 - wireless | + | '''Description:'''[[File:Nbl.png|thumb]] |
| + | Netronix NBL-2 - wireless RFID reader with Bluetooth. | ||
| + | |||
'''NBL-2 is great in these use cases:''' | '''NBL-2 is great in these use cases:''' | ||
| − | * Authorized driving - track who is driving your vehicle | + | * Authorized driving - keep track of who is driving your vehicle according to the NBL-2 ID they use to authenticate themselves. |
| − | * Private mode – | + | * Private mode – gives ability to mask all the personal data while vehicle is used in Private mode. |
| − | |||
| − | |||
| − | |||
| − | |||
| − | |||
| − | |||
| − | |||
| − | |||
| − | |||
| − | |||
| − | |||
==Product Specification== | ==Product Specification== | ||
{| class="wikitable" | {| class="wikitable" | ||
| + | |Operating frequency | ||
| + | |13,56MHz | ||
| + | |- | ||
| + | |Supported standards | ||
| + | |MIFARE® Classic | ||
| + | MIFARE® DESFire | ||
| + | |- | ||
| + | |Interface | ||
| + | |Bluetooth | ||
|- | |- | ||
|Supply voltage | |Supply voltage | ||
| Line 36: | Line 34: | ||
|Size (mm) | |Size (mm) | ||
|58 x 99 x 19 | |58 x 99 x 19 | ||
| − | |||
| − | |||
| − | |||
|- | |- | ||
|Type | |Type | ||
| Line 44: | Line 39: | ||
|} | |} | ||
| − | == | + | ==Configuration== |
| − | |||
| − | |||
| − | |||
| − | |||
| − | |||
| − | |||
'''1. Updating NBL-2''' | '''1. Updating NBL-2''' | ||
| − | Go to NBL Tools application -> Device -> Characteristic -> Device Information Service -> Firmware Revision String. | + | First, you have to make sure that NBL-2 firmware version is updated to 1.3. Go to NBL Tools application -> Device -> Characteristic -> Device Information Service -> Firmware Revision String. |
[[File:NBL_conf1.jpg.jpg|alt=|frameless|520x520px]] [[File:NBL_conf2.jpg.jpg|alt=|border|frameless|520x520px]] [[File:NBL_conf3.jpg.jpg|alt=|frameless|519x519px]] | [[File:NBL_conf1.jpg.jpg|alt=|frameless|520x520px]] [[File:NBL_conf2.jpg.jpg|alt=|border|frameless|520x520px]] [[File:NBL_conf3.jpg.jpg|alt=|frameless|519x519px]] | ||
| Line 61: | Line 50: | ||
| − | + | Note: If the firmware version is 1.1 or 1.0, it is not possible to update it. | |
If it is 1.2, then update NBL-2 according to these steps: | If it is 1.2, then update NBL-2 according to these steps: | ||
| − | 1. Run | + | 1. Run NBL Tools application |
| − | 2. Update the firmware database (tap: | + | 2. Update the firmware database (tap: Menager Firmware -> Update the database -> Start). Select NBL-2 and check 1.3 firmware version. |
| − | + | 3. Back to main menu. | |
| − | + | 4. Tap Device option. | |
| − | + | 5. Wake up the device - eg entering it into the bootloader mode. | |
| − | + | 6. Select the device from the list (long press), then select Update firmware from the drop-down menu and press Start button. | |
| − | |||
| − | |||
| − | |||
| − | 6. Select the device from the list, then select Update firmware from the drop-down menu and press | ||
| − | |||
| − | |||
7. Correct firmware update will be signaled by device start-up led message. | 7. Correct firmware update will be signaled by device start-up led message. | ||
| − | |||
| − | |||
| − | |||
| − | |||
| − | |||
| − | |||
| − | |||
| − | |||
| − | |||
| − | |||
| − | |||
| − | |||
| − | |||
| − | |||
| − | |||
| − | |||
| − | |||
| − | |||
| − | ''' | + | '''2. Configuring NBL-2 for RFID card''' |
| − | + | Setting up NBL-2 device to connect with FMB device. Go to Teltonika configurator -> Bluetooth 4.0 and set it up like it shown in this screenshot (MAC adress will depend on your particular NBL sensor): | |
| − | |||
| − | |||
| − | |||
| − | |||
| − | |||
| − | |||
| − | Setting up NBL-2 device to connect with FMB device. | ||
| − | |||
| − | Go to Teltonika configurator -> | ||
| − | |||
| − | |||
| − | |||
| − | |||
| − | |||
| − | |||
Then go to I/O settings: | Then go to I/O settings: | ||
| − | Make sure to enable | + | Make sure to enable BLE Custom 1 parameter (ID: 51190) and set operand to „On Change“. |
| − | |||
| − | |||
| − | |||
| − | |||
| − | |||
| − | |||
| − | |||
| − | |||
| − | |||
| − | |||
| − | |||
| − | |||
| − | |||
| − | |||
| − | |||
| − | |||
| − | |||
| − | |||
| − | |||
| − | |||
| − | |||
| − | + | '''3. Setting up Private/Business mode:''' | |
| − | + | Make sure to enable Private/Business mode in Trip/Odometer settings. It can be done using SMS commands or configurator. Not every device has these parameters visible in the configurator, therefore they should be configured via SMS commands. It can be done by sending ''setparam'' SMS (how to send SMS commands: [[FMB120 SMS/GPRS Commands|https://wiki.teltonika-gps.com/view/FMB120_SMS/GPRS_Commands]]). Set it to High or Low priority (parameter ID: 11850). Enable triggers as NBL-1 Button1 or NBL-1 Button2 (parameter ID: 11811). | |
| − | + | Don‘t forget to save all these changes to device and you are ready to test NBL-2 sensor. | |
| − | |||
| − | + | '''4. Testing NBL-2''' | |
| + | Power up FMB device and start logging it in Terminal application. When RFID card is not enabled, BLE Custom 1 parameter (AVL ID: 331) will show a specific value. Example: | ||
| − | '' | + | ''IO ID[331] Length[ 0]: NaN'' |
| − | + | When RFID card is activated (card touched to NBL-2 and followed by two beeps) BLE Custom 1 parameter should look like this: | |
| − | + | ''IO ID[331] Length[ 8]: 00h 19h 3Eh F2h 57h 66h 80h 00h'' | |
| − | |||
| − | |||
| − | |||
| − | ''IO ID[ | ||
| − | |||
| − | |||
| − | |||
| − | |||
When Private/Business mode is enabled (Button1 or Button2 is pressed): | When Private/Business mode is enabled (Button1 or Button2 is pressed): | ||
| − | ''IO ID[ | + | ''IO ID[331] Length[ 8]: 00h 00h 00h 00h 00h 00h 00h 00h'' |
| − | |||
| − | |||
| − | |||
| − | |||
| − | |||
| − | |||
| − | |||
| − | |||
| − | |||
| − | |||
| − | |||
| − | |||
| − | |||
| − | |||
| − | |||
| − | |||
| − | |||
| − | |||
| − | |||
| − | |||
| − | |||
| − | |||
| − | |||
| − | |||
| − | |||
| − | |||
| − | |||
| − | |||
| − | |||
| − | |||
| − | |||
| − | |||
| − | |||
| − | |||
| − | |||
| − | |||
| − | |||
| − | |||
| − | |||
| − | |||
| − | |||
| − | |||
| − | |||
| − | |||
| − | |||
| − | |||
| − | |||
| − | |||
| − | |||
| − | |||
| − | |||
| − | |||
| − | |||
| − | |||
| − | |||
| − | |||
| − | |||
| − | |||
| − | |||
| − | |||
| − | |||
| − | |||
| − | |||
| − | |||
| − | |||
| − | |||
| − | |||
| − | |||
| − | |||
| − | |||
| − | |||
| − | |||
| − | |||
| − | |||
| − | |||
| − | |||
| − | |||
| − | |||
| − | |||
| − | |||
| − | |||
| − | |||
| − | |||
| − | |||
| − | |||
| − | |||
| − | |||
| − | |||
| − | |||
| − | |||
| − | |||
| − | |||
| − | |||
| − | |||
| − | |||
| − | |||
| − | |||
| − | |||
| − | |||
| − | |||
| − | |||
| − | |||
| − | |||
| − | |||
| − | |||
| − | |||
| − | |||
| − | |||
| − | |||
Revision as of 13:28, 4 November 2022
Main Page > Accessories > NBL-2Introduction to the product
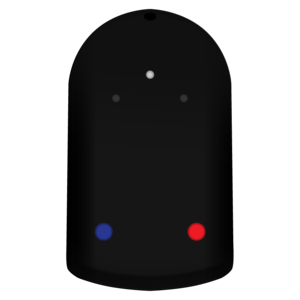
Description:
Netronix NBL-2 - wireless RFID reader with Bluetooth.
NBL-2 is great in these use cases:
- Authorized driving - keep track of who is driving your vehicle according to the NBL-2 ID they use to authenticate themselves.
- Private mode – gives ability to mask all the personal data while vehicle is used in Private mode.
Product Specification
| Operating frequency | 13,56MHz |
| Supported standards | MIFARE® Classic
MIFARE® DESFire |
| Interface | Bluetooth |
| Supply voltage | two AAA batteries |
| Sensor | Accelerometer
Low battery voltage |
| Operating temperature | -20ºC to +70ºC |
| Size (mm) | 58 x 99 x 19 |
| Type | RFID reader |
Configuration
1. Updating NBL-2
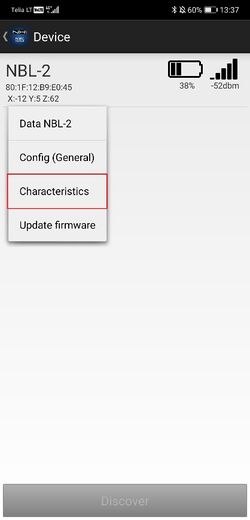
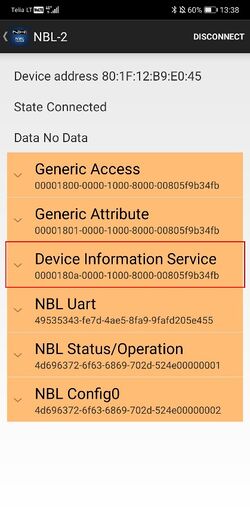
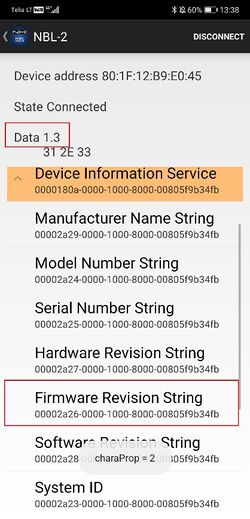
First, you have to make sure that NBL-2 firmware version is updated to 1.3. Go to NBL Tools application -> Device -> Characteristic -> Device Information Service -> Firmware Revision String.
Note: If the firmware version is 1.1 or 1.0, it is not possible to update it.
If it is 1.2, then update NBL-2 according to these steps:
1. Run NBL Tools application
2. Update the firmware database (tap: Menager Firmware -> Update the database -> Start). Select NBL-2 and check 1.3 firmware version.
3. Back to main menu.
4. Tap Device option.
5. Wake up the device - eg entering it into the bootloader mode.
6. Select the device from the list (long press), then select Update firmware from the drop-down menu and press Start button.
7. Correct firmware update will be signaled by device start-up led message.
2. Configuring NBL-2 for RFID card
Setting up NBL-2 device to connect with FMB device. Go to Teltonika configurator -> Bluetooth 4.0 and set it up like it shown in this screenshot (MAC adress will depend on your particular NBL sensor):
Then go to I/O settings:
Make sure to enable BLE Custom 1 parameter (ID: 51190) and set operand to „On Change“.
3. Setting up Private/Business mode:
Make sure to enable Private/Business mode in Trip/Odometer settings. It can be done using SMS commands or configurator. Not every device has these parameters visible in the configurator, therefore they should be configured via SMS commands. It can be done by sending setparam SMS (how to send SMS commands: https://wiki.teltonika-gps.com/view/FMB120_SMS/GPRS_Commands). Set it to High or Low priority (parameter ID: 11850). Enable triggers as NBL-1 Button1 or NBL-1 Button2 (parameter ID: 11811).
Don‘t forget to save all these changes to device and you are ready to test NBL-2 sensor.
4. Testing NBL-2
Power up FMB device and start logging it in Terminal application. When RFID card is not enabled, BLE Custom 1 parameter (AVL ID: 331) will show a specific value. Example:
IO ID[331] Length[ 0]: NaN
When RFID card is activated (card touched to NBL-2 and followed by two beeps) BLE Custom 1 parameter should look like this:
IO ID[331] Length[ 8]: 00h 19h 3Eh F2h 57h 66h 80h 00h
When Private/Business mode is enabled (Button1 or Button2 is pressed):
IO ID[331] Length[ 8]: 00h 00h 00h 00h 00h 00h 00h 00h


