Difference between revisions of "Anti-Theft Solution and Stolen Vehicle Recovery"
m (Correction of supported devices. FMC and FMM now support jamming according to datasheet.) |
|||
| (27 intermediate revisions by 8 users not shown) | |||
| Line 1: | Line 1: | ||
| − | + | ==Project description == | |
| − | |||
| − | |||
| − | == | ||
| − | |||
| − | |||
| − | |||
| − | |||
| − | |||
| − | |||
Vehicle theft is one of the world’s fastest-growing crimes as thieves turn to use highly advanced equipment, e.g. jammers. By jamming GSM signals, the criminals aim to interfere and inhibit the performance of a tracking device – its ability to monitor and gather important information. Luckily, Teltonika trackers have a functionality that can detect jamming and help to prevent theft or to recover a stolen vehicle. | Vehicle theft is one of the world’s fastest-growing crimes as thieves turn to use highly advanced equipment, e.g. jammers. By jamming GSM signals, the criminals aim to interfere and inhibit the performance of a tracking device – its ability to monitor and gather important information. Luckily, Teltonika trackers have a functionality that can detect jamming and help to prevent theft or to recover a stolen vehicle. | ||
| − | We | + | We glad that you decide to test our “Anti-Theft and stole vehicle recovery” solution. |
| − | + | Here you will find how to prepare and to test this solution. | |
| − | Here you will find how to prepare and test this solution. | ||
==What you need for a solution?== | ==What you need for a solution?== | ||
| + | # Anti-Theft solution is supported by any of Teltonika device, which has DOUT | ||
| + | # The SIM card in order to get data to your server | ||
| + | # Relay, which will be controlled by DOUT and depending on which option you will choose, will turn on the alarm, disable engine start or lock doors. The relay can be ordered from Teltonika. Please contact your sales representative. If you will order it by yourself please make sure for which voltage range relay support. | ||
| + | # FMB configurator, to configure the device in order to work with this solution. | ||
| + | # FOTA WEB to remotely send the configuration to the device. | ||
| − | |||
| − | + | ==Installation== | |
| − | |||
| − | |||
| − | + | It’s important to well hide tracker, so it would not be a simple task for the thieves to find and unplug it. But also, please do not forget to follow mounting recommendations as well. | |
| − | |||
| − | |||
Although devices have high gain antennas it’s important to mount devices with stickers on top and in metal-free space. The device should be firmly fixed to the surface or cables. Please make sure, that device is not fixed to heat emitting or moving parts. | Although devices have high gain antennas it’s important to mount devices with stickers on top and in metal-free space. The device should be firmly fixed to the surface or cables. Please make sure, that device is not fixed to heat emitting or moving parts. | ||
| + | [[image:FMB920_1_demo.png|500px]] | ||
| − | To have a working solution it’s important to properly make | + | To have a working solution it’s important to properly make wairing. |
| − | As the main solution accessory is a relay, please make sure that | + | As the main solution accessory is a relay, please make sure that right contacts are connected |
| − | + | [[image:Theft_solution_relay.png|150px]] | |
| − | + | Contact 86 and 87a should be connected to vehicle power, 85 to Teltonika device DOUT which corresponds to the ground and when jamming is detected is activated by device and contact should be connected to start, alarm or door lock | |
| − | |||
| − | |||
| − | |||
| − | + | [[image:Theft_solution_buzz.png]] | |
| − | |||
| − | + | During installation please follow recommendations in order to avoid damage device and vehicle: | |
| − | + | • Wires should be connected while the module is not plugged in. <br> | |
| − | <br | + | • Be sure that after the car computer falls asleep, power is still available on the chosen wire. Depending on the car, this may happen in a 5 to 30 minutes period. <br> |
| + | • When the module is connected, be sure to measure the voltage again if it did not decrease. <br> | ||
| + | • Ground wire is connected to the vehicle frame or metal parts that are fixed to the frame. <br> | ||
| − | === | + | ==Configuration== |
| − | + | <br> | |
| − | + | * Please do not worry that the device is already mounted to the vehicle, you can make offline configuration and with FOTA WEB solution remotely send it to the device. <br> | |
| − | + | Please make sure, that sleep mode is disabled as jamming scenarios do not work while the device is in sleep mode. | |
| − | + | '''To read more about sleep mode [[FMB204_Sleep_modes|press here]]''' | |
| − | <br | ||
| − | |||
| − | * | ||
| − | |||
| − | |||
| − | |||
| − | |||
| − | |||
| − | |||
| − | |||
| − | |||
| − | |||
| − | |||
| − | |||
| − | |||
| − | |||
| − | <br | ||
| − | |||
| − | |||
| − | |||
| − | |||
| − | |||
| − | |||
| − | |||
| − | |||
| − | [[ | ||
| − | |||
| − | |||
| − | |||
| − | |||
| − | |||
| − | |||
| − | |||
| − | |||
| − | |||
| − | |||
| − | |||
| − | |||
| − | |||
| − | + | [[image:Sleep_mode.gif|250px]] | |
| − | ''' | + | * Please select the proper ignition source. We recommend the use of Digitial input 1. But in case if during installation you do not connect DIN you can use power voltage as well, just select low and hight values depending on your vehicle. |
| − | + | '''More information about ignition source [[FMB920_System_settings#Ignition_Source|press here]]''' | |
| − | + | [[image:Ignition_settings.gif|250px]] | |
| − | + | * In the GPRS tab, you need to configure your SIM card APN settings, server and make sure, that FOTA WEB is enabled. | |
| + | '''More information about GPRS settings [[FMB920_GPRS_settings|press here|200px]]''' | ||
| − | + | Please make sure that GPRS context is enabled and enter your SIM card provider APN settings: | |
| − | + | [[image:Theft_solution_gprs.png|250px]] | |
| − | |||
| − | |||
| − | |||
| − | |||
| − | |||
| − | |||
| − | |||
| − | | | ||
| + | * Configure the server to which device should send data: | ||
| − | + | [[image:Theft_solution_server_settings.png|250px]] | |
| − | |||
| − | |||
| − | |||
| − | |||
| − | |||
| − | |||
| − | |||
| − | |||
| − | |||
| − | |||
| − | |||
| − | |||
| − | |||
| − | |||
| − | |||
| − | |||
| − | |||
| − | |||
| − | |||
| − | |||
| − | |||
| − | |||
| − | |||
| − | |||
| − | |||
| − | |||
| − | |||
| − | |||
| − | |||
| − | |||
| − | |||
| − | |||
| − | |||
| − | |||
| − | |||
| − | |||
| − | |||
| − | |||
| − | |||
| − | |||
| − | |||
| − | |||
| − | |||
| − | |||
| − | |||
| − | |||
| − | |||
| − | |||
| − | |||
| − | |||
| − | |||
| − | |||
| − | |||
| − | |||
| − | |||
| − | |||
| − | |||
| − | |||
| − | |||
| − | |||
| − | |||
| − | |||
| − | |||
| − | |||
| − | |||
| − | |||
| − | |||
| − | |||
| − | |||
| − | |||
| − | |||
| − | |||
| − | |||
| − | |||
| − | |||
| − | |||
| − | |||
| − | |||
| − | |||
| − | |||
| − | |||
| − | |||
| − | |||
| − | |||
| − | |||
| − | |||
| − | |||
| − | |||
| − | |||
| − | |||
| − | |||
| − | |||
| − | |||
| − | |||
| − | |||
| − | |||
| − | |||
| − | |||
| − | |||
| − | |||
| − | |||
| − | |||
| − | |||
| − | |||
| − | |||
| − | |||
| − | |||
| − | |||
| − | |||
| − | |||
| − | |||
| − | |||
| − | |||
| − | |||
| − | |||
| − | |||
| − | |||
| − | |||
| − | |||
| − | |||
| − | |||
| − | |||
| − | |||
| − | |||
| − | |||
| − | |||
| − | |||
| − | |||
| − | |||
| − | |||
| − | |||
| − | |||
| − | |||
| − | |||
| − | |||
| − | |||
| − | |||
| − | |||
| − | |||
| − | |||
| − | |||
| − | |||
| − | |||
| − | |||
| − | | | ||
| − | + | * Make sure that FOTA WEB is enabled | |
| − | + | [[image:Theft_solution_fota.png|250px]] | |
| − | [[ | + | * In Feature tab you need configure Jamming scenario which will detect GSM signal jamming ant control DOUT in order to turn on the alarm, lock door, or disable engine start. |
| + | '''More information about Jamming [[FMB920_Features_settings#Jamming|press here]]''' | ||
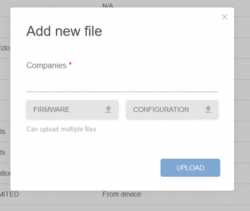
| + | * When the configuration is ready you need to upload it to the device. Please login to fm.teltonika.lt. If you do not have logins please contact your sales representative. | ||
| + | 1. In FOTA WEB upload your created configuration file: | ||
| − | + | [[image:Theft_solution_fota1.png|250px]] | |
| − | [[ | ||
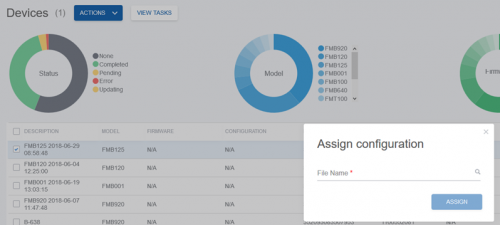
| + | 2. Select the device and assign configuration: | ||
| − | [[ | + | [[image:Theft_solution_fota2.png|500px]] |
Revision as of 12:59, 28 May 2020
Main Page > General Information > Usage scenarios > Anti-Theft Solution and Stolen Vehicle RecoveryProject description
Vehicle theft is one of the world’s fastest-growing crimes as thieves turn to use highly advanced equipment, e.g. jammers. By jamming GSM signals, the criminals aim to interfere and inhibit the performance of a tracking device – its ability to monitor and gather important information. Luckily, Teltonika trackers have a functionality that can detect jamming and help to prevent theft or to recover a stolen vehicle.
We glad that you decide to test our “Anti-Theft and stole vehicle recovery” solution. Here you will find how to prepare and to test this solution.
What you need for a solution?
- Anti-Theft solution is supported by any of Teltonika device, which has DOUT
- The SIM card in order to get data to your server
- Relay, which will be controlled by DOUT and depending on which option you will choose, will turn on the alarm, disable engine start or lock doors. The relay can be ordered from Teltonika. Please contact your sales representative. If you will order it by yourself please make sure for which voltage range relay support.
- FMB configurator, to configure the device in order to work with this solution.
- FOTA WEB to remotely send the configuration to the device.
Installation
It’s important to well hide tracker, so it would not be a simple task for the thieves to find and unplug it. But also, please do not forget to follow mounting recommendations as well.
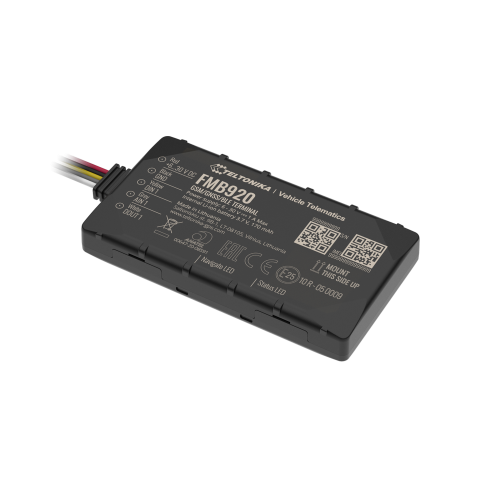
Although devices have high gain antennas it’s important to mount devices with stickers on top and in metal-free space. The device should be firmly fixed to the surface or cables. Please make sure, that device is not fixed to heat emitting or moving parts.
To have a working solution it’s important to properly make wairing.
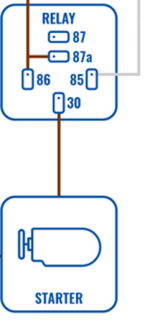
As the main solution accessory is a relay, please make sure that right contacts are connected
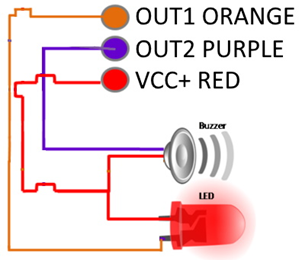
Contact 86 and 87a should be connected to vehicle power, 85 to Teltonika device DOUT which corresponds to the ground and when jamming is detected is activated by device and contact should be connected to start, alarm or door lock
During installation please follow recommendations in order to avoid damage device and vehicle:
• Wires should be connected while the module is not plugged in.
• Be sure that after the car computer falls asleep, power is still available on the chosen wire. Depending on the car, this may happen in a 5 to 30 minutes period.
• When the module is connected, be sure to measure the voltage again if it did not decrease.
• Ground wire is connected to the vehicle frame or metal parts that are fixed to the frame.
Configuration
- Please do not worry that the device is already mounted to the vehicle, you can make offline configuration and with FOTA WEB solution remotely send it to the device.
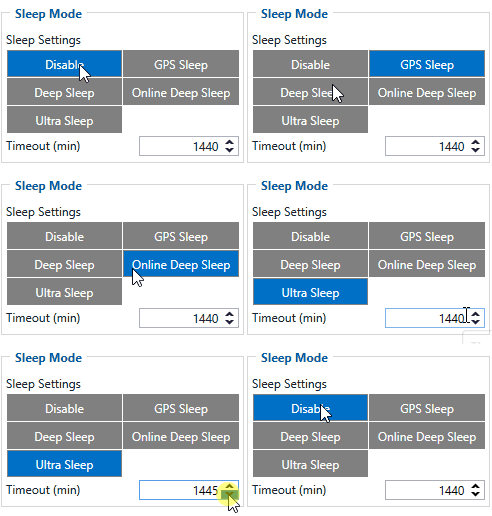
Please make sure, that sleep mode is disabled as jamming scenarios do not work while the device is in sleep mode. To read more about sleep mode press here
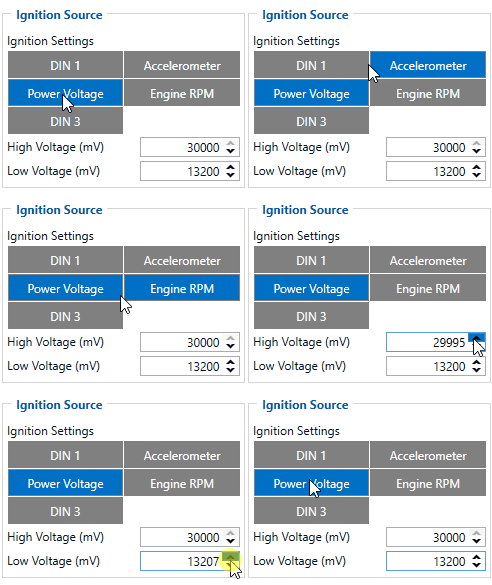
- Please select the proper ignition source. We recommend the use of Digitial input 1. But in case if during installation you do not connect DIN you can use power voltage as well, just select low and hight values depending on your vehicle.
More information about ignition source press here
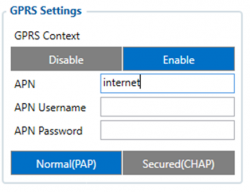
- In the GPRS tab, you need to configure your SIM card APN settings, server and make sure, that FOTA WEB is enabled.
More information about GPRS settings press here|200px
Please make sure that GPRS context is enabled and enter your SIM card provider APN settings:
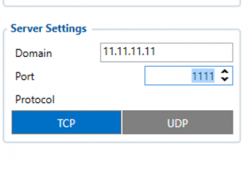
- Configure the server to which device should send data:
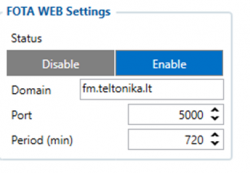
- Make sure that FOTA WEB is enabled
- In Feature tab you need configure Jamming scenario which will detect GSM signal jamming ant control DOUT in order to turn on the alarm, lock door, or disable engine start.
More information about Jamming press here
- When the configuration is ready you need to upload it to the device. Please login to fm.teltonika.lt. If you do not have logins please contact your sales representative.
1. In FOTA WEB upload your created configuration file:
2. Select the device and assign configuration:
