Difference between revisions of "NBL-2"
m (Text replacement - "Bluetooth(?!®)" to "Bluetooth®") |
m |
||
| (14 intermediate revisions by one other user not shown) | |||
| Line 4: | Line 4: | ||
'''Description:''' | '''Description:''' | ||
| − | Netronix NBL-2 - wireless | + | Netronix NBL-2 - wireless Bluetooth RFID reader with additional buttons. |
'''NBL-2 is great in these use cases:''' | '''NBL-2 is great in these use cases:''' | ||
| Line 11: | Line 11: | ||
| − | ''' | + | '''Functionality:''' |
| − | * | + | * Unpaired reader (state after default reset) is waiting for button only |
| − | * | + | * Reader scans for RFID card or button press all time after it is paired |
| − | * | + | * In the case previously mentioned events occur, the reader sends an advertising packet for Ta time in period Tb. Defaults: Ta=50sec, Tb=100ms |
| − | * | + | * While NBL-2 is advertising the green led is flashing slowly. The reader stops blinking and advertising after disconnection. |
| − | * | + | * Depending on the configuration, read card ID can be present on the advertising packet or/and on characteristic |
| − | * | + | * Reader closes the connection and goes into low power 50 seconds after the last data exchange. |
| − | * | + | * Reader can be on/off by long button press |
| − | * | + | * Reader performs sensor measurement in a period that is configurable |
| + | * Button reacts immediately | ||
| + | * Sensors configuration is set by GATT services. | ||
| + | * Detecting the start and stop of the vehicle. This mode is active immediately after turning on the device.<br /> | ||
==Product Specification== | ==Product Specification== | ||
{| class="wikitable" | {| class="wikitable" | ||
| + | |Operating frequency | ||
| + | |13,56MHz | ||
| + | |- | ||
| + | |Supported standards | ||
| + | |MIFARE® Classic | ||
| + | MIFARE® DESFire | ||
| + | |- | ||
| + | |Interface | ||
| + | |Bluetooth | ||
|- | |- | ||
|Supply voltage | |Supply voltage | ||
| Line 36: | Line 48: | ||
|Size (mm) | |Size (mm) | ||
|58 x 99 x 19 | |58 x 99 x 19 | ||
| − | |||
| − | |||
| − | |||
|- | |- | ||
|Type | |Type | ||
| Line 44: | Line 53: | ||
|} | |} | ||
| − | ==NBL-2 | + | ==NBL-2 configuration== |
| − | |||
| − | |||
| − | |||
| − | |||
| − | |||
| − | |||
'''1. Updating NBL-2''' | '''1. Updating NBL-2''' | ||
| − | Go to NBL Tools application -> Device -> Characteristic -> Device Information Service -> Firmware Revision String. | + | First, you have to make sure that NBL-2 firmware version is updated to 1.3. Go to NBL Tools application -> Device -> Characteristic -> Device Information Service -> Firmware Revision String. |
[[File:NBL_conf1.jpg.jpg|alt=|frameless|520x520px]] [[File:NBL_conf2.jpg.jpg|alt=|border|frameless|520x520px]] [[File:NBL_conf3.jpg.jpg|alt=|frameless|519x519px]] | [[File:NBL_conf1.jpg.jpg|alt=|frameless|520x520px]] [[File:NBL_conf2.jpg.jpg|alt=|border|frameless|520x520px]] [[File:NBL_conf3.jpg.jpg|alt=|frameless|519x519px]] | ||
| Line 77: | Line 80: | ||
[[File:NBL conf7.jpg.jpg|frameless|520x520px]] | [[File:NBL conf7.jpg.jpg|frameless|520x520px]] | ||
| − | 5. Wake up the device - | + | 5. Wake up the device - eg entering it into the bootloader mode. |
| − | 6. Select the device from the list, then select Update firmware from the drop-down menu and press the Start button. | + | 6. Select the device from the list (long press), then select Update firmware from the drop-down menu and press the Start button. |
[[File:NBL conf9.jpg.jpg|frameless|520x520px]] [[File:NBL conf8.jpg.jpg|frameless|519x519px]] | [[File:NBL conf9.jpg.jpg|frameless|520x520px]] [[File:NBL conf8.jpg.jpg|frameless|519x519px]] | ||
7. Correct firmware update will be signaled by device start-up led message. | 7. Correct firmware update will be signaled by device start-up led message. | ||
| − | |||
| − | |||
| − | |||
| − | |||
| − | |||
| − | |||
| − | |||
| − | |||
| − | |||
| − | |||
| − | |||
| − | |||
| − | |||
| − | |||
| − | |||
| − | |||
| − | |||
| − | |||
| − | |||
| − | |||
| − | |||
| − | |||
| − | |||
| − | |||
| − | |||
| − | |||
==Device configuration== | ==Device configuration== | ||
| − | + | Setting up NBL-2 device to connect with FMB device. Go to Teltonika configurator -> Bluetooth 4.0 and set it up like it shown in this screenshot (MAC address will depend on your particular NBL sensor): | |
| − | |||
| − | Setting up NBL-2 device to connect with FMB device. | ||
| − | |||
| − | Go to Teltonika configurator -> | ||
[[File:Nbl2 1.png|frameless|660x660px]] | [[File:Nbl2 1.png|frameless|660x660px]] | ||
| Line 125: | Line 98: | ||
Then go to I/O settings: | Then go to I/O settings: | ||
| − | Make sure to enable the BLE RFID #1 parameter (ID: 51740) | + | Make sure to enable the BLE RFID #1 parameter (ID: 51740) and set the operand to „On Change“. |
[[File:Nbl2 3.png|frameless|999x999px]] | [[File:Nbl2 3.png|frameless|999x999px]] | ||
| Line 144: | Line 117: | ||
==Testing NBL-2== | ==Testing NBL-2== | ||
| − | + | Power up the FMB device and start logging it into the Terminal application. When the RFID card is not enabled, the BLE RFID #1 parameter (AVL ID: 451) will show a specific value. Example: | |
| − | |||
| − | |||
| − | |||
| − | |||
| − | |||
| − | |||
| − | |||
| − | |||
| − | |||
| − | |||
| − | |||
| − | |||
| − | |||
| − | |||
| − | |||
| − | |||
| − | Power up the FMB device | ||
| − | |||
| − | When the RFID card is not enabled, the BLE RFID #1 parameter (AVL ID: 451) will show a specific value. | ||
| − | |||
| − | Example: | ||
''IO ID[451]: 0x0000000000000000'' | ''IO ID[451]: 0x0000000000000000'' | ||
| Line 183: | Line 135: | ||
==NBL-2 packet== | ==NBL-2 packet== | ||
NBL-T data is being read via broadcast packets only. The packet structure is described below: | NBL-T data is being read via broadcast packets only. The packet structure is described below: | ||
| − | |||
| − | |||
| − | |||
| − | |||
| − | |||
| − | |||
| − | |||
| − | |||
| − | |||
| − | + | [[File:NBL conf 13.png|frameless]] | |
| − | + | ||
| − | + | ||
| − | | | + | 0x02010606094E424C2D540CFF4E58 A7CB250501B01A0047 |
| − | + | ||
| − | + | '''Table No. 1.''' Parsed broadcast packet | |
| − | |||
| − | |||
| − | |||
{| class="wikitable" | {| class="wikitable" | ||
| − | + | |'''Type''' | |
| − | + | |'''HEX Value''' | |
| − | + | |'''ASCII Value''' | |
| − | + | |'''Description''' | |
| − | |||
| − | |||
| − | |||
| − | |||
| − | |||
| − | |||
|- | |- | ||
| − | | | + | |09 |
| − | | | + | |4E424C2D540C |
| − | | | + | |NBL-T |
| − | | | + | |Complete Local name |
| − | |||
| − | |||
| − | |||
| − | |||
| − | |||
| − | |||
| − | |||
| − | |||
| − | |||
| − | |||
|- | |- | ||
| − | | | + | |FF |
| − | | | + | |4E58 A7CB250501B01A 00 47 |
| − | | | + | |1. UUID – 2 bytes |
| − | |||
| − | |||
| − | |||
| − | |||
| − | |||
| − | |||
| − | |||
| − | |||
| − | |||
| − | |||
| − | |||
| − | |||
| − | |||
| − | |||
| − | |||
| − | |||
| − | |||
| − | |||
| − | |||
| − | |||
| − | |||
| − | |||
| − | |||
| − | + | 2. RFID Id – 7 bytes | |
| − | + | 3. Button status – 1 byte | |
| − | + | 4. Battery level – 1 byte (%) | |
| + | |Manufacturer data | ||
| + | |} | ||
| − | |||
| − | |||
| − | |||
| − | |||
| − | |||
| − | |||
| − | |||
| − | |||
| − | |||
| − | |||
| − | |||
| − | |||
| − | |||
| − | |||
| − | |||
| − | |||
| − | |||
| − | |||
| − | |||
| − | |||
| − | |||
| − | |||
| − | |||
[[Category:Accessories]] | [[Category:Accessories]] | ||
Revision as of 15:56, 12 December 2022
Main Page > Accessories > NBL-2Introduction to the product
Description:
Netronix NBL-2 - wireless Bluetooth RFID reader with additional buttons.
NBL-2 is great in these use cases:
- Authorized driving - track who is driving your vehicle. You will receive a card ID every time a driver applies a card to NBL-2 reader.
- Private mode – this solution will allow your company car to be used by employees for personal purposes without violating the EU General Data Protection Regulations by masking all the personal data while vehicle is used in Private mode. Moreover, self-employed people can easily convert their own car into a business asset and ensure that the data provided (Example - distance traveled) is correct and shown only working hours' driven distance. Private/business mode can be easily switched by any of the NBL-2 buttons.
Functionality:
- Unpaired reader (state after default reset) is waiting for button only
- Reader scans for RFID card or button press all time after it is paired
- In the case previously mentioned events occur, the reader sends an advertising packet for Ta time in period Tb. Defaults: Ta=50sec, Tb=100ms
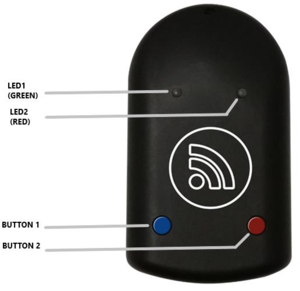
- While NBL-2 is advertising the green led is flashing slowly. The reader stops blinking and advertising after disconnection.
- Depending on the configuration, read card ID can be present on the advertising packet or/and on characteristic
- Reader closes the connection and goes into low power 50 seconds after the last data exchange.
- Reader can be on/off by long button press
- Reader performs sensor measurement in a period that is configurable
- Button reacts immediately
- Sensors configuration is set by GATT services.
- Detecting the start and stop of the vehicle. This mode is active immediately after turning on the device.
Product Specification
| Operating frequency | 13,56MHz |
| Supported standards | MIFARE® Classic
MIFARE® DESFire |
| Interface | Bluetooth |
| Supply voltage | two AAA batteries |
| Sensor | Accelerometer
Low battery voltage |
| Operating temperature | -20ºC to +70ºC |
| Size (mm) | 58 x 99 x 19 |
| Type | RFID reader |
NBL-2 configuration
1. Updating NBL-2
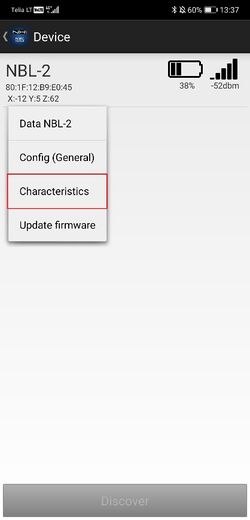
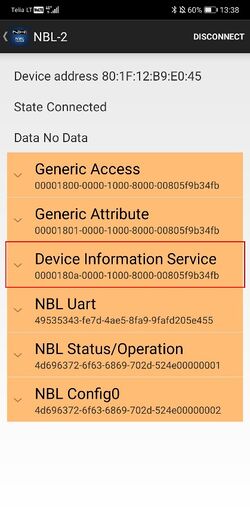
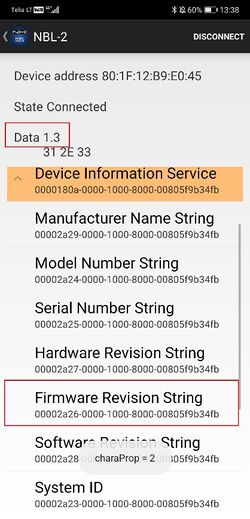
First, you have to make sure that NBL-2 firmware version is updated to 1.3. Go to NBL Tools application -> Device -> Characteristic -> Device Information Service -> Firmware Revision String.
Note: If the firmware version is 1.1 or 1.0, it is not possible to update it.
If it is 1.2, then update NBL-2 according to these steps:
1. Run the NBL Tools application
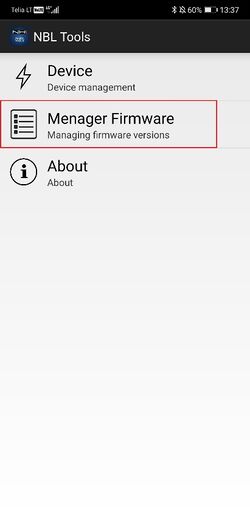
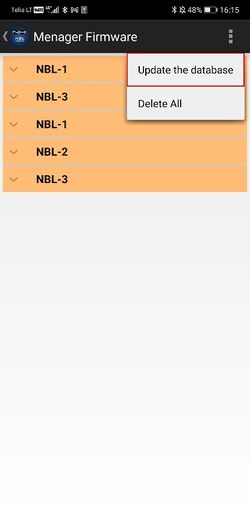
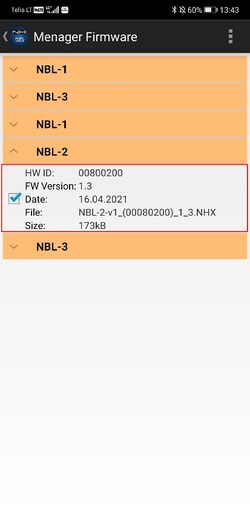
2. Update the firmware database (tap: Manager Firmware -> Update the database -> Start). Select NBL-2 and check 1.3 firmware version.
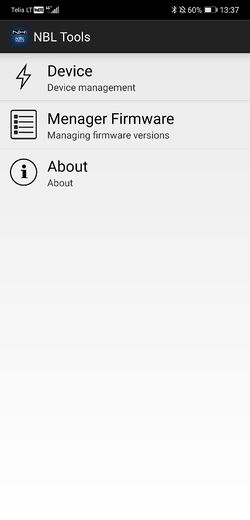
3. Back to the main menu.
4. Tap the Device option.
5. Wake up the device - eg entering it into the bootloader mode.
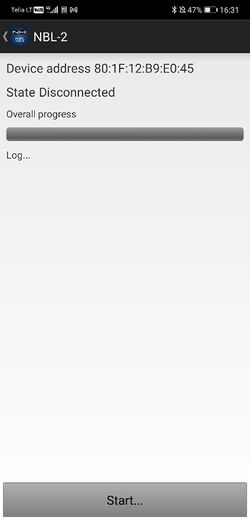
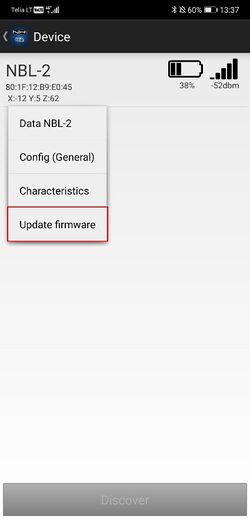
6. Select the device from the list (long press), then select Update firmware from the drop-down menu and press the Start button.
7. Correct firmware update will be signaled by device start-up led message.
Device configuration
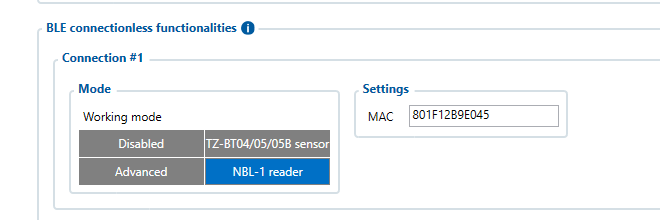
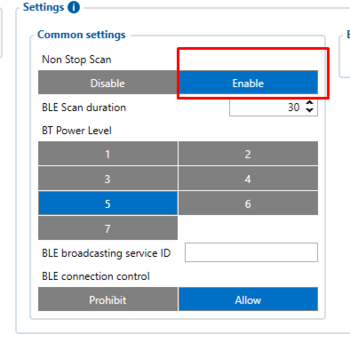
Setting up NBL-2 device to connect with FMB device. Go to Teltonika configurator -> Bluetooth 4.0 and set it up like it shown in this screenshot (MAC address will depend on your particular NBL sensor):
Mandatory setting condition: Non Stop Scan
Then go to I/O settings:
Make sure to enable the BLE RFID #1 parameter (ID: 51740) and set the operand to „On Change“.
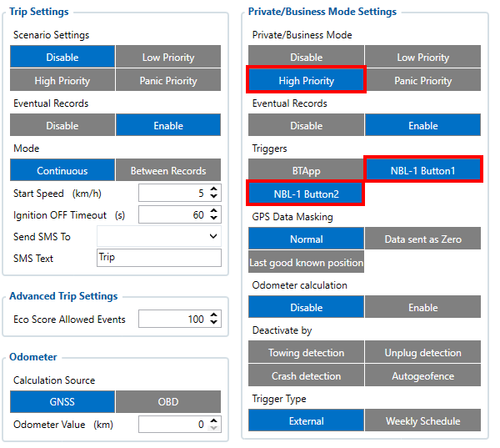
Setting up Private/Business mode
Make sure to enable Private/Business mode in Trip/Odometer settings. It can be done using SMS commands or a configurator. Not every device has these parameters visible in the configurator, therefore they should be configured via SMS commands. It can be done by sending setparam SMS (how to send SMS commands: https://wiki.teltonika-gps.com/view/FMB120_SMS/GPRS_Commands). Set it to High or Low priority (parameter ID: 11850). Enable triggers as NBL-1 Button1 or NBL-1 Button2 (parameter ID: 11811).
Don't forget to set up data masking in Private mode if necessary.
Don‘t forget to save all these changes to the device and you are ready to test the NBL-2 sensor.
More information about Private/Business Driving Mode Functionality.
Testing NBL-2
Power up the FMB device and start logging it into the Terminal application. When the RFID card is not enabled, the BLE RFID #1 parameter (AVL ID: 451) will show a specific value. Example:
IO ID[451]: 0x0000000000000000
When the RFID card is activated (card touched to NBL-2 and followed by two beeps) BLE RFID #1 parameter should look like this:
IO ID[451]: 0x0004193EF2576680
When Private/Business mode is enabled (Button1 or Button2 is pressed):
IO ID[451]: 0x0000000000000000
and
IO ID[391]: 1
NBL-2 packet
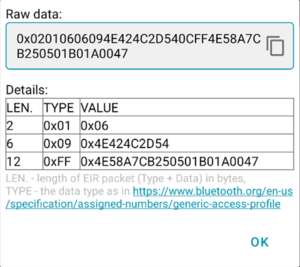
NBL-T data is being read via broadcast packets only. The packet structure is described below:
0x02010606094E424C2D540CFF4E58 A7CB250501B01A0047
Table No. 1. Parsed broadcast packet
| Type | HEX Value | ASCII Value | Description |
| 09 | 4E424C2D540C | NBL-T | Complete Local name |
| FF | 4E58 A7CB250501B01A 00 47 | 1. UUID – 2 bytes
2. RFID Id – 7 bytes 3. Button status – 1 byte 4. Battery level – 1 byte (%) |
Manufacturer data |
