Difference between revisions of "Getting Started"
m |
|||
| (15 intermediate revisions by the same user not shown) | |||
| Line 93: | Line 93: | ||
<br> | <br> | ||
| − | '''Note''': 1. All FMBXXX devices except for FMB64X should have at least [[FMB_firmware_errata#01.03.03.Rev.00|01.03.03.Rev.00]] firmware version installed.<br />2. FMB64X should have at least [[FMB640 firmware errata#00.02.05|00.02.05]] version installed.<br />Please check [https://wiki.teltonika-gps.com/view/Firmware_versions Firmware Link] to find latest base firmware for your device.<br> | + | '''Note''': 1. All FMBXXX devices except for FMB64X should have at least [[FMB_firmware_errata#01.03.03.Rev.00|01.03.03.Rev.00]] firmware version installed.<br />2. FMB64X should have at least [[FMB640 firmware errata#00.02.05|00.02.05]] version installed.<br />3. FM36YX devices should have at least [[FM36 firmware errata#01.12.00.Rev.02|01.12.00.Rev.02]] version installed. (FM36YX FotaWeb functionality for firmware update only)<br /> |
| + | Please check [https://wiki.teltonika-gps.com/view/Firmware_versions Firmware Link] to find latest base firmware for your device.<br> | ||
<br> | <br> | ||
| + | |||
| + | '''Default FOTA WEB configuration settings:''' | ||
| + | |||
| + | '''Domain:''' fota.teltonika.lt<br /> | ||
| + | '''Port:''' 5000 <br /> | ||
| + | '''Period:''' 720 minutes (every 720 minutes device shall connect to FOTA WEB) | ||
| + | [[File:FOTA in TCT.png|none|thumb|986x986px]] | ||
=='''Network requirements'''== | =='''Network requirements'''== | ||
| Line 100: | Line 108: | ||
If your SIM cards are within Mobile Operator’s VPN (private APN), the following must be ensured and paid special attention. | If your SIM cards are within Mobile Operator’s VPN (private APN), the following must be ensured and paid special attention. | ||
<br /> | <br /> | ||
| − | '''1.''' Must ensure that domain | + | '''1.''' Must ensure that domain '''[http://fota.teltonika.lt https://fota.teltonika.lt]''' can be resolved from within Operator’s network.<br /> |
| − | '''2.''' Following | + | '''2.''' Following IP and ports (egress) must be allowed by the operator. |
| + | <br /> | ||
| − | + | *IP: 35.156.7.140 | |
| − | |||
| − | * | ||
| − | |||
| − | |||
| − | |||
| − | |||
| − | |||
*Ports: | *Ports: | ||
| − | ** | + | **2000<br /> |
| − | ** | + | **3000<br /> |
| + | **4000<br /> | ||
| + | **5000<br /> | ||
| + | **6000<br /> | ||
| + | **7000<br /> | ||
| − | When using VPN SIM cards, you should still configure | + | When using VPN SIM cards, you should still configure '''[http://fota.teltonika.lt https://fota.teltonika.lt]''' domain in your configurator, not the plain IP address. |
=='''How to access FOTA WEB'''== | =='''How to access FOTA WEB'''== | ||
| − | FOTA WEB is reached using domain address '''[http://fota.teltonika.lt https://fota.teltonika.lt]'''. FOTA WEB uses | + | FOTA WEB is reached using domain address '''[http://fota.teltonika.lt https://fota.teltonika.lt]'''. FOTA WEB uses HTTP ports 80 and 85 for authentication so if your network has HTTP proxy service or is blocking outgoing traffic – make sure that those two ports are added to exceptions in network proxy service and firewall. |
<br> | <br> | ||
| Line 149: | Line 155: | ||
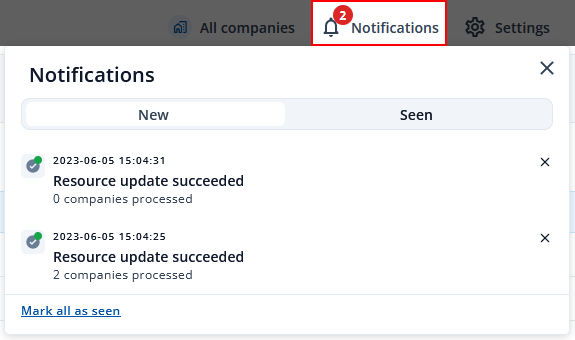
'''Notifications''' is located at the top-right corner of the page. Notifications will inform you when certain actions are completed such as devices firmware got updated, configuration got uploaded to or downloaded from the device and also notifies when devices are transferred from one company to another or moved from main company to child company. | '''Notifications''' is located at the top-right corner of the page. Notifications will inform you when certain actions are completed such as devices firmware got updated, configuration got uploaded to or downloaded from the device and also notifies when devices are transferred from one company to another or moved from main company to child company. | ||
[[File:FOTA Web Notifications.png]] | [[File:FOTA Web Notifications.png]] | ||
| − | |||
| − | |||
| − | |||
| − | |||
| − | |||
| − | |||
| − | |||
| − | |||
| − | |||
| − | |||
Revision as of 12:21, 20 February 2024
Here you will discover basic information on what FM devices support FOTA Web solution and where you can get started by following step by step guide from the invitation to your first login. Additionally you will find web sites basic settings such as changing language, API and more.
Device requirements
| Supported Devices |
|---|
|
|
|
|
|
|
Note: 1. All FMBXXX devices except for FMB64X should have at least 01.03.03.Rev.00 firmware version installed.
2. FMB64X should have at least 00.02.05 version installed.
3. FM36YX devices should have at least 01.12.00.Rev.02 version installed. (FM36YX FotaWeb functionality for firmware update only)
Please check Firmware Link to find latest base firmware for your device.
Default FOTA WEB configuration settings:
Domain: fota.teltonika.lt
Port: 5000
Period: 720 minutes (every 720 minutes device shall connect to FOTA WEB)
Network requirements
If your SIM cards are within Mobile Operator’s VPN (private APN), the following must be ensured and paid special attention.
1. Must ensure that domain https://fota.teltonika.lt can be resolved from within Operator’s network.
2. Following IP and ports (egress) must be allowed by the operator.
- IP: 35.156.7.140
- Ports:
- 2000
- 3000
- 4000
- 5000
- 6000
- 7000
- 2000
When using VPN SIM cards, you should still configure https://fota.teltonika.lt domain in your configurator, not the plain IP address.
How to access FOTA WEB
FOTA WEB is reached using domain address https://fota.teltonika.lt. FOTA WEB uses HTTP ports 80 and 85 for authentication so if your network has HTTP proxy service or is blocking outgoing traffic – make sure that those two ports are added to exceptions in network proxy service and firewall.
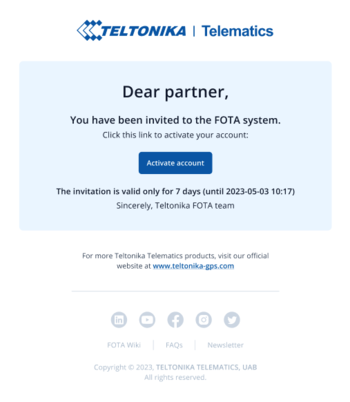
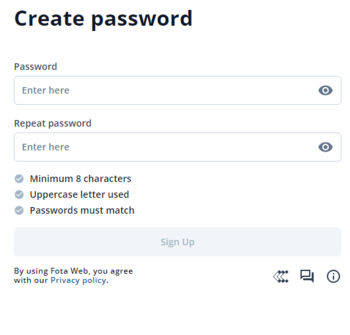
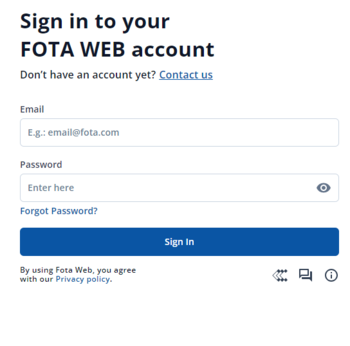
| 1. Invitation for FOTA WEB is being delivered to user e-mail. Press the URL to create a password for your account. | 2. After pressing the URL Link you will be asked to create a password for your account. | 3. Last step is logging into FOTA WEB with the newly created account by entering your email address and password for your account. Email address is the same as the address you've received the invitation. |
Select company
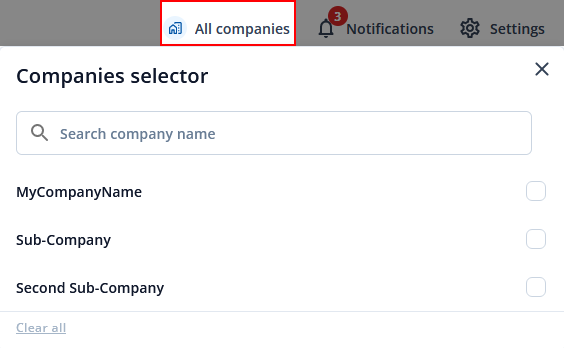
At the top-right corner, you can find the Company selector button. Pressing on a button will open a list of parent and child companies. Selecting a company allows for filtering resources available such as devices, task groups, groups, users, and files. It is an easy way to separate resources and make sure that you are working with the correct ones. Company selector button behavior:
- When a single company is selected, you will see the company button label change to the selected company's name.
- When two or more companies are selected, you will see a number of companies selected instead of an icon and "Companies" label.
- When nothing is selected, you will see everything available and "All companies" label.
Note: Every company has to be selected individually.
Notifications
Notifications is located at the top-right corner of the page. Notifications will inform you when certain actions are completed such as devices firmware got updated, configuration got uploaded to or downloaded from the device and also notifies when devices are transferred from one company to another or moved from main company to child company.
